Menu
Shopping Cart
Close

Pop Up Banner Designs That Convert: From Concept to Standout Display

Walk any trade show aisle and you’ll see it: some stands are swarmed while others sit empty. Often, the difference is a single, well‑designed pop up banner doing the heavy lifting. When your message has three seconds to land, design choices directly determine whether people stop or keep walking.

Strong pop up banner designs turn passing glances into conversations by combining clear hierarchy, bold visuals, and focused messaging. Unlike web ads, a pop up banner competes with physical noise, distance, and movement, so every centimetre must be intentional. When you align layout, copy, and colour with specific event goals, banners become reliable lead‑generation assets rather than decorative backdrops.

A high‑performing pop up banner also respects practical constraints like typical viewing distances of 2–6 metres, standard widths of 800–1000 mm, and variable venue lighting. Designing with these realities in mind helps you avoid unreadable text, muddy images, and awkward cropping. The result is a display that not only looks professional but also actively supports sales conversations.

Approaching pop up banner design as a repeatable process lets marketers and designers iterate quickly between events. By documenting winning layouts, proven headlines, and colour combinations that consistently attract visitors, you create a reusable design system. That system keeps every new banner on‑brand, measurable, and tightly aligned with campaign objectives, instead of reinventing from scratch each time.

1
pop up banner designs

Core Principles of Effective Pop Up Banner Designs

Core Principles of Effective Pop Up Banner Designs

Core principles like visual hierarchy, simplicity and legibility make the difference between a banner that blends into the background and one that draws people in. At typical viewing distances, large type, clear focal points and generous spacing ensure your key message is visible first, even in a crowded, visually noisy venue.

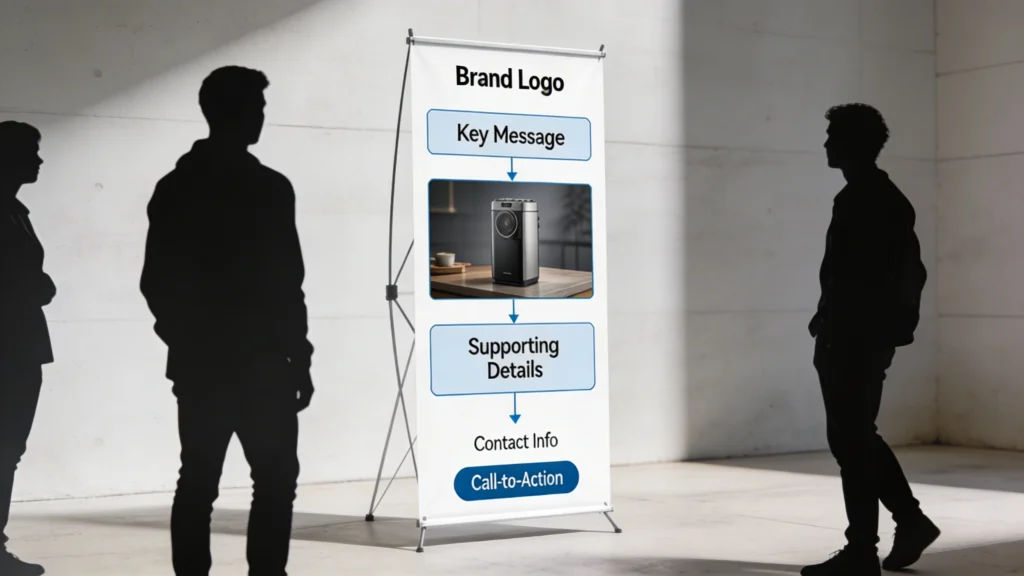
Effective pop up banner designs start with visual hierarchy, which determines what people notice during the first two seconds from 3–5 metres away. Large, high‑contrast headlines at least 150–200 pt guide attention, followed by supporting visuals and concise copy. When you deliberately control this order, you reduce cognitive load and help viewers instantly understand why your stand matters.

Hierarchy, Contrast and Whitespace

Hierarchy works best when combined with strong contrast and generous whitespace, especially on tall formats around 2,000 mm high. Dark text on light backgrounds, or vice versa, improves legibility under mixed exhibition lighting. Leaving 20–30% of the banner as empty space around key elements prevents visual clutter, making your main message feel premium and easier to scan from a distance.

Scale for Distance and Movement

Because visitors often walk past at 4–5 km/h, your design must be readable in motion. That means limiting headline length to around eight words and using icons or product photos large enough to recognise at 5 metres. Placing the core benefit statement in the upper third ensures people see it even when crowds partially block lower sections of the pop up banner.

2
banner design

Crafting Clear Messaging for Pop Up Banner Designs

Messaging on a pop up banner must survive harsh editing because viewers rarely read more than 10–12 words initially. Instead of describing everything your organisation does, focus on one primary outcome, such as “Cut warehouse picking time by 30%” or “Book more qualified demos today.” This outcome‑first approach gives passers‑by a concrete reason to pause and engage your team.

Crafting Clear Messaging for Pop Up Banner Designs

Thoughtful layout guides the viewer’s eye from top to bottom in a logical sequence. Placing your logo and primary message at the top, a compelling visual at eye level, then concise details and a clear call-to-action near the bottom ensures that even brief glances translate into understanding and potential engagement.

Designing Copy for Viewing Distance

Copy length and font size should correlate with typical viewing distances of 2–8 metres. Headlines visible at 5 metres usually require at least 120 pt when printed at 300 dpi on an 850 mm wide pop up banner. Supporting lines can drop to 60–80 pt if they’re only intended for people who have already approached your stand, ensuring you don’t overcrowd the layout.

Concise, benefit‑driven headlines outperform vague slogans because they shorten decision time; visitors instantly know whether your stand is relevant, which raises qualified engagement and filters out uninterested traffic.

Structuring Headlines, Support and CTA

Structure messaging in three tiers: a primary headline, one supporting line, and a single clear call‑to‑action. The headline states the benefit, the supporting line adds credibility with a metric or timeframe, and the CTA tells people exactly what to do, like “Scan to book a 15‑minute demo.” This sequence mirrors a micro‑sales pitch, compressing persuasion into a vertical display.

3
pop up banner

Choosing Colours, Fonts and Imagery for Pop Up Banner Designs

Choosing Colours, Fonts and Imagery for Pop Up Banner Designs

Colour, typography and imagery should work together to express your brand and improve readability under different lighting conditions. High contrast between text and background, limited font choices and a single strong image are more effective than decorative elements. Consistency across banners also reinforces recognition as visitors move through the event space.

Colour, typography and imagery give your pop up banner its instant recognisability from across a busy hall. Aligning these elements with your existing brand guidelines maintains trust, especially when prospects have already seen your website or social ads. Consistent use of brand colours and typefaces also speeds up production, because designers can reuse approved swatches and styles without repeated sign‑off rounds.

Colour Psychology and Brand Consistency

Colour choices influence perceived positioning and urgency. For example, deep blues and greys often signal reliability in B2B technology, while bright oranges or limes suggest innovation or disruption. Limiting yourself to one dominant colour, one accent, and a neutral background prevents visual noise. Maintaining at least a 4.5:1 contrast ratio between text and background ensures accessibility and readability under variable venue lighting.

  • Use one primary brand colour for 60% of the banner, an accent for 20%, and neutral tones for remaining 20%.
  • Select a sans‑serif font like Montserrat or Open Sans for headlines, avoiding decorative styles below 80 pt size.
  • Ensure all imagery is at least 150 dpi at final print size, preventing pixelation on 2,000 mm tall displays.
  • Choose photos showing your product in real environments, not generic stock, to anchor benefits in tangible scenarios.
  • Reserve bright accent colours for CTAs or key statistics, creating visual anchors that pull the eye immediately.

Imagery that Carries the Message

Images on pop up advertising banners should do more than decorate; they should visually prove your promise. For a logistics SaaS product, that might mean a warehouse dashboard on a laptop beside neatly organised shelves. Cropping images to fill at least one‑third of the banner height ensures recognisability from distance. Avoid complex collages, which quickly become indistinct shapes when seen across the aisle.

4
pop up banner design

Layout Best Practices for Pop Up Banner Design

Layout decisions determine how smoothly a viewer’s eye travels from top to bottom of the pop up banner. Because the format is vertical, you can treat it as three stacked zones: top, middle and bottom. Each zone should have a specific job, preventing you from sprinkling content randomly and forcing visitors to hunt for the main message or call‑to‑action.

Layout Best Practices for Pop Up Banner Design

Clear messaging starts with a single, benefit-led idea expressed in as few words as possible. A strong headline supported by a short subheading and minimal bullets helps visitors grasp what you offer within seconds. This focus prevents your banner from becoming a wall of copy that no one bothers to read.

Content Zoning and Logo Placement

Reserve the top 25–30% of the banner for your logo and primary headline, as this area remains visible even in crowds. The middle 40–50% should carry your key proof points, such as a product photo, statistic, or short benefit bullets. Place your main CTA and any contact details within the bottom 20–25%, where people naturally look once they’ve decided to interact.

Guiding the Viewer’s Eye

Use visual cues like angled shapes, arrows, or overlapping panels to subtly direct attention downward. Aligning elements along a single central axis, or using a gentle diagonal from top‑left to bottom‑right, mirrors natural reading patterns in Western markets. Keeping margins of at least 30–40 mm around all edges avoids important content disappearing into the stand’s cassette or being visually cropped when viewed off‑centre.

When every vertical zone has a single, clear job, staff can reference specific sections during conversations, turning your banner into a structured visual script that reinforces spoken messaging and keeps discussions focused.

5
pop up banners

Designing Pop Up Banners for Events with Specific Goals

Pop up banner design perform best when tailored to one primary event objective instead of trying to support every marketing goal simultaneously. A banner optimised for lead capture looks different from one focused on wayfinding or pure brand awareness. By defining success metrics beforehand, such as scanned badges or booked demos, you can reverse‑engineer layout and copy choices that directly support those outcomes.

Designing Pop Up Banners for Events with Specific Goals

Goal‑Specific Layout Choices

For lead capture, emphasise a compelling offer and an easy next step, like a QR code linking to a form. Product launch banners should showcase a large, isolated product image occupying at least 40% of the height. Wayfinding pop up banners benefit from oversized arrows and minimal text, allowing visitors to understand direction in under one second while walking.

Goal, Message and CTA Alignment

Aligning message and CTA with the event stage of your audience increases conversion. At an industry expo where attendees are researching options, CTAs like “See a 5‑minute live demo” work well. At a user conference, “Upgrade today for 20% off” may be more relevant. Matching urgency and offer intensity to audience readiness keeps your pop up banner persuasive rather than pushy.

6

Common Pop Up Banner Design Mistakes to Avoid

Common Pop Up Banner Design Mistakes to Avoid

Many underperforming pop up advertising banners share the same avoidable mistakes: overcrowded layouts, low‑contrast text, and poor imagery. These issues often arise when teams try to repurpose brochure content directly onto a 2,000 × 850 mm canvas without editing. Recognising these pitfalls early lets you build a pre‑flight checklist, so every new design passes a simple quality gate before going to print.

Typical Errors and Their Impact

Overcrowding with multiple paragraphs or dense bullet lists makes the banner unreadable from more than 2–3 metres. Low‑contrast combinations like light grey text on white disappear under spotlights. Using web‑resolution images at 72 dpi leads to visible pixelation on large‑format prints. Each of these problems reduces perceived professionalism and lowers the likelihood that serious buyers will approach your stand.

Quick‑Check Fixes Before Printing

A simple three‑step review can catch most issues: stand back 3–5 metres from a full‑size proof, squint to test contrast, and verify that the main message is understandable in under three seconds. If not, remove one secondary element, increase text size by at least 20 pt, or darken the background behind key copy. These incremental adjustments can dramatically improve real‑world performance without a full redesign.

  • Limit on‑banner text to roughly 30–40 words total, excluding logo taglines and legal disclaimers.
  • Ensure headline contrast passes WCAG AA, using tools like Stark or WebAIM before exporting artwork.
  • Export final artwork at 300 dpi with 3–5 mm bleed, matching your printer’s pop up banner specifications.
  • Check that QR codes are at least 25–30 mm wide so smartphones scan reliably from one metre away.
7

Collaborating with Designers and Printers on Pop Up Banner Designs

Collaboration between marketers, designers and printers often determines whether a strong concept survives to final print. Without clear briefs and technical alignment, you risk costly reprints or banners that don’t fit supplied stands. Treat your pop up banner as a mini‑project with defined responsibilities, deadlines, and sign‑off stages, rather than a last‑minute artwork request the week before an event.

Collaborating with Designers and Printers on Pop Up Banner Designs

Translating Strategy into a Design Brief

A useful brief includes the event name, audience profile, primary goal, key message, and one success metric, such as demo bookings. Attach brand guidelines, logo files in vector format, and examples of previous pop up banner designs that performed well. Specifying final dimensions, orientation, and whether the banner will be reused at multiple events helps designers plan flexible layouts and evergreen messaging.

Aligning with Printing Constraints

Printers often provide templates for common sizes like 800 × 2,000 mm or 1,000 × 2,150 mm, including bleed and safe areas. Importing these templates directly into design software avoids content being cut off by the cassette mechanism. Confirming material type, such as anti‑curl PET or PVC, and finishing options like matte versus gloss laminate affects colour appearance and glare under venue lighting.

Banner Size (mm) Typical Visible Area Recommended DPI Approx. UK Price (ex VAT)
800 × 2000 780 × 1960 300 dpi £45–£70 including basic aluminium stand
850 × 2150 830 × 2110 300 dpi £55–£85 with padded carry case
1000 × 2000 980 × 1960 200–300 dpi £70–£110 for premium cassette
1200 × 2000 1180 × 1960 200–300 dpi £95–£140 for wide‑format display
1500 × 2000 1480 × 1960 150–200 dpi £130–£190 for large back‑wall banner

Sharing this level of technical detail early lets designers work at the correct resolution and aspect ratio, preventing last‑minute stretching or cropping. It also allows marketers to budget accurately and decide whether to invest in wider pop up banner stands for greater impact or stick with standard widths. Clear collaboration turns printing from a risk point into a predictable, repeatable step.

Cart