
Event banners are so much more than just printed signs; they’re the lifeblood of your event. They’re the first thing people see, the silent guides that direct crowds, and the backdrop to countless photos. From a tough outdoor vinyl banner that can handle a bit of classic British weather to a sharp-looking roller banner for your indoor stand, getting it right is key.
Your Guide to Choosing the Perfect Event Banner
So, you need a banner for your event. Where do you even start? This guide is your new best friend. Whether you're setting up for a massive trade show, a local community festival, or a slick corporate conference, we’ll walk you through everything. Think of it as your personal roadmap to making the best choice, without any of the usual jargon.
The UK events scene is buzzing and incredibly competitive. According to industry data from IBISWorld, the Convention & Trade Fair Planning sector alone is made up of 70,590 businesses and pulls in a staggering £33.0 billion in revenue. In a market that crowded, you have to stand out. A high-quality, eye-catching banner isn't just a nice-to-have; it's a must.
What You Will Learn in This Guide
Our goal here is to give you the confidence to order banners that don’t just look brilliant on the day but also deliver real value. We'll get into all the practical details, making sure your next event is one to remember.
Here’s a quick look at what we'll be covering:
- Banner Types Uncovered: We’ll break down the best uses for every type, from rugged outdoor vinyl and mesh banners to portable roller banners and stunning pop-up backdrops.
- Material and Finish Mastery: You'll learn why the right material is your best defence against wind and rain, and how a simple choice between a matte or gloss finish can make all the difference.
- Smart Placement Strategy: Discover how to turn a simple sign into a powerful marketing tool by thinking strategically about where you place it to guide guests and grab attention.
- Design and Ordering Confidence: We’ll share some practical tips on getting your artwork ready and what to expect with turnaround times, ensuring a totally stress-free process from start to finish.
By the time you're done, you'll know exactly how to choose the perfect banner for your goals, your venue, and your budget.
From Vinyl Banners to Pop-Up Displays
Choosing the right banner for your event can feel a bit like picking a single spanner to fix an entire engine. To get the job done right, you need to know what each tool is for. Let's get past the jargon and look at what these banners actually do, so you can match the perfect display to your event.
The UK events scene is massive – we're talking a projected value of £68.7 billion by 2025, with 85 million people heading to events every year. From a windswept festival field in Wales to a packed exhibition hall in London, the right banner is what gets you noticed. It's no wonder that savvy event organisers put an average of 14% of their marketing budget straight into making an impact on the day.
The All-Weather Workhorse: Weatherproof Vinyl Banners
Think of a standard PVC vinyl banner as the trusty Land Rover of the banner world. It’s tough, it’s versatile, and it just shrugs off the notoriously unpredictable British weather. For outdoor events like street fairs, farmers' markets, or promotions on construction sites, these are the go-to choice for one simple reason: they last.
Made from a seriously durable and waterproof PVC material, they’ll take a downpour or a heatwave in their stride without the colours fading or the material tearing. This makes them a brilliant long-term investment. A well-made vinyl banner can be rolled out year after year for your annual village fete or seasonal sale, looking just as sharp as it did on day one.
Taming the Wind with Mesh Banners
Now, picture this: you're setting up a massive banner on a blustery seaside pier, or high up on scaffolding. A solid vinyl banner would turn into a giant sail, straining against its fixings and becoming a real hazard. This is precisely where mesh banners step in.
Mesh banners are cleverly designed with thousands of tiny perforations. These little holes let the wind pass straight through, dramatically reducing the stress on the banner and whatever it's attached to. They are the only sensible choice for exposed, windy spots. You’ll see them used for:
- Construction site fencing: A great way to brand your site without it turning into a kite.
- Scaffolding wraps: Turn an entire building renovation into a huge advertising space.
- Large-scale festival backdrops: Get that epic stage presence without worrying about a sudden gust bringing it down.
Indoor Impact: Roller and Pop-Up Banners
When you move indoors, the game changes. Forget the weather; now it’s all about logistics, portability, and making a big visual splash in a crowded room. For exhibitions, conferences, and indoor markets, roller banners and pop-up displays are king.
Roller Banners are the ultimate in 'grab-and-go' marketing. Tucked away inside a neat, self-contained base, you can have one set up in less than a minute. They're perfect for travelling sales teams or any exhibitor who needs to make a professional impact without lugging around a complicated kit.
Pop-Up Displays, on the other hand, are about creating a whole environment. While they take a little more effort than a roller banner, these large-format backdrops give you a seamless, professional wall of graphics. They can completely transform a bland exhibition shell scheme into your own branded space, giving you a much bigger canvas for your message. Check out our complete guide to pop-up banner systems to see how they can elevate your stand.
Here's a simple way to choose: a roller banner is your punchy headline, delivering one key message fast. A pop-up display is the full-page feature article, creating a backdrop that tells your whole brand story.
Creating Shareable Moments with Backdrops
Finally, let's talk about the banners that keep working for you long after everyone's gone home. Event Backdrops and Step-and-Repeat Banners are designed for one thing: to be in the background of photos. By featuring your logo, often in a repeating pattern, you guarantee your brand is front and centre in every picture snapped at your event.
In the age of Instagram and LinkedIn, this is marketing gold. Every photo shared by an attendee, a guest speaker, or a VIP becomes a piece of user-generated content promoting you online. It turns a simple photo op into an organic marketing campaign that reaches far beyond the four walls of the venue. For red carpet events, award ceremonies, and product launches, they're not just nice to have – they're essential.
Selecting the Right Materials and Finishes
The real secret to a banner that looks fantastic and lasts the distance isn't just the design—it's the nuts and bolts of how it's made. Choosing the right material and finish isn't just a box-ticking exercise; it’s a critical decision that dictates how well your banner holds up and how professional your message looks on the day.
Let’s get into the details that make all the difference.
Your first big choice is the material itself. Standard PVC vinyl is the industry workhorse for a good reason. It’s tough, waterproof, and makes printed colours look incredibly vivid. But if you're looking to reduce your event's environmental footprint, there are now brilliant eco-friendly options like non-PVC polyethylene. These are 100% recyclable and deliver fantastic quality without compromise.
Decoding Material Weights
When you look at different banners, you’ll see a weight listed in gsm (grams per square metre). The easiest way to think about this is to compare it to paper. You know the difference between a flimsy piece of 80gsm printer paper and a thick, premium 300gsm business card, right? It’s the same principle here.
A higher gsm means a denser, tougher, and more opaque material.
- Standard Vinyl (e.g., 440gsm): This is your perfect all-rounder. It’s ideal for most indoor events and shorter-term outdoor use, hitting that sweet spot between durability and cost.
- Heavy-Duty Vinyl (e.g., 510gsm+): If your banner is going to be up for a while, face the great British weather, or be used again and again, stepping up to a heavier weight is a smart move. It’s far more resistant to tearing and general wear.
A heavier gsm doesn't just add strength; it also stops light bleeding through from behind. This is absolutely essential for double-sided banners or any banner placed in front of a window or bright light, keeping your design sharp and easy to read.
This simple flowchart can help you pinpoint the best banner type for your specific setup.
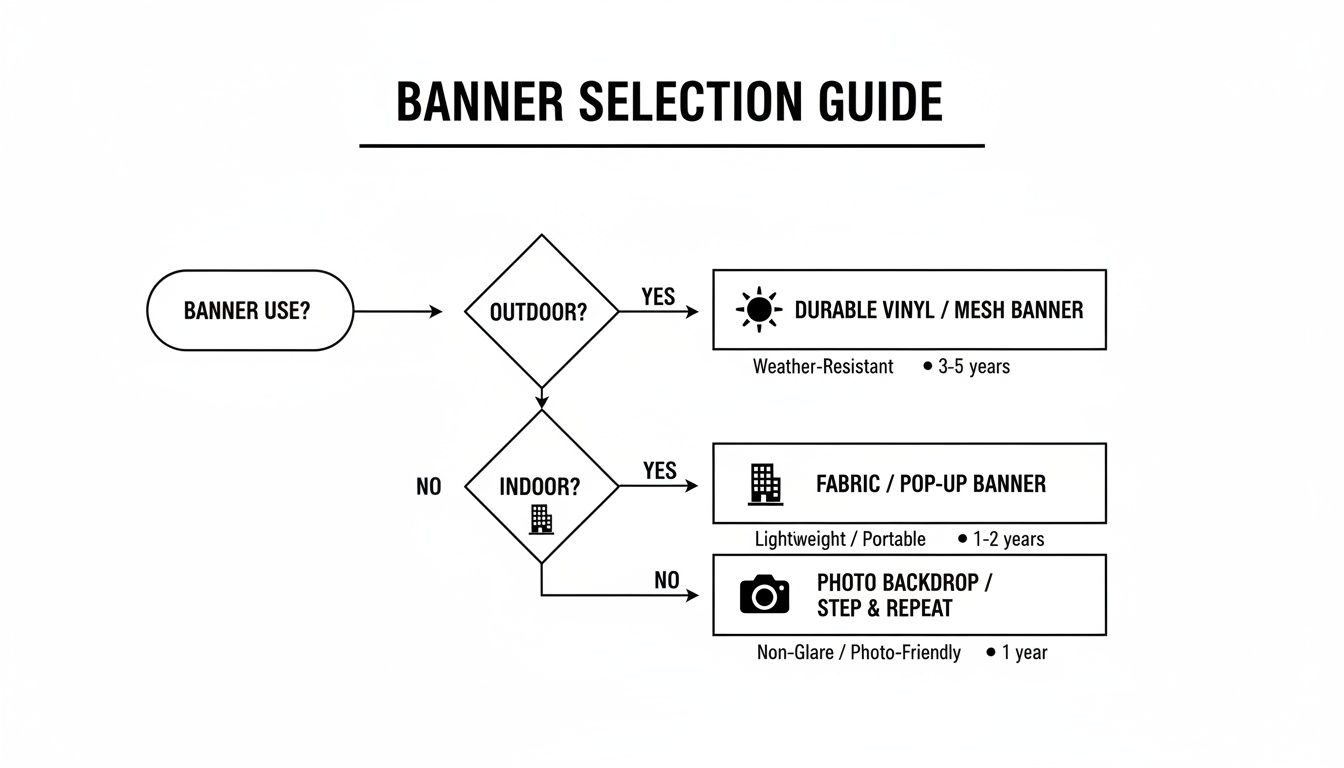
The main takeaway? Let your venue be your guide. An indoor exhibition hall, a windy outdoor festival, or a dedicated photo booth all demand different things from your banner.
Essential Finishing Options
Once the material is sorted, it’s time to think about the finishing touches. These are what turn a simple sheet of printed vinyl into a professional, ready-to-hang display. Skipping these details can leave your banner looking amateurish or, even worse, cause it to fail when you need it most.
Hemming and Eyelets
Think of hemming like sewing a hem on a pair of jeans. We fold over and weld the edges of the banner to reinforce them. This simple step massively increases its strength, stopping the edges from fraying or tearing, which is a real risk in windy conditions.
Eyelets (or grommets) are the metal rings we punch along those reinforced edges. They create strong, secure points for you to use rope, cable ties, or bungees. For any large outdoor banners for events, we strongly recommend placing eyelets roughly every 50cm. This spreads the tension evenly, preventing rips and giving you that tight, flat, professional look.
Matte vs Gloss Finish
Finally, you have a choice of surface finish, and this can make or break your banner's readability.
- Gloss Finish: A gloss finish looks shiny and can make colours really pop. The big downside is glare. Under bright stage lights or direct sun, it can become a mirror, making your message impossible to read.
- Matte Finish: A matte finish has a subtle, non-reflective surface. It soaks up light instead of bouncing it back, ensuring your text and graphics are perfectly clear from any angle. For almost any event, especially where photos will be taken, a matte finish is the superior choice for readability.
Designing Banners That Get Noticed
A brilliant banner all starts with a smart design. Get it right, and you can stop people in their tracks. Get it wrong, and it doesn't matter how much you spent on printing – it'll just blend into the background. Let's walk through some practical, real-world advice for creating artwork that’s not only eye-catching but also technically spot-on for large-format printing.
You’ve got seconds, literally, to grab someone's attention at a busy event. It’s a well-known fact that our brains process images 60,000 times faster than text, which means your design needs to land its message almost instantly. The secret? Simplicity and focus.
The Core Principles of Effective Banner Design
Before you even think about opening Adobe Illustrator, take a step back and ask: what is this banner for? Is it to guide people to your stand? Shout about a special offer? Or just build brand awareness? Pinpointing that one single goal is the key, as it should shape every design choice you make from here on out.
Your next step is to create a clear visual hierarchy. It’s a bit of a designer’s term, but all it really means is arranging things on the banner to guide the viewer’s eye. Whatever your main message is – the headline, the offer, the big news – it needs to be the most prominent thing they see.
Follow these golden rules for maximum impact:
- Go for High-Contrast Colours: Think bold and punchy. A vibrant yellow text on a deep blue background is going to be far more readable from across a crowded hall than a subtle pastel-on-pastel combo.
- Choose Bold, Readable Fonts: Save the elegant, swirly fonts for wedding invitations. For a banner, you need clean, strong fonts that are easy to read at a glance. You can't go wrong with classic sans-serifs like Helvetica, Arial, or Open Sans.
- Stick to One Powerful Message: It’s tempting to cram every last detail onto your banner, but you have to resist. Pick one killer headline – “50% Off Today Only” or “Live Music Starts Here” – and make it the hero. All other text should be minimal and play a supporting role.
A great banner is like a powerful billboard. It doesn't tell the whole story; it makes you curious enough to want to learn the rest. Focus on a single, compelling call to action that tells people what to do next.
To make sure your banners feel like a natural part of the event, it's worth exploring some unforgettable event branding ideas. After all, a well-designed banner should enhance your overall theme, not clash with it.
Getting Your Artwork Technically Perfect
Once you’ve nailed the visual concept, it's time to get the file ready for printing. This part is absolutely crucial. Getting the technical specs wrong is the difference between a crisp, professional banner and a blurry, pixelated disaster.
Vector is King for Large Format
If you remember one thing from this section, make it this: use vector files wherever you can. Vector graphics are created in programmes like Adobe Illustrator and use maths to draw shapes. What this means for you is that you can scale a vector logo to the size of a double-decker bus, and it will stay perfectly sharp.
Common vector file types include:
- AI (Adobe Illustrator)
- EPS (Encapsulated PostScript)
- PDF (when saved correctly from vector software)
- SVG (Scalable Vector Graphics)
On the other hand, standard image files like JPEGs or PNGs are raster images, which are made up of tiny squares called pixels. When you blow them up too much, they go all blurry and "blocky"—a look you definitely want to avoid. While photos will always be raster, your logos, text, and other graphic elements should always be in a vector format.
Your Pre-Print Checklist
Before you hit 'send' on that artwork file, quickly run through this technical checklist. For a much deeper dive, you can check out our full guide on how to design a banner for print.
- Resolution (DPI): For banners that people will see up close (like a roller banner), you should aim for 150 DPI (dots per inch) at the final print size. If it’s a massive banner that will be viewed from a distance, you can often get away with 75 DPI.
- Colour Mode (CMYK): Your computer screen shows colours in RGB (Red, Green, Blue). Professional printers, however, use CMYK (Cyan, Magenta, Yellow, Black). Always design and save your final print file in CMYK mode to avoid any nasty colour surprises when it comes off the press.
- Bleed Area: Always add a 'bleed' of at least 5mm around all edges of your artwork. This is a small extra margin for your background colour or image. It gets trimmed off after printing, but it guarantees your design goes right to the very edge of the banner, with no ugly white borders.
Getting The Size, Siting, and Weather Right
You can have the most stunning banner design in the world, but if you put it in the wrong spot, it’s a complete waste of money. The strategy behind where you put your banner and how big you make it is every bit as crucial as the message printed on it.
Think of it this way: a whisper in a library carries perfectly, but the same whisper at a rock concert is totally lost. It’s the same with banners. The size has to match the environment and, most importantly, the distance from which people will be looking. A small roller banner is ideal for an exhibition stand where people are just feet away, but it would vanish across a festival field.
Match Banner Size to Viewing Distance
So, where do you start? With one simple question: how far away will your audience be? A brilliant rule of thumb we use is that for every three metres of viewing distance, your text needs at least 2.5cm of height to stay legible. Get this right, and your message will land with real impact.
Here’s a quick way to visualise it:
- Up Close (1-5 metres): Perfect for roller banners, pop-up displays, and smaller vinyl banners at registration desks or inside a trade show booth. You can afford to have smaller, more detailed text here.
- Medium Distance (5-15 metres): This is your typical range for banners along walkways, at food stalls, or near the side of a stage. You’ll want to go with bigger fonts and a bolder, simpler message.
- Long Distance (15+ metres): Now we’re talking about large-format banners for events. These are the big boys you see from across a field, fixed to scaffolding, or on the side of a building. Go big on everything – the banner and the text.
High-Impact Placement Tactics
Once you’ve nailed the size, clever placement turns your banner from a simple sign into a powerful event tool. Don't just look for an empty space; think about the natural flow of people and where their eyes will instinctively go.
Some of our tried-and-tested placement tactics include:
- At Key Entrances and Exits: This is prime real estate. A welcome banner sets the tone instantly, while a ‘thank you for coming’ banner with a social media tag leaves a lasting impression on the way out.
- Along High-Traffic Walkways: Use a series of banners to guide people between stages, stands, or different zones. They can act as signposts, promote sponsors, or build hype for upcoming activities.
- As a Commanding Stage Backdrop: Nothing elevates the look of a performance or presentation like a huge, professionally printed backdrop. It creates an instant focal point and a fantastic photo opportunity.
Preparing for the Great British Weather
Let's be honest, planning an outdoor event in the UK means planning for all four seasons in a single afternoon. Our infamous weather can turn a beautiful banner into a sorry, tattered mess if you haven’t prepared. This is where your choice of material and installation method really counts.
For any large vinyl banner out in the elements, you absolutely must use every single eyelet. Securing it properly with bungee cords or strong rope spreads the tension evenly, stopping the wind from catching an edge and ripping it. It’s a small detail that separates a professional setup from an amateur one.
But, when you’re in a seriously exposed location – think scaffolding, coastal events, or attached to temporary fencing – a standard vinyl banner can act like a giant sail. This puts enormous strain on the banner and whatever it's fixed to, quickly becoming a safety hazard.
This is precisely why mesh banners are the go-to choice for these situations. The tiny perforations in the material let the wind pass straight through, meaning your message stays visible and your banner stays put. To see exactly how this works, it’s worth reading up on why mesh banners are ideal for outdoor promotions. It’s a smart choice that ensures your investment looks great, come rain or shine.
Understanding Costs and Turnaround Times
When you're running an event, your budget and your deadlines are everything. They're the two rails the whole project runs on. So when it comes to ordering your banners for events, you need to know exactly what you're paying for and, just as importantly, when it will arrive.
Getting this right is the key to a stress-free setup. Let’s pull back the curtain on how banner costs are worked out and what happens from the moment you click 'order' to when the courier knocks on your door.
What Determines the Price of Your Banner
Think of ordering a banner a bit like ordering a custom-made suit. The final price tag isn't just one figure; it's a sum of the fabric, the size, the cut, and any extra features you choose. The exact same principle applies here.
The final cost of your event banner boils down to a few key things. Knowing what they are will help you tweak your order to get the best possible value for your event's needs.
Here are the main ingredients that go into the price:
- Banner Size: This one's the most obvious. A bigger banner uses more material and more ink, so it costs more. It's all about finding that sweet spot between making a huge impact and staying within budget.
- Material Choice: The type of PVC or fabric you go for makes a real difference. For instance, a super tough, heavy-duty 510gsm vinyl is going to be priced higher than our standard 440gsm vinyl because it's built to last longer. Likewise, specialist materials like wind-friendly mesh or our eco-friendly options will have their own price points.
- Finishing Options: Those final touches, like reinforced hemming or the number of eyelets, will tweak the cost. It can be tempting to skip these to save a few quid, but for a banner that has to face the great outdoors, strong finishes are an investment in its lifespan.
- Quantity: As with most things, buying in bulk saves you money. If you've got a series of events lined up or need to cover a large venue, putting in one big order is almost always more cost-effective than several smaller ones.
- Double-Sided Printing: Want your message seen from both directions? No problem. But this requires a special blockout material to stop the design from showing through, plus double the ink, and the price will reflect that.
From Your File to Our Printers
Once you've made your choices and uploaded your artwork, our team in Manchester gets straight to work. The journey from your computer to our print floor is designed to be quick and foolproof.
The first thing we do is a pre-flight check on every single file. This isn't some automated scan; one of our in-house designers personally opens and inspects your artwork to make sure it's ready for print. They're looking for things like image resolution, correct CMYK colour setup, and proper bleed – catching any little gremlins before they can cause a problem.
This hands-on check is our promise to you. It’s a vital safety net that guarantees what you designed on your screen is exactly what you get in your hands. No nasty surprises, just a crisp, professional print every time.
As soon as your file gets the thumbs-up, it’s sent directly to our state-of-the-art printers.
Understanding Turnaround and Dispatch Times
We know event planning happens on a tight schedule. That's why our whole operation is built for speed and reliability. For most standard orders, we offer a next-day dispatch service.
It’s really important to know what that means. "Next-day dispatch" is our promise that your banner will be printed, finished, carefully packed, and handed over to the courier within one working day of your order. From there, the delivery time is down to the courier, which is usually another 24-48 hours for most of the UK.
While we take great pride in our quick turnarounds, the best advice is always to plan ahead, especially if you have a large or complex order. Giving yourself a buffer of a few extra days is the best way to avoid any last-minute panic and ensures your fantastic new banners are on-site with plenty of time to spare.
Your Event Banner Questions, Answered
Ordering banners for an event can throw up a few last-minute questions, especially when you’re aiming for perfection. We get it. To help you nail down those final details with total confidence, we’ve put together the answers to the questions we hear most from event organisers across the UK.
Think of this as your go-to cheat sheet. Getting these practical bits right is the key to making sure your banners don't just look the part, but perform brilliantly on the day.
What's the Best Banner for an Outdoor UK Event?
For pretty much any outdoor event in the UK, a PVC Vinyl Banner is going to be your best all-round bet. It’s a real workhorse, built to stand up to our famously unpredictable British weather. We always suggest going for a heavyweight material (like our 440gsm or 510gsm options) with reinforced hems and plenty of eyelets to keep it securely fastened.
But there's one big exception. If you're tying your banner to temporary fencing, scaffolding, or any exposed, windy spot, you need a Mesh Banner. Its clever perforated design is a game-changer, letting the wind pass straight through instead of turning your banner into a giant, flapping sail. This simple feature drastically reduces the strain, preventing damage to both the banner and whatever it’s attached to. It’s a must for safety and durability in blustery conditions.
What Artwork Resolution Do I Need for a Big Banner?
This is a classic query, but the answer is less scary than you might think. You don't need the super-high 300 DPI (dots per inch) you'd use for a brochure that's being held inches from your face. For large banners, it all comes down to viewing distance.
For a banner that will be seen up close, like a roller banner at a trade stand, 150 DPI at the final print size is spot on. For massive banners that are viewed from far away—think of one plastered on the side of a building—you can often get away with as low as 75 DPI and no one will ever notice the difference.
The single most important thing is to start with good quality files. Always use vector logos (AI, EPS, or SVG files are perfect) and the highest resolution photos you can get your hands on. This is your best defence against any nasty pixelation. If you're ever in doubt, just send us the highest resolution you have – we'll handle the rest.
How Should I Store My Banners to Use Them Again?
Looking after your banners properly is the secret to making them last for event after event. For your vinyl and mesh banners, it’s a simple but vital process.
First, give them a gentle clean with a damp cloth and some mild soap to get rid of any grime. The crucial step here is to let them dry completely. Trapped moisture is a fast track to mould and mildew.
Whatever you do, don't fold your banner. It creates horrible, permanent creases that are a nightmare to get out. Instead, roll the banner tightly with the printed side facing outwards. This protects the ink from getting scuffed or scratched in storage. Pop the rolled-up banner in a sturdy tube or its original box and keep it somewhere cool and dry, out of direct sunlight.
For roller banners, it's even easier. Just let the graphic retract carefully back into its base, making sure it goes in straight to avoid fraying the edges over time.
Ready to get banners that will make your event one to remember? The team at Banner Printing Ltd is here to help. With fast, free UK delivery and an expert eye checking over every single order, we make getting professional, high-quality banners completely stress-free. Upload your artwork and get started today!


