Printed PVC banners are the workhorses of UK advertising. They're tough, weatherproof vinyl signs that deliver a massive visual punch without breaking the bank. For any business needing to grab attention—from a grand opening to a festival stage—they are the go-to, cost-effective and versatile tool.
What Are Printed PVC Banners and Why Do They Work?
Think of a printed PVC banner as your own portable, heavy-duty billboard. It's the ultimate solution for UK businesses that need to get their message seen, whether it’s strapped to scaffolding, hung over a shop front, or set up at a bustling trade show. Their job is simple but powerful: to be a high-impact visual that can stand up to the British weather.
So, what’s the magic behind them? It all starts with the material. At its core, a banner is a sheet of Polyvinyl Chloride (PVC), a seriously robust plastic known for its durability and fantastic print quality. When you combine that with modern large-format printing, a digital design is transformed into a vibrant, physical advertisement that’s ready for action.
The Power of Versatility and Cost
One of the biggest reasons PVC banners are everywhere is their incredible versatility. They can be made in almost any size you can imagine and finished with eyelets, pole pockets, or reinforced hems, meaning you can install them just about anywhere. This adaptability makes them a perfect fit for a huge range of jobs.
You’ll see them being used for:
- Retail Promotions: Shouting about sales, new products, or seasonal offers.
- Event Signage: Guiding crowds, promoting sponsors, or decorating stages.
- Construction Sites: Showing off company branding and project details on hoardings.
- Personal Celebrations: Creating custom backdrops for birthdays and parties.
A well-designed banner does more than just show information; it creates an instant visual landmark. It turns a boring fence or a plain wall into a live advertising spot, catching the eye of anyone passing by who might otherwise have missed your message.
A Strong and Growing Market
The sheer number of banners you see out there reflects a strong and growing demand in the UK print industry. The UK printed vinyl market, which is the foundation of all PVC banner production, generated USD 460.6 million and is on track to hit USD 639.1 million by 2030. That’s a clear sign of just how effective these banners are for promotions. You can read the full research about the UK printed vinyl market for a deeper dive.
This guide will walk you through everything, from the simple idea in your head to a professionally installed banner, giving you the knowledge to order with complete confidence.
Choosing the Right Banner Material for Your Project
Picking the right material for your printed PVC banner is probably the most important call you'll make. It’s the foundation that dictates everything else – not just how your banner looks, but how it holds up out there in the real world. Don't get bogged down by the technical terms; we'll break it all down into plain English.
Think of it like choosing the right coat for the weather. You wouldn't wear a thin raincoat in a blizzard, would you? Banner materials are exactly the same. Different weights and types are engineered for specific conditions, and getting this choice right from the start means your message stays bold, secure, and effective for a long, long time.
This quick visual guide can help point you in the right direction, linking what you need your banner to do with where it's going to live.
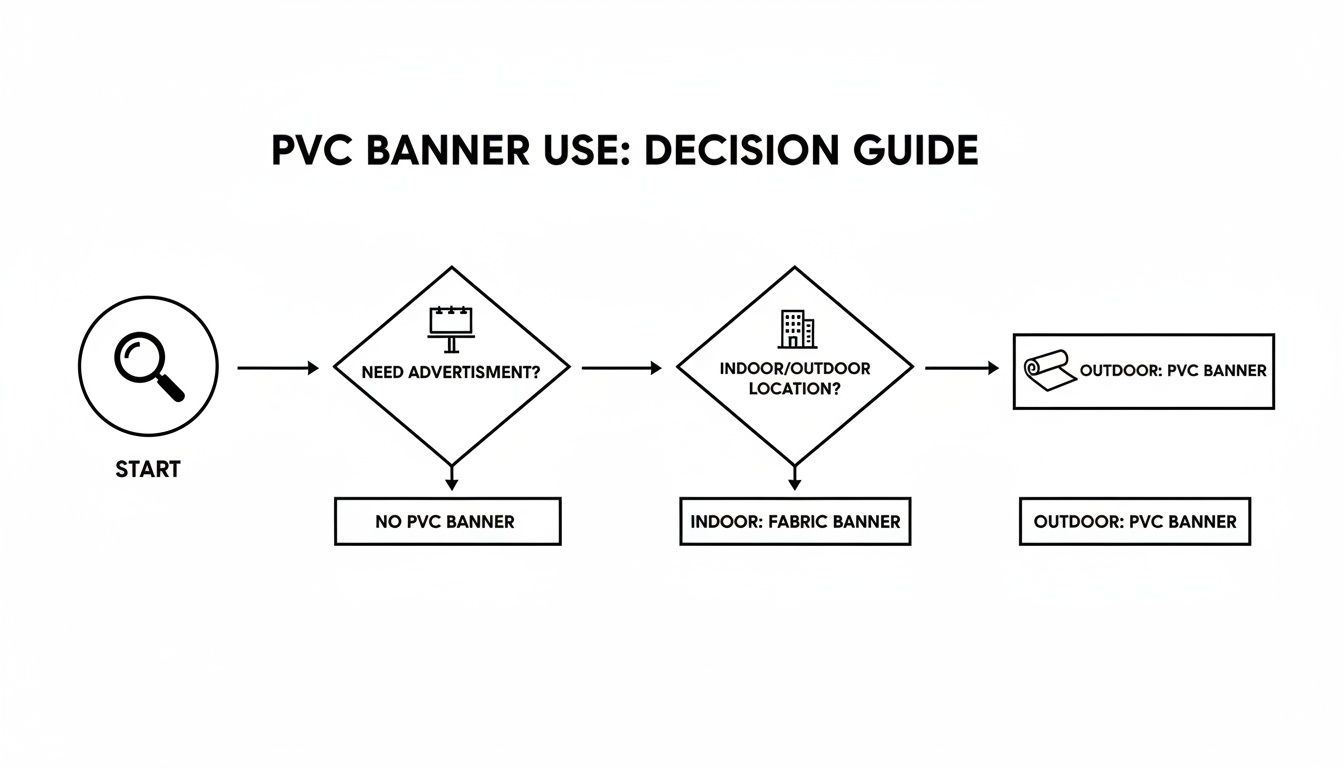
As you can see, it really boils down to two things: your banner's main goal and its final location. Nail those, and you're already halfway to the perfect material choice.
Understanding Banner Weight (GSM)
The first spec you’ll almost always run into is GSM, which stands for Grams per Square Metre. All this really means is how heavy and thick the material is. It’s a bit like the difference between standard printer paper and a fancy business card.
-
440gsm PVC: This is our go-to, the industry workhorse. It’s a brilliant all-rounder, tough enough for most indoor displays and any short-to-medium-term outdoor use. Think event promotions, in-store sale signs, or exhibition stands. It hits that sweet spot of durability and great value.
-
510gsm PVC: Now we're talking heavyweight. This stuff is noticeably thicker and more rugged. You'll want to step up to 510gsm for banners that are going to be outdoors for months on end, especially if they're in a spot that gets a bit of weather. It’s built for superior strength and a longer life.
For most jobs, 440gsm will serve you perfectly. But if that banner is a permanent fixture, spending a little extra on 510gsm buys you that extra confidence and longevity.
To make it even simpler, here's a quick cheat sheet to help you decide.
PVC Banner Material Comparison
| Material Type | Best For | Key Feature | Common Use Case |
|---|---|---|---|
| 440gsm PVC | Versatile indoor & short-term outdoor use | Excellent balance of durability and value | Retail promotions, indoor events, birthday banners |
| 510gsm PVC | Long-term outdoor advertising & high-stress areas | Extra thickness and superior weather resistance | Building wraps, permanent shopfront signage |
| Mesh PVC | Windy or exposed locations | Perforated to allow wind to pass through | Scaffolding, construction site fences, bridges |
| Blockout PVC | Double-sided printing is required | Opaque core prevents light from showing through | Lamppost banners, exhibition hanging signs |
This table gives you a clear snapshot, but let's dive into the difference between solid, mesh, and blockout materials a little deeper.
Solid PVC vs Mesh Banners
Beyond just the weight, you need to think about the physical structure of the banner, especially when it's going up outside. This is where you'll choose between solid PVC and mesh.
A standard solid PVC banner is just that – a solid sheet. This gives you a completely opaque surface, which is fantastic for making your printed colours pop with maximum vibrancy. It’s the default choice for most situations, particularly when you're fixing it flat against a wall where wind can't get behind it.
A mesh banner, however, is a different beast. It's cleverly perforated with thousands of tiny holes. These little perforations let the air flow straight through the material, which dramatically reduces the "sail effect" – that moment a big gust of wind catches your banner and puts immense strain on the fixings.
Mesh banners are the definitive solution for high-wind locations. By letting the wind pass harmlessly through, they take the pressure off the eyelets and frame, preventing rips and ensuring your banner stays put on scaffolding, wire fences, or exposed bridges.
The print on mesh is naturally a little less punchy up close because of the holes, but from any normal viewing distance, the visual impact is virtually the same as solid PVC. For a full breakdown, check out our guide on comparing mesh vs PVC banners in the UK.
When to Use Blockout Banners
So, what happens if you want a different design printed on each side? That’s the job for a blockout banner.
Normal PVC is a little translucent. If you held it up to the sun, you'd see light pass through. This means a design printed on the back would create a faint "ghosting" effect on the front, muddying both images.
Blockout material cleverly solves this by sandwiching a super-thin, completely opaque layer of black or grey material right in the middle of the PVC. This light-blocking core guarantees that neither side's graphic can be seen from the other, no matter how bright the lighting is.
This makes them the only real choice for:
- Lamppost banners you see on high streets
- Double-sided signs hanging in shopping centres
- Exhibition displays that need to be viewed from all angles
By getting to grips with these three core concepts—weight (GSM), structure (solid vs mesh), and opacity (standard vs blockout)—you’re fully equipped to choose the perfect material for a banner that not only looks brilliant but performs flawlessly for its entire lifespan.
Getting the Right Finish to Make Your Banner Last
Printing your design is only half the story. The finishing touches are what turn a simple sheet of PVC into a tough, professional banner that’s ready for anything you can throw at it. These aren’t just nice-to-haves; they’re what give your banner its strength, safety, and polished look.
Think of it like this: the print is the paint job on a car, but the finishes are the chassis, the welds, and the seatbelts. They provide the structural integrity. Skimping on these details is a recipe for a banner that frays, tears, or fails right when you need it most, which doesn't do your brand or your budget any favours.

Hemming for Tough Edges
First up, and probably the most important finish, is hemming. We fold over the raw edges of the banner and weld them shut. This creates a thick, double-layered border around the whole thing. It’s the same idea as the seam on a good pair of jeans—it stops the material from unravelling when it’s under strain.
Without a hem, a banner’s edges are its biggest weakness. The wind will quickly find a loose thread and start flapping it, leading to fraying and tearing. A strong hem is essential for giving eyelets a secure grip and spreading tension evenly across the banner, adding years to its life.
Eyelets and Pole Pockets for Hanging
With the edges reinforced, you need a way to actually hang the banner. This is where eyelets and pole pockets come in. Your choice here depends entirely on where and how you’ll be displaying it.
-
Eyelets: These are the classic metal rings punched through the hemmed edges. They’re incredibly versatile and are the most common way to hang a banner. You can use cable ties, rope, or bungees to fix your banner to fences, walls, or railings. We typically space them every 50cm to give solid, reliable support.
-
Pole Pockets: Instead of rings, a pole pocket is a channel or sleeve created by folding over a larger flap of material. This lets you slide a pole through the top and/or bottom for a rigid and taut display. They are absolutely essential for things like parade banners, exhibition stands, or lamppost banners where you need the banner to hang perfectly flat.
Picking the right hanging method is crucial. For attaching to a temporary fence, eyelets are your best bet. But for a professional display on a scaffold or in a parade, pole pockets are the only way to go.
Flame Retardancy: A Non-Negotiable for Indoor Safety
If your banner is heading indoors—especially to a public space like an exhibition hall, school, or shopping centre—it absolutely must be flame retardant. This isn't just a suggestion; it's a legal requirement. Materials are certified to standards like M1/B1 (the common European ratings).
This certification means that if the banner is exposed to a flame, it will self-extinguish rather than helping the fire spread. Using a non-certified banner indoors is a serious safety hazard that could get you kicked out of an event or even void your insurance. Always check for the correct fire rating. In the UK's £9.3 billion commercial printing market, safety compliance is taken very seriously, and it's what keeps the industry reliable.
By thinking through these finishing options, you ensure your banner is not just a pretty picture, but a durable, safe, and professional piece of kit. A well-made product like a premium outdoor vinyl banner is built to be weatherproof and UV-resistant, giving you the best possible return on your investment.
How to Prepare Artwork for a Flawless Print
Getting a professional result from your printed PVC banner isn’t about being a graphic design wizard. It’s about understanding a few simple rules. Your digital file is the blueprint for the final product, and getting it right is the secret to translating your vision perfectly from the screen to the finished vinyl.
Think of it like a recipe: get the ingredients right, and the result will be perfect every time.
This guide breaks down the three core concepts you need to nail your artwork preparation: resolution (DPI), colour mode (CMYK), and bleed. We’ll skip the jargon and give you practical, easy-to-follow advice.
Getting the Resolution Right
Resolution, measured in DPI (Dots Per Inch), is simply how much detail is packed into your image file. It’s the single most common reason for a disappointing print, but thankfully, it’s an easy one to get right.
Imagine a high-quality photo on your computer. You can zoom in and still see sharp details. Now, picture a low-quality image; when you zoom in, it becomes a blurry, "pixelated" mess where you can see the individual squares of colour.
Printing a low-resolution file on a huge banner is exactly like zooming in too far. The printer has to stretch that limited information over a massive area, leaving you with a fuzzy, unprofessional finish. For a crisp, clear print that looks sharp even up close, your artwork should be 150 DPI at its final print size.
Understanding Print Colours
Another critical step is setting the right colour mode. The colours you see on your monitor (which emits light) are created very differently from the colours a printer produces by mixing ink on a surface.
- RGB (Red, Green, Blue) is for digital screens. It’s an additive process, where light is added to create colours. White is the combination of all three.
- CMYK (Cyan, Magenta, Yellow, Key/Black) is for printing. It’s a subtractive process, where inks are layered to absorb light and create colour on a physical surface like vinyl.
If you send us a file saved in RGB, our printing software has to make its best guess at how to convert those screen colours into ink. This often leads to dull or inaccurate colours on the final banner. To make sure the vibrant reds and deep blues you designed look just as you intended, always convert your artwork to the CMYK colour profile before you save it.
For designs that need exact brand colours or specialty finishes like metallics, checking a guide to PMS color matching is the best way to ensure your printed banner colours are spot on.
Adding a Safety Margin with Bleed
Finally, let’s talk about bleed. When we print your banner, it starts on a much larger roll of vinyl which is then trimmed down to your final size. Our trimming machines are incredibly precise, but we’re still talking about fractions of a millimetre.
Without bleed, any tiny shift during the trimming process could leave a sliver of an unprinted white edge on your banner. Not a good look.
To prevent this, you simply add a "bleed area." This just means extending your background colour or image slightly beyond the final trim lines. Think of it as a safety margin. A standard bleed of 5mm on all sides is perfect. It guarantees that even with the slightest movement during cutting, your colour goes right to the very edge for a clean, professional finish.
For more details, our team has put together a simple guide on uploading artwork for custom banners that walks you through it.
Installing Your Banner for Maximum Visibility
You've got a brilliantly designed PVC banner ready to go, but its real power is only unleashed when it's installed properly. Let's be honest, a slack, wrinkled, or crooked banner just looks unprofessional and undoes all the hard work you put into the design.
Getting the installation right is the final, crucial step. It ensures your investment pays off by grabbing attention and presenting your brand in the best possible light. We’ll walk through the practical, real-world methods for getting your banner up and looking sharp, whether it's on a fence, a wall, or a special stand.
Choosing a Practical Banner Size
While we can print a banner to virtually any custom dimension, some sizes have become industry favourites for a reason. Here in the UK, the 3 metre by 1 metre banner is a true heavyweight, consistently making up about 10% of all banner orders.
This isn’t a coincidence. This size is a perfect match for standard UK fencing, railings, and building frontages, which makes your life a whole lot easier when it comes to installation. You can find out more about the most popular PVC banner sizes on Banner World.
Opting for a size that works with existing structures means you'll achieve a taut, professional finish without needing custom frames or fiddly fixings.
Fence and Railing Installation Techniques
Fences and railings are the go-to mounting spots for temporary events, construction sites, or promotions. The key to a great look is creating even tension across the banner to get rid of any sagging or wrinkles.
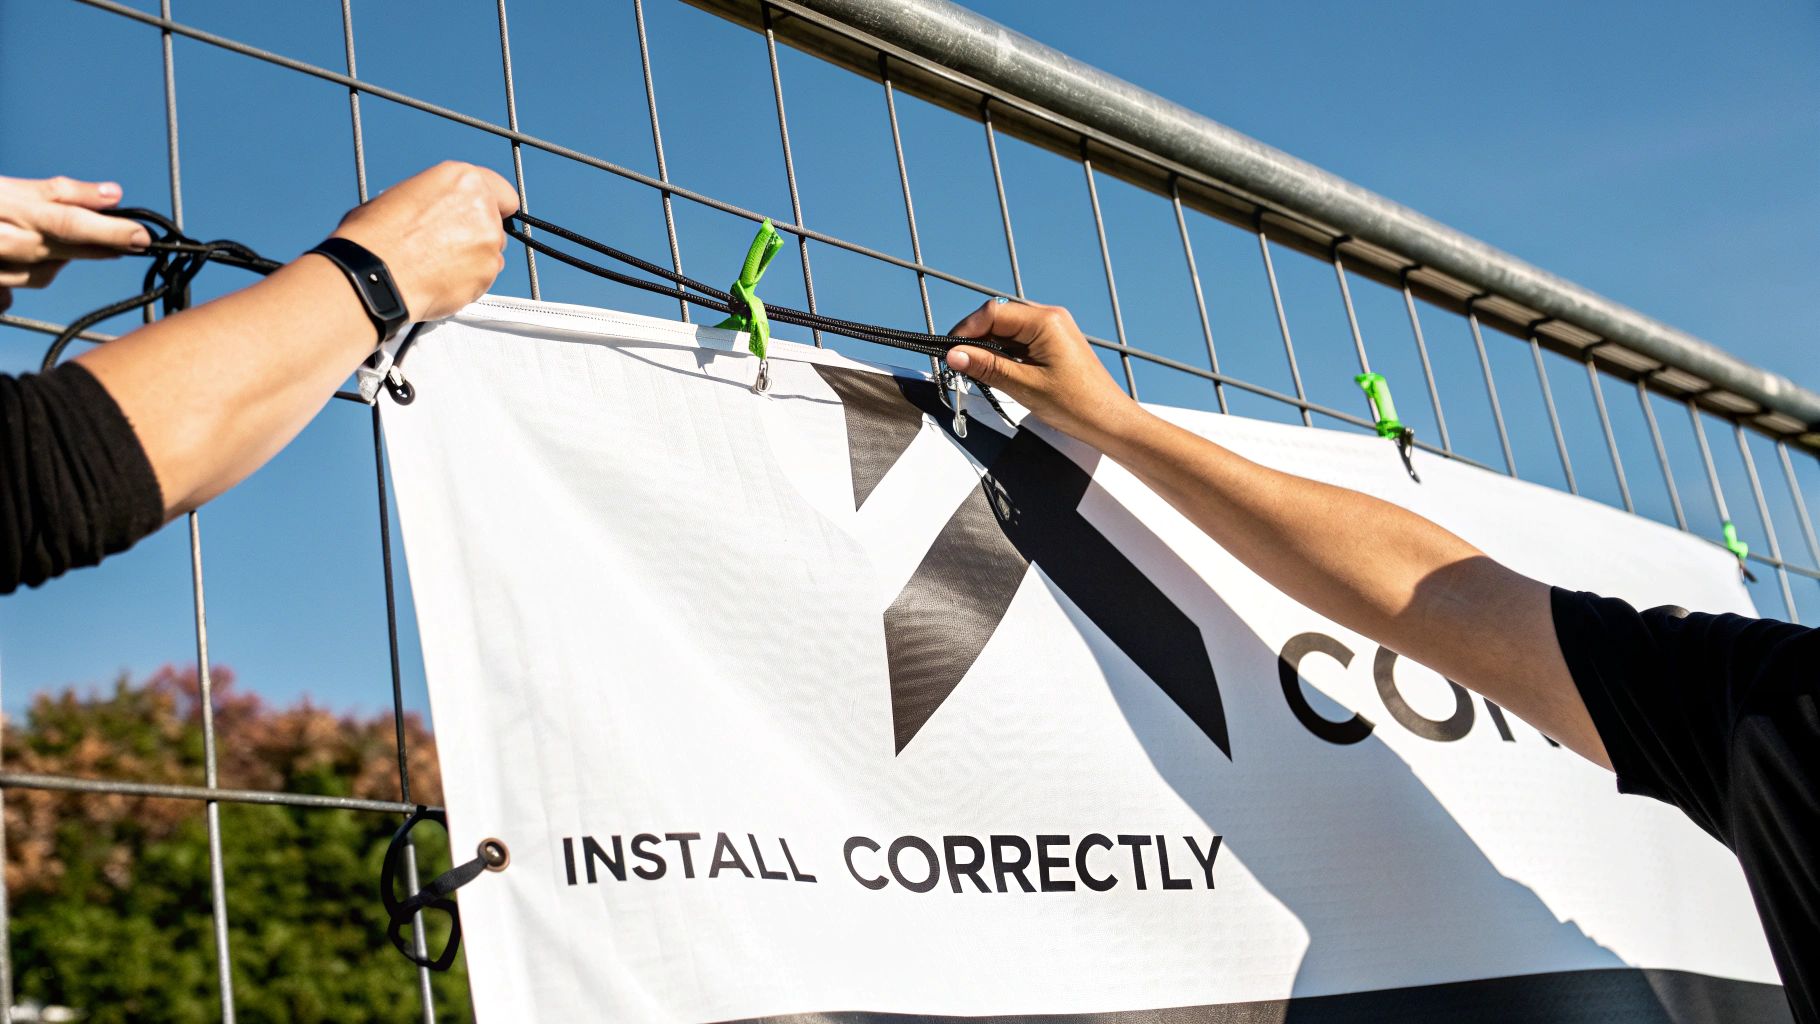
Using Cable Ties:
- Start with the four corners first. Pull the banner reasonably taut and secure them.
- Next, work your way around the banner, threading a cable tie through each eyelet and fixing it to the fence.
- Once all the ties are on, go back and tighten them gradually. Alternate between sides and top-to-bottom to spread the tension evenly—don't just yank one side tight before starting the others.
Using Bungee Cords:
- Bungees are brilliant because they offer flexible tension, which allows the banner to handle wind gusts without tearing.
- Simply hook one end through an eyelet and loop the other around a fence post or rail.
- Just like with cable ties, fix the corners first and then the rest of the eyelets, making sure everything is balanced.
A professional finish is all about even tension. If you pull one corner too tight, you'll create diagonal creases that look messy and can put a real strain on the material. Take your time adjusting each fixing point for a perfectly flat display.
Wall Mounting for a Permanent Display
For a more permanent fixture, like on a shop front or warehouse, mounting directly to the wall is your best bet. This gives you maximum security and durability.
-
Position and Mark: Hold the banner up against the wall exactly where you want it. Grab a spirit level to get it perfectly straight, then use a pencil to mark the wall through the centre of each eyelet.
-
Drill and Plug: Set the banner aside and drill your holes on the marks. Pop the right wall plugs (like rawlplugs) into the holes, tapping them in so they sit flush with the wall.
-
Secure with Screws and Washers: Put the banner back up. Now, drive a screw through a washer, then through the eyelet, and finally into the wall plug. The washer is essential here—it spreads the load and stops the screw head from ripping through the eyelet in high winds. Repeat for all the eyelets.
Using Pole Pockets Correctly
If you ordered your banner with pole pockets, it's designed for a specific display setup, like on a scaffold pole, parade banner, or stand system.
Just slide the pole through the pocket, making sure it's a snug fit. This method gives you a clean, rigid display that hangs perfectly flat. It’s the ideal choice when a taut, completely crease-free look is the top priority.
Keeping Your Banner Looking Its Best (and Exploring Greener Options)
Once your banner is up and doing its job, a little bit of care will go a long way. Looking after it properly doesn't just keep it looking sharp; it seriously extends its life, making sure you get every penny's worth of value out of your investment.
Keeping it in top condition is easier than you think. For banners hanging outdoors, a gentle wipe-down with a soft cloth, some mild soapy water, and a bit of elbow grease is all it takes to shift any grime and bring the colours back to life. Just be sure to avoid any harsh chemical cleaners or scrubbers, as they can strip away the protective UV coating on the print.
But here’s the golden rule: when it’s time to store it, never, ever fold it. Folding creates nasty, permanent creases that will crack the ink and weaken the PVC material over time. Instead, always roll your banner up neatly—with the printed side facing outwards—to keep it smooth and ready for its next appearance.
Time to Go Green? Exploring PVC-Free Banners
There’s no denying that PVC is a tough, durable material, but its environmental footprint is something more and more businesses are thinking about. This has paved the way for some fantastic PVC-free alternatives that deliver brilliant results without the traditional vinyl drawbacks.
These eco-friendly options are typically made from textiles like polyester or from recyclable plastics such as polypropylene. They provide a superb print surface and are every bit as versatile as their PVC cousins, making them a great fit for all sorts of indoor displays and short-to-medium-term outdoor campaigns.
Making the switch to a PVC-free banner is a straightforward way to bring your marketing in line with your company’s sustainability goals.
For eco-conscious brands, public sector organisations, and festivals, choosing a recyclable banner material sends a powerful message. It shows a real commitment to environmental responsibility that truly connects with today's customers and partners.
The Big Benefits of PVC-Free Banners
Going greener doesn't mean you have to settle for less. In fact, these modern materials come with some compelling advantages that make them a smart move for any campaign.
- Properly Recyclable: Unlike PVC, which is a real headache to recycle, many PVC-free banner materials are 100% recyclable, helping you cut down on landfill waste.
- Lighter to Handle: They're often much lighter than traditional PVC. This makes them easier to transport and install, which can also trim down their carbon footprint during shipping.
- Stunning Print Quality: Don't worry about your graphics suffering. Modern non-PVC materials are engineered for vibrant, high-resolution prints, so your message will look just as punchy.
- A Smaller Footprint: The production process for these materials generally uses fewer harmful chemicals, meaning they have a lower environmental impact from the get-go.
Your Printed PVC Banner Questions Answered
We know that ordering new marketing materials can bring up a few questions. To help you feel completely confident in your choice, we’ve put together the most common queries we get from UK businesses about our printed PVC banners.
Think of this as a final check-in, clearing up any last-minute thoughts before you finalise your order.
How Long Will My PVC Banner Last Outdoors?
A well-made PVC banner is built to stand up to the famously unpredictable British weather. You can generally expect it to last between 3-5 years outdoors.
Of course, a few things can affect its lifespan. The biggest one is constant, direct sunlight, which can cause colours to fade over time. That’s why we use UV-resistant inks to dramatically slow down this process, keeping your design looking vibrant.
High-wind areas are another factor. For exposed or blustery spots, we often suggest a mesh banner, as the small holes let wind pass through, reducing the strain on the banner and its fixings. With the right installation and a quick wipe-down now and then, your banner will be a fantastic marketing tool for years.
Key Takeaway: For most outdoor uses, a standard 440gsm or 510gsm PVC banner is more than tough enough. The combination of durable material, reinforced hems, and UV-stable inks means it can handle rain, wind, and sun, giving you a brilliant return on your investment.
Is There a Difference Between PVC and Vinyl Banners?
This is probably the question we hear most often, and the answer couldn't be simpler: there’s absolutely no difference! The two terms are used interchangeably in the printing world.
"PVC" is just the technical name for the material – Polyvinyl Chloride. "Vinyl" is the common, everyday name for it. So, when you order a PVC banner, you’re getting a durable, weatherproof vinyl banner. They’re one and the same.
Can I Print a Different Design on Each Side?
You certainly can, but it requires a special type of material. To get different graphics on the front and back, you’ll need what’s called a blockout banner.
This material has a very thin, completely opaque layer hidden in the middle. This light-blocking core is essential, as it stops the design from one side showing through to the other (a problem known as "ghosting"). A standard banner is slightly translucent, so it just won't work for double-sided prints. Just let us know you need it, and we'll make sure to use the correct blockout material.
How Fast Can I Get My Banner Delivered?
We get it – sometimes opportunities pop up and you need your marketing materials fast. We’ve built our service around being quick and reliable. For most standard banner orders where you provide print-ready artwork, we can print and dispatch from our UK facility within 24-48 hours.
We use tracked delivery across the United Kingdom, so you’ll know exactly when to expect your new banner. For huge orders or complex custom finishing, we’ll always confirm the production schedule with you upfront. Our main goal is to get your banner in your hands as quickly as possible.
Ready to bring your message to life with a high-quality, custom-printed banner? At Banner Printing Ltd, we combine speed, quality, and exceptional service to deliver visuals that make an impact. Get your instant quote today.


