
Trying to pick the right pull up banner size can feel like a bit of a minefield, but let's cut through the noise. The most popular and versatile option, hands down, is the 850mm x 2050mm banner. This is the industry go-to for a reason—it hits that sweet spot between grabbing attention and being easy to carry, making it perfect for trade shows, shops, and corporate events all over the UK.
Finding Your Perfect Pull Up Banner Size
Choosing the right dimensions is the very first step to creating a portable display that actually works. While you can find a huge range of sizes out there, most people find what they need from just a handful of standard options. Think of them as the trusty workhorses of the events world, designed to fit perfectly into common spaces like exhibition booths and reception areas.
Standard Sizes and Common Uses
To make things simple, here’s a quick cheat sheet. This table breaks down the most common sizes we print, where they work best, and what makes each one a smart choice. It’s the fastest way to feel confident about your decision.
Standard Pull Up Banner Sizes and Common Uses
Here's a quick-reference table comparing the most popular pull up banner dimensions with their ideal applications and key features.
| Banner Size (Width x Height) | Best For | Key Feature |
|---|---|---|
| 600mm x 2000mm | Narrow retail spaces and point-of-sale | Slim profile, minimal footprint |
| 850mm x 2050mm | Exhibitions, trade shows, and receptions | The industry standard; highly versatile |
| 1000mm x 2050mm | Creating a wider visual impact | More graphic space without being oversized |
| 1500mm x 2050mm | Small backdrops and media walls | Excellent for creating a sense of presence |
| 2000mm x 2050mm | Large-scale event backdrops | Maximum visual impact for spacious venues |
After looking at the table, you can see why certain sizes have become so popular.
In the UK's buzzing events scene, a pull-up banner is an exhibitor's best friend. Recent industry data shows the UK hosted 1,016 exhibitions that drew in almost 7 million visitors, sparking a 7.2% jump in event budgets. This boom has cemented the popularity of standard sizes like the 850mm x 2050mm because they offer a professional look with zero fuss. If you want to dive deeper, you can read the full report on recent banner advertising trends.
Key Takeaway: The 850mm x 2050mm pull up banner is the most popular for a reason. It gives you a generous canvas for your message while staying incredibly easy to transport and set up almost anywhere indoors. When in doubt, this is a safe and effective bet.
Understanding Standard Pull Up Banner Dimensions
Ever wondered why pull-up banners come in specific sizes? It’s not just random numbers. The dimensions you see are the product of years of practical experience, figuring out what works best in real-world spaces, what’s easy to transport, and what simply looks right. Get your head around the logic, and you'll be able to pick the perfect size for any job.
Walk into almost any trade show, and you'll see a sea of banners that are either 800mm or 850mm wide. These are the industry workhorses for a good reason. They give you a generous canvas for your message but are still slim enough to tuck into a tight corner or stand in a busy reception area without getting in the way. It’s the sweet spot between making an impact and being practical.
The height is just as intentional. At around 2000mm (a touch over two metres), your main message and logo sit squarely at eye level for most people. This is crucial for grabbing attention, especially when you're competing for eyeballs in a packed room.
Aspect Ratio and Visual Effect
The relationship between the banner's width and height—its aspect ratio—completely changes the feel of your design.
- Standard Banners (e.g., 850mm x 2050mm): These are tall and narrow, like a portrait. This shape is fantastic for drawing the eye to a single, focused point—a powerful headline, one hero product shot, or a full-length figure.
- Wide Banners (e.g., 1500mm x 2050mm): These have a more cinematic, landscape feel. The extra width is perfect for laying out information side-by-side, showcasing a panoramic image, or creating a small-scale backdrop for a product display.
So, which one is for you? It all comes down to what you’re trying to say. A portrait banner guides the viewer’s gaze up and down, while a landscape one encourages them to scan from left to right.
The UK printed signage market continues to grow, and pull-up banner sizes like the standard 200cm x 80cm are essential for businesses wanting to capture a slice of the increasing spend on banner advertising. Larger formats, such as 3m x 2m variants used for backdrops, also play a key role in this expanding sector. You can explore more insights into the UK's custom printing market outlook to see the latest trends.
Moving Beyond the Standard
While the 850mm is the go-to for versatility, sometimes you need to break the mould. A skinny 600mm banner, for instance, is a lifesaver in a cramped retail spot where every inch of floor space is gold. It’s perfect for a point-of-sale promo right by the till.
On the other end of the scale, wider banners of 1000mm, 1500mm, or even a massive 2000mm are designed to make a huge statement. These aren’t just signs; they're portable feature walls. Use them as a photo backdrop for an event, to section off a pop-up lounge area, or to guarantee your brand gets noticed from clear across the exhibition hall.
Matching Your Banner Size to Your Space
Choosing the right pull-up banner size isn't just a technical detail—it’s about understanding the environment where your message will live. A banner that looks massive in your office can suddenly feel minuscule in a cavernous exhibition hall. The trick is to match the banner’s dimensions to its purpose and place, ensuring it works as hard as you do.
Think of it like choosing a speaker for an event. You wouldn't use your laptop speakers to fill a concert hall, nor would you rig up a festival sound system in a small meeting room. Your banner is no different. Its size has to be right for the viewing distance and the visual noise around it.
To make things easier, this decision tree helps you nail down the perfect size based on your real-world needs for transport, available space, and visual impact.
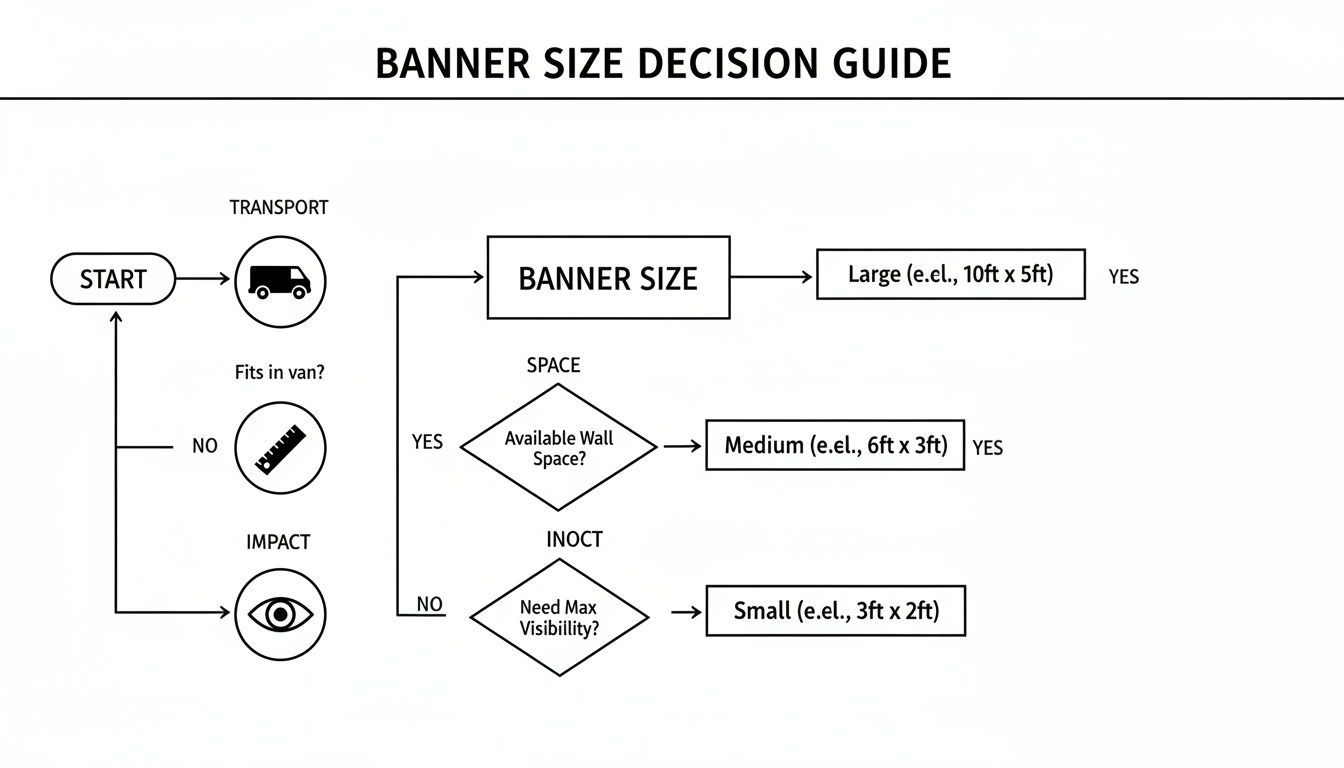
As you can see, practical things like how you'll get it there and where it will stand are just as important as the design itself, guiding you toward the most effective choice.
Scenarios for Common Banner Sizes
Let's walk through a few real-world examples to see how this plays out. When you can visualise your banner in its natural habitat, making the right call becomes a whole lot easier.
-
Trade Show Exhibitor: In a standard 3m x 2m shell scheme booth, every inch of floor space is gold. An 850mm wide banner is your best friend here. It’s got enough presence to make a strong visual statement without cramping your style, leaving you room for a table, products, and actually talking to people. We’ve got more tips in our guide on using banners for trade show displays.
-
Retail Store Owner: You want to shout about a sale right by the entrance, but the shop floor is already packed with stock. A slim 600mm banner is the perfect fit. Its tiny footprint means you can pop it in a high-traffic spot without causing a bottleneck, delivering a punchy point-of-sale message exactly where it counts.
-
Corporate Receptionist: The goal is to create a polished, professional welcome for visitors. A slightly wider 1000mm banner against a feature wall adds a touch of class and cements your brand identity the moment someone walks in. It’s substantial enough to look like a permanent fixture but still easy to shift for cleaning or special events.
Getting the size and design right is absolutely crucial if you want to grab attention and boost booth engagement at trade shows.
A banner’s effectiveness is directly tied to its environment. Always consider sightlines, foot traffic, and ambient lighting. A banner tucked in a dimly lit corner needs a much bolder, simpler design than one standing proud in a brightly lit, open space.
The Bigger Picture for Larger Events
When you’re dealing with larger promotional events, conferences, or media interviews, you need to think bigger. A 1500mm or 2000mm banner works brilliantly as a branded backdrop. This is the size you want for creating a step-and-repeat wall for photos or ensuring your logo is clearly visible behind speakers on a stage.
These larger pull-up banners are a huge part of why portable signage has become so popular, especially for UK businesses getting involved in experiential marketing. They offer maximum impact with minimum fuss, making them a firm favourite in the thriving UK print market.
How to Prepare Your Artwork for a Perfect Print
Even the most brilliant design can fall flat if the artwork isn’t prepared correctly for large-format printing. While technical specs might sound a bit daunting, getting them right is the secret to a professional, high-impact pull up banner.
Think of it this way—you’ve already picked out the perfect banner size. Now, it’s time to make sure the artwork's quality matches its scale.
Getting your file print-ready from the get-go helps you sidestep common headaches like blurry images, unexpected colour shifts, or crucial text getting chopped off. We'll walk through the essentials in simple terms, making sure your vision translates perfectly from screen to print.
Getting the Resolution Right
Resolution, measured in Dots Per Inch (DPI), is all about the sharpness of your printed image. If the resolution is too low, your banner will look pixelated and unprofessional when printed at full size.
Imagine your computer screen is made of tiny points of light (pixels). For a crisp image on-screen, 72 DPI is often fine. But printing is a different beast entirely; it needs a much higher density of dots to create a sharp, clear finish.
For a full-size pull up banner, your artwork should be created at 150 DPI at its final print size. This is the sweet spot that ensures your images and text stay sharp and legible, even up close, with no distracting blurriness.
Understanding Bleed and Safe Area
When we print your banner, we print it on a larger sheet of material and then trim it down to the final, precise size. To prevent any unsightly white slivers along the edges after trimming, we need your design to extend slightly beyond the final cut line. This extra bit is called the bleed.
Think of it as a safety buffer for your design. For most pull up banners, we recommend a bleed of at least 3mm on all sides.
On the flip side, the safe area (or safe zone) is the inner margin where you should place all your critical elements—like your logo, text, and contact details. Keeping everything inside this zone guarantees nothing important gets accidentally trimmed off during the finishing process. And if you're using a QR code, remember its design matters; check out this guide on how to design a QR code for maximum scannability and appeal to make sure it works perfectly.
Your Print-Ready Artwork Checklist
To make this whole process as smooth as possible, we’ve put together a quick checklist and a summary table. Nailing these details from the start saves time and ensures a flawless result.
For a more in-depth look, you can always check our guide on uploading artwork for custom banners.
-
Correct File Format: Always save your final design as a print-ready PDF. While high-quality JPG or PNG files can work in a pinch, PDF is the industry standard. It locks in your fonts, images, and layout, so what you send is exactly what we print.
-
CMYK Colour Mode: Your computer screen displays colours using an RGB (Red, Green, Blue) model. Commercial printers, however, use a different process: CMYK (Cyan, Magenta, Yellow, Black). Designing in CMYK from the beginning ensures the colours you see on your screen will be a much closer match to the final printed banner.
-
Embedded or Outlined Fonts: To avoid any font-related glitches (like your carefully chosen typeface being replaced by a default one), you need to either embed the fonts directly into your PDF file or convert all text to outlines (sometimes called 'curves'). This essentially turns the text into a fixed shape, so it prints perfectly every time.
Here's a quick summary of what our print team looks for in a perfect artwork file.
Artwork Specification Checklist
| Specification | Recommendation | Why It Matters |
|---|---|---|
| Resolution | 150 DPI at full size | Ensures images and text are sharp and not pixelated. |
| Colour Mode | CMYK | Matches printer colour profiles for accurate colour reproduction. |
| Bleed | 3mm on all sides | Prevents white edges after the banner is trimmed to size. |
| Safe Area | Keep text/logos 50mm from edges | Guarantees no critical information is cut off or hidden by the stand. |
| File Format | Print-Ready PDF | Preserves fonts, images, and layout for consistent printing. |
| Fonts | Outlined or Embedded | Prevents font substitution issues on our printing systems. |
Following these guidelines is the best way to ensure your pull up banner looks exactly as you imagined it – crisp, vibrant, and professional.
Choosing the Right Materials, Stands and Finishes
Getting the right pull-up banner size is a great start, but it’s just one piece of the puzzle. To create a display that truly reflects your brand’s quality, you need to look at what it’s made of—from the graphic panel itself to the base it stands on.
These components are what separate a good banner from a great one. They determine not just how your banner looks on day one, but how it holds up event after event. Think of it as the difference between a one-off display and a genuine long-term marketing asset.
It’s like buying a good suit. You wouldn't just check the size on the label; you’d feel the fabric, check the stitching, and see how it hangs. Your banner deserves that same attention to detail.
Selecting the Best Graphic Material
The material your design is printed on has a huge impact on its final appearance and durability. Each option we offer has distinct benefits, tailored to different uses and budgets.
-
Standard PVC: This is our most popular and cost-effective choice. It's tough, waterproof, and makes colours pop, making it a reliable workhorse for most indoor events.
-
Premium Fabric: If you're after a more high-end feel, consider a wrinkle-resistant fabric. This material gives you a sophisticated, glare-free finish that’s perfect for premium brands, photography backdrops, or upmarket retail spaces.
-
Eco-Friendly Options: We also have PVC-free materials for businesses focused on sustainability. These alternatives deliver excellent print quality while helping to reduce your environmental footprint.
The right material ensures your message is presented with the clarity and professionalism it deserves.
Understanding Banner Stands and Bases
The stand is the hardware that does all the heavy lifting. While they might look similar at a glance, there are key differences between budget and premium options that really affect stability and longevity.
A budget-friendly stand is absolutely fine for light, infrequent use—think a one-day event or a static display in a quiet reception area. It’s lightweight and gets the job done without any fuss.
For repeated use at busy trade shows, conferences, and exhibitions, a premium stand is a worthwhile investment. These feature a heavier, more stable base, a stronger retraction mechanism, and more robust components. They’re built to withstand constant transport and setup without letting you down.
This choice directly impacts the lifespan of your display. For a deeper dive into the hardware, check out our guide to portable display stands for exhibitions to find the perfect match for your needs.
The Finishing Touch: Lamination
Finally, let’s talk about the finish. Lamination adds a protective layer over your print, shielding it from the scratches, scuffs, and UV light that can cause colours to fade over time.
For most event spaces, a matte lamination is the best way to go. Exhibition halls are often filled with bright spotlights that can cause intense glare on glossy surfaces, making your banner difficult to read. A matte finish diffuses this light beautifully, ensuring your message remains clear and legible from every angle.
Placing Your Order: Quick, Simple, and Secure
Ready to get started? We’ve made ordering your pull-up banner incredibly straightforward. No hoops to jump through, no complicated forms—just a clear path to getting a brilliant banner, fast.
The first step is picking the right size for your needs on our website. Once you've found the perfect fit, just add it to your basket and upload your artwork. While we can work with various file types, a print-ready PDF will always give you the best results.
Why You Can Trust Banner Printing Ltd
Once you’ve sent us your file, our work truly begins. This is where you see the Banner Printing Ltd difference. Every single piece of artwork goes through a free pre-flight check by our in-house design team. We personally inspect your file to make sure the resolution is spot-on and it’s perfectly set up for printing, catching any potential hiccups before they become a problem.
We’re firm believers in getting it right the first time. Think of our expert file check as a quality guarantee—it’s our promise that your finished banner will look every bit as professional as you imagined.
From our UK facility, we print and dispatch most banners within 24-48 hours. And to make your life easier, every order comes with a durable, padded carry case, so you can transport your banner to your next event without a scratch. With our speedy and reliable delivery, your new banner will be at your door and ready for action in no time.
Got Questions? We've Got Answers
Even after covering the basics, a few specific questions always seem to pop up. Here are the quick, no-fuss answers to the things our customers ask most often about pull-up banner sizes, artwork, and everyday use.
What’s the Most Popular Pull-Up Banner Size?
Hands down, it's the 850mm x 2050mm. This size has become the industry go-to for a reason. It strikes that perfect sweet spot between making a real visual impact and still being incredibly easy to handle, which is why you’ll see it everywhere from trade shows and shop promotions to corporate reception areas.
Can I Reuse My Pull-Up Banner Stand?
Of course! That’s one of the best things about investing in a quality stand. Our premium units are built to last, so when you're ready to launch a new campaign or update your message, we can simply print a new graphic for you. It’s a brilliant, cost-effective way to keep your marketing fresh without forking out for a whole new system.
Expert Tip: Think of a quality stand as a long-term investment. It's designed to take the knocks of repeated use, meaning you can just swap out the graphics for years to come and save a lot of money in the process.
How Should I Supply My Artwork?
To get that crisp, professional finish, a print-ready PDF is the way to go. Make sure your design is set up in CMYK colour mode and has a resolution of at least 150 DPI when viewed at its final print size. And don't forget the technical bits: add a 3mm bleed on all sides and keep your essential text and logos tucked safely inside the designated safe area.
How Portable Are These Banners?
Incredibly portable. Every single pull-up banner we sell comes with its own padded carry case, designed to make transport a breeze while protecting your investment. The banner retracts snugly into its lightweight aluminium base, making it a simple one-person job to carry by hand or pop in the car.
Ready to create a professional display that turns heads? At Banner Printing Ltd, we make it easy to pick the perfect pull-up banner size and get a flawless print delivered right to your door, fast. Take a look at our full range of pull-up banners and get started today.


