A step and repeat banner is your secret weapon for creating a professional photo opportunity at any event. It’s that iconic logo-covered wall you see behind celebrities on the red carpet, and its job is to guarantee brand visibility in every single picture.
What Is a Step and Repeat Banner?
Ever watched a red-carpet event and noticed that branded backdrop where all the photographers are snapping away? That wall, covered in a smart, repeating pattern of company logos, is a classic step and repeat banner. But it's far more than just a bit of decoration; it’s a seriously powerful marketing tool designed to turn any space into a professional photo zone.
Think of it as a branded stage. The name "step and repeat" perfectly describes its function: a guest steps in front of it to have their photo taken, and the logos repeat in a pattern across the entire backdrop. This brilliantly simple design ensures that no matter where someone stands, the sponsoring brands are always in the shot.
Turning Walls into Opportunities
At its core, a step and repeat banner provides a clean, consistent, and branded background for photos. In doing so, it unlocks a few key advantages for event organisers and sponsors.
- Massive Brand Visibility: Every photo taken becomes a mini-advert. As guests share their pictures on social media, your brand awareness spreads organically.
- A Professional Atmosphere: A well-designed backdrop instantly makes an event feel more organised, polished, and important. It signals quality.
- An Enhanced Guest Experience: It gives attendees a fun, designated spot to capture memories, encouraging them to mingle and engage with the event.
- Better Event Flow: When you place one at an entrance or another key spot, it naturally directs foot traffic and creates a central gathering point.
Where You’ll See Them
While they’re famous for high-profile film premieres and awards ceremonies, step and repeat banners are incredibly versatile. Their power to generate buzz and create memorable photos makes them a must-have for all sorts of gatherings across the UK.
You’ll commonly find them at:
- Corporate Conferences and Trade Shows: Creating a sharp, professional background for networking photos and exhibitor booths.
- Product Launches: Building excitement and a clear focal point to celebrate a new release.
- Charity Galas and Fundraisers: Giving sponsors the recognition they deserve while adding a touch of glamour.
- Weddings and Big Birthdays: Personalising the celebration with the couple's monogram or the guest of honour's name.
A step and repeat banner is essentially a silent brand ambassador. It works tirelessly in the background, making sure your brand or sponsors get the spotlight in every photo. It's a simple tool that delivers huge exposure long after the last guest has gone home.
Choosing Step and Repeat Banner Size and Material
Getting the size and material right for your step and repeat banner is a bit like choosing the perfect outfit for a big event. It needs to fit the venue, match the mood, and most importantly, make a fantastic first impression. This decision affects everything from how professional your backdrop looks to how well it photographs and how easy it is to handle on the day.
Let's break down the most popular choices to help you find the perfect fit for your event.
Matching Banner Size to Your Event
The size of your step and repeat banner should be all about scale and purpose. Go too small, and your backdrop gets lost in a big room. Go too big, and it can overwhelm a more intimate setting. It's all about balance.
Here are the go-to UK sizes and where they shine:
-
2.4 m × 2.4 m (approx. 8ft × 8ft): This square format is a real workhorse. It’s perfect for smaller gatherings, trade show booths, or photo walls where you expect small groups of two to four people. It gives you plenty of coverage without taking over the whole space.
-
3 m × 2 m (approx. 10ft × 6.5ft): Need a bit more room? This wider, rectangular size is brilliant for fitting in larger groups of four to six people. It's a popular pick for corporate events, entrance displays, and red-carpet moments where you want to capture bigger group shots.
The UK's printed signage market is booming, and banners are a massive part of that. While big backdrops are key for events, industry trends show that the 3 m × 1 m banner has become a standard for general commercial use, proving there's a huge demand for print that makes a real impact.
This quick guide can help you figure out if your event calls for a promotional banner or a different kind of informational sign.
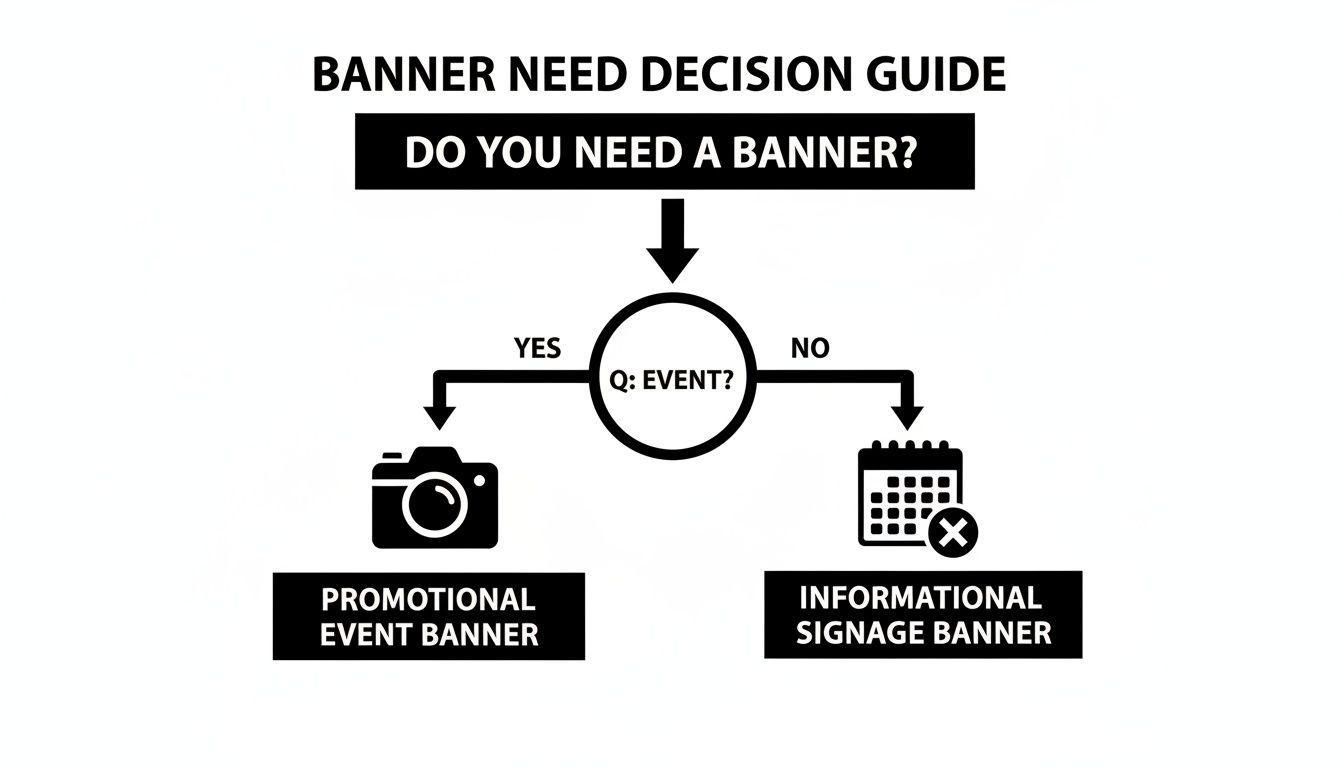
As the flowchart shows, if branding and photography are at the heart of your event, a custom step and repeat banner is exactly what you need.
Understanding Key Material Options
The material you pick is a big deal. It influences the final look, durability, and even how easy the banner is to transport. Each option has its own strengths, designed for different settings and goals. Just think about where and how you’ll be using it—that’s the best place to start.
The goal is to select a material that makes your design look incredible, not one that causes problems. If there’s any chance of flash photography, a non-reflective surface is absolutely essential to avoid ruining photos with glare.
A matte finish guarantees your logos stay sharp and clear, whatever the lighting. You can get into the nitty-gritty of choosing event backdrop banners with our detailed guide.
Step and Repeat Banner Material Comparison
To make things even simpler, here’s a quick guide to help you choose the best banner material based on your event's specific needs.
| Material Type | Best For | Key Benefit | Consideration |
|---|---|---|---|
| Matte Vinyl | Flash photography and high-traffic areas | Anti-glare finish prevents hotspots in photos | Heavier than fabric and needs to be rolled |
| Durable PVC | Outdoor events or long-term installations | Weatherproof, waterproof, and highly resilient | Can be stiff and prone to creasing if folded |
| Seamless Fabric | Premium indoor events and elegant settings | Lightweight, machine-washable, and seamless | More expensive and less suited for outdoor use |
Each material delivers a professional finish, but the right one depends entirely on your specific requirements for the day.
Making Your Final Decision
Picking the perfect size and material combo doesn't have to be a headache. Just start by asking yourself three quick questions about your event:
- Venue: Is it indoors or outdoors? A windy outdoor spot needs tough, durable PVC, while a controlled indoor space is perfect for a premium fabric finish.
- Budget: What have you set aside for the backdrop? Matte vinyl gives you a fantastic balance of quality and cost. Fabric offers that high-end feel but comes with a higher price tag.
- Aesthetics: What’s the vibe you're going for? For a perfectly smooth, luxurious look, seamless fabric is the clear winner. For maximum durability and punchy, vibrant colours, you can't go wrong with vinyl.
By thinking through these points, you can confidently choose a step and repeat banner that not only looks brilliant but also works perfectly for your event.
Designing Step and Repeat Banner Artwork
The real magic of a step and repeat banner isn't just the material or size—it’s the artwork. A brilliant design makes sure every logo is sharp, balanced, and perfectly framed in photos. Get it wrong, and you end up with a cluttered mess that cheapens your brand and leaves sponsors wondering why they bothered.
Think of designing your banner like laying tiles. Each logo is a vital piece, and the pattern you create determines the final look. The goal is a backdrop that looks professional and intentional, not like a random collage. This means nailing both the creative layout and the technical file prep.
Mastering Logo Placement and Layout
One of the biggest mistakes we see is just lining logos up in straight, uninspired rows. It might seem simple, but this layout is static and often leads to awkward photos where someone's head completely blocks out a sponsor. To create a backdrop that really works, you need a smarter arrangement.
These layouts give you much better logo visibility in every shot:
- Checkerboard Pattern: This classic approach staggers the logos in alternating rows, just like a chessboard. It’s a simple trick that guarantees at least one or two logos will always be clearly visible next to someone’s head and shoulders.
- Diagonal Layout: Arranging logos diagonally adds a sense of movement and makes the whole banner more visually interesting. It breaks up the monotony and helps ensure wider logo coverage in photos.
The key is balance. Your pattern needs enough negative space—the empty area around each logo—to let the design breathe. Jamming too many logos together makes them hard to read and just looks cheap. Give each brand its own space to shine.
For a deeper dive into making your visuals pop, take a look at our complete guide on how to design a banner.
Getting the Technical Details Right
A fantastic design concept can be completely let down by poor technical setup. To ensure your banner prints sharp, vibrant, and exactly as you pictured it, you have to get your artwork file right. It’s not as daunting as it sounds; it just means paying attention to a few crucial details.
These are the non-negotiables for any print-ready file:
- Resolution is King: Your artwork absolutely must be set to 300 DPI (dots per inch) at the final print size. Using low-resolution logos pulled from a website will result in a blurry, pixelated disaster when blown up on a huge banner. Always get the original, high-quality logo files.
- Use Vector Logos: Whenever you can, use vector files like .AI, .EPS, or .SVG. Unlike pixel-based images (like JPGs), vectors can be scaled to any size without losing a drop of quality. This is your guarantee for perfectly crisp logos.
- Set the Correct Colour Profile: Make sure your design software is set to CMYK (Cyan, Magenta, Yellow, Key/Black). This is the standard colour model for professional printing. If you design in RGB (Red, Green, Blue), which is for screens, your colours can come out looking dull or just plain wrong.
Common Pitfalls and How to Avoid Them
Even with the best intentions, small mistakes can have a big impact on your final step and repeat banner. Knowing the common tripwires helps you sidestep them from the start.
Here’s a quick checklist to keep you on the right track:
Do:
- Do keep the design clean and focused on the logos.
- Do use a neutral background like white, grey, or black to make the logos pop.
- Do make logos large enough to be easily read from a distance—aim for between 8 to 11 inches wide.
Don't:
- Don't use busy or patterned backgrounds that fight for attention with the logos.
- Don't place logos or text too close to the edges where they might be hidden by the stand or hem.
- Don't forget to proofread everything one last time before sending it to print!
If you're exploring other creative options for your event, you might find some great ideas in this guide on how to make a photo backdrop for your event. By following these design principles, you’ll create a step and repeat banner that not only looks professional but turns every photo into a marketing victory.
Assembling and Transporting Your Banner Stand

A professional step and repeat banner needs to look impressive at your event, but getting it set up shouldn't feel like a chore. Thankfully, modern banner stands are designed for ridiculously easy assembly. You don't need a specialist crew to achieve that flawless, high-end finish.
In fact, with a bit of practice, you can have your entire backdrop ready to go in minutes. It really just comes down to knowing which type of frame you have. Most are built for speed, letting you focus on the more important parts of running your event.
Understanding Your Banner Stand Type
You'll almost always come across two main types of stands: telescopic frames and pop-up displays. They assemble a bit differently, but both are incredibly user-friendly.
- Telescopic Frames: Think of these like heavy-duty tent poles or adjustable camera tripods. They’re made of lightweight aluminium poles that you simply extend to your desired height and width before locking them in. It's an intuitive, snap-together process that gives you tons of flexibility.
- Pop-Up Stands: These are even simpler and work just like an accordion. The entire frame expands from a compact bundle into a full-sized grid in one smooth move. You just listen for the clicks as the locking mechanisms secure the structure.
Both options are designed to be set up by one or two people without any special tools. That makes them perfect for busy event organisers who need something that just works.
The real beauty of modern backdrop banner stands is their clever engineering. They are built to be robust enough to create a taut, seamless display, yet lightweight and simple enough for anyone to assemble with confidence.
A Simple Step-by-Step Assembly Guide
While the exact instructions can vary slightly from model to model, the basic steps for setting up a telescopic frame are pretty universal. Follow this sequence, and you'll get a stable, professional-looking backdrop every time.
- Lay Out All Components: First things first, unpack everything from the carry case and lay it all out on the floor. Getting a clear view of all the poles and feet stops any confusion before it starts.
- Assemble the Base: Attach the vertical poles to the weighted feet. Make sure they're screwed in tightly to create a solid foundation for your banner.
- Extend the Vertical Poles: Raise the vertical poles to the height you need, checking they're both at the same level. Most use a simple twist-lock or clip system to hold them securely in place.
- Attach the Horizontal Crossbars: Now, connect the top and bottom horizontal poles. It's easiest to start with the top one, extending it to the right width and securing it to the vertical supports. Then, do the same for the bottom bar.
- Attach the Banner: Time for the main event. Carefully unroll your banner. Most vinyl or fabric banners have pole pockets at the top and bottom. Just slide the horizontal poles through these pockets before you attach them to the frame. If your banner uses eyelets, use bungee cords or zip ties to attach it securely.
- Final Adjustments: With the banner in place, take a moment to adjust the tension. You want to eliminate any sagging or wrinkles. Make sure the frame is standing straight and the banner is perfectly taut for that clean, professional look.
Transport and Long-Term Care Tips
Packing down and storing your banner properly is just as important as setting it up. Get into good habits now, and you’ll massively extend the life of both the print and the hardware, protecting your investment for many events to come.
To keep your step and repeat banner in top condition:
- Always Roll, Never Fold: This is the golden rule, especially for vinyl banners. Always roll the print with the graphic facing outwards. Folding creates permanent creases that are almost impossible to get out and will completely ruin the look of your display.
- Use the Padded Carry Case: That case your stand came with isn't just for making it easy to carry; it’s essential protection. It stops the poles and hardware from getting scratched, dented, or lost between venues.
- Store in a Cool, Dry Place: When your banner is not in use, keep it stored somewhere away from direct sunlight and extreme temperatures. This simple step prevents the print from fading and protects the hardware from any long-term damage.
Step and Repeat Banner Pricing and Turnaround
Let's talk numbers. Getting a handle on costs and timelines is key to keeping your event plan running smoothly. The price for a step and repeat banner isn't just one flat fee; it's built from a few different parts. Knowing what they are means you can budget properly without any nasty surprises down the line.
The two biggest things that shape the cost are the banner's size and the material you choose. It makes sense that a massive 3m x 2m backdrop will cost more than a standard 2.4m x 2.4m one – it simply uses more material and ink. In the same way, a premium seamless fabric with its elegant, lightweight feel will have a higher price point than a classic matte vinyl.
Breaking Down the Costs
Once you've sorted the size and material, a few other choices will influence the final quote. Think of it like customising a car – every feature you add adjusts the total.
The main cost drivers to keep in mind are:
- The Stand Type: A heavy-duty telescopic stand built for years of use is more of an investment than a basic, lightweight frame you might only need for a single event.
- Design Complexity: Most printers will do a quick check of your file for free. But if you need their design team to make major changes or create something from scratch, that will usually add a fee.
- Added Services: Need it yesterday? Opting for an express production slot or a professional artwork review will also affect the total price.
So, a basic 2.4m x 2.4m vinyl banner with a standard stand could be the perfect entry-level choice for a local business launch. On the other hand, a high-profile corporate gala might call for a premium package: a huge fabric banner, a robust stand, and rush delivery to meet a tight deadline.
Typical Turnaround Times in the UK
When you're up against an event deadline, speed is everything. The demand for fast, reliable service is pushing the UK custom printing market to grow, with some projections showing it could hit USD 4,243.6 million by 2030. You can read more about the UK custom printing market growth on grandviewresearch.com.
What does that mean for you? Most professional printers are set up for lightning-fast production. A standard turnaround is often just 24 to 48 hours from the moment your artwork gets the green light. The key phrase there is "artwork gets the green light." The clock doesn't start until your file is confirmed as print-ready, so make sure it meets all the tech specs from the get-go to avoid delays.
We print and dispatch from our Manchester facility, which means we can offer free, tracked UK delivery on all step and repeat banner orders. This helps you save on shipping costs and get your backdrop delivered quickly and reliably.
If you're in a real pinch, most printers offer a rush or express service for an extra charge, which bumps your order to the front of the queue. But the easiest way to avoid that extra cost is simple: plan ahead. Get your final artwork submitted as early as you possibly can.
Integrating Step and Repeat Banners in Event Strategy
A modern step and repeat banner isn't just a backdrop anymore. It's the vital link between your physical event and its online buzz. If you think smart, that simple photo opportunity becomes a powerful machine for generating online engagement, getting your brand seen far beyond the four walls of the venue.
The easiest win? Weave a memorable event hashtag right into the banner design. A simple, clear hashtag like #YourEvent2024 next to the logos prompts every single guest to tag their photos when they share them. Just like that, you're amplifying your message across social media.
From Photo Zone to Viral Campaign
This simple trick turns your attendees into genuine brand ambassadors. When they post their professional-looking photos, they’re not just sharing a memory—they’re giving your event and its sponsors a personal endorsement. That kind of authentic, user-driven promotion is pure gold and creates a wave of excitement that traditional advertising just can't buy.
And if you need something more dynamic, you can always explore high-impact alternatives like LED video walls. They can work alongside your banner or even replace it, offering endless possibilities for branding and content.
Embracing Sustainable Event Solutions
Event planning has changed. Today, both attendees and sponsors care about the environmental impact, and making eco-friendly choices is a massive part of a modern event strategy. The good news is you can match your branding with these values by choosing sustainable banner materials.
Even with environmental concerns guiding decisions, businesses still know the power of a physical banner. It gives you a tangible presence that works perfectly alongside your digital campaigns. You can find out more about how print and digital work together by checking out more insights about banner advertising on statista.com.
Choosing a PVC-free fabric or another recyclable material for your step and repeat banner sends a powerful signal. It shows your organisation is serious about its responsibilities, which builds trust and appeals to a more conscious audience.
Creating an Immersive Brand Experience
To really squeeze every drop of value out of your banner, don't just put it against a wall. Build a complete, immersive photo experience around it. A well-planned setup gets more people involved and produces far better, more shareable photos.
Here’s a quick checklist to take your photo zone to the next level:
- Lighting is Everything: Good lighting is non-negotiable. Use professional lights to get rid of harsh shadows and make sure everyone looks their best.
- Bring in Fun Props: Branded props, silly costume bits, or signs that tie into your event theme spark creativity and make the photos way more interesting.
- Don't Forget the Floor: A red carpet or a custom-branded floor runner finishes the look. It makes the whole experience feel more exclusive and polished.
Pull all these elements together, and your step and repeat banner becomes the heart of a memorable brand activation that keeps delivering results long after the last guest has gone home.
Step and Repeat Banner FAQ
You've got the vision, but a few last-minute questions always crop up before hitting that order button. It's smart to double-check. Getting these details right is what makes a step and repeat banner truly shine on the day. Here are the answers to the questions we hear most from UK event organisers.
How Big Should Logos Be on a Banner?
It all comes down to one thing: camera visibility. You need the logos sharp and clear in every photo, but you don't want them to distract from the people standing in front.
The sweet spot is usually between 8 and 11 inches wide for each logo. This size is big enough to be instantly recognisable in group photos and social media posts, yet small enough to create that clean, professional repeating pattern. It’s the perfect balance of brand presence and polished design.
Can I Use a Step and Repeat Banner Outdoors?
You absolutely can, but choosing the right material is non-negotiable. An indoor banner just won't cut it against the classic British weather.
For any outdoor event, a durable PVC vinyl banner is your best bet. It’s tough, waterproof, and weatherproof enough to handle whatever the day throws at it. Just as important is the stand—make sure it's properly weighted down with sandbags or secured with stakes. You don't want a sudden gust of wind turning your backdrop into a kite.
Your artwork file is the blueprint for the final print. Submitting a file that isn't print-ready is the most common cause of production delays. Always double-check your specs before you upload to ensure a fast, smooth process.
How Long Will My Banner Last?
Think of it as a long-term investment. With a bit of care, your step and repeat banner can be the star of countless events for years to come. How long it lasts really depends on the material and how you look after it.
A high-quality vinyl or fabric banner, when rolled up properly and kept in its carry case, will last for several years. The golden rule is to never fold it, as this creates permanent creases. Keep it clean, dry, and away from direct sunlight when in storage, and it’ll be ready to go whenever you are.
What Is the Best Way to Submit Artwork?
To get that crisp, professional print quality, your artwork needs to be spot-on. We always ask for logos as vector files (that’s .AI, .EPS, or .PDF formats). Why? Because vector graphics can be scaled up to any size without a hint of blurriness, which is absolutely essential for a large backdrop.
Also, make sure the entire design file is set to 300 DPI at the final print size and uses the CMYK colour profile. This prevents any pixelation or nasty colour surprises when it comes off the press.
Ready to create a professional backdrop for your next event? Banner Printing Ltd offers high-quality, custom step and repeat banners with fast, free UK delivery. Design your perfect banner today.


