Getting a clean finish when removing adhesive from glass all comes down to having the right tools on hand. A bit of preparation here saves you a world of frustration, preventing those annoying scratches, smudges, and leftover sticky patches.
The best game plan is to combine a few approaches: mechanical tools like scrapers to do the lifting, solvent-based cleaners to dissolve the gunk, and the proper safety gear. This way, you’re ready for anything, from a simple sticker to stubborn, baked-on vinyl graphics, without damaging the glass.
Your Essential Toolkit for a Flawless Finish
Before you even think about scraping or spraying, get your kit organised. This is the first real step towards getting a professional result. Trying to remove adhesive without the right gear is a recipe for a half-finished job or, even worse, permanent scratches on a shop window or glass display.
Think of it as setting the stage. A good toolkit covers all your bases and makes the whole process smoother and safer.
Mechanical and Safety Equipment
This is your hands-on gear—the tools you'll use to physically lift and scrape away the sticky stuff, plus the kit to keep you safe. It’s tempting to just grab the nearest sharp object, but the right tool really depends on the type of glass you’re working with and how stubborn the residue is.
- Plastic Razor Blades/Scrapers: These should be your go-to for most jobs. They’re surprisingly good at getting under the edge of stickers and scraping off soft glue, and they’re much less likely to scratch the glass.
- Single-Edge Metal Razor Blade: Keep this for the really tough, baked-on adhesives, and only use it on non-tempered glass. A fresh, sharp blade held at a low angle is key to avoiding gouges.
- Solvent-Resistant Gloves: A must-have. Many chemical removers are harsh on the skin, and a good pair of nitrile gloves will keep you protected.
- Safety Goggles: An easy one to forget, but crucial for protecting your eyes from chemical splashes or bits of dried adhesive flying off.
- Quality Microfibre Cloths: You’ll need a few of these. They’re perfect for applying solvents and for the final wipe-down, as they won’t leave lint behind.
Solvents and Cleaning Agents
Chemicals do the hard work here, breaking down the sticky compounds so you can simply wipe them away. The golden rule is to always start with the mildest option and work your way up if you need to.
If you want to dive deeper into the different types, we've put together more advice on choosing the right adhesive remover.
A step that’s so easy to miss, but makes all the difference, is the final clean. Once the adhesive is gone, some solvents can leave behind a hazy film. Getting that streak-free shine is what separates a decent job from a professional one.
To get that truly perfect, crystal-clear finish, a high-quality glass cleaner is non-negotiable. It will cut right through any oily film left by products like WD-40 or citrus-based removers. That final wipe with a clean microfibre cloth is what gives you that flawless look, especially on commercial window displays where every detail counts.
Mastering The Core Adhesive Removal Methods
Forget guesswork. Getting a flawless, professional finish on any glass surface comes down to a methodical approach, not just brute force. For businesses taking down large promotional decals or old signage, picking the right technique is the difference between a quick job and a costly mistake.
The most effective strategies fall into four main camps. Each is suited to different types of residue, from the light tack of a sticker to stubborn, sun-baked vinyl adhesive. Knowing when to use which method is the secret to getting it right the first time.
The Mechanical Approach: Using Scrapers
When you’re up against thick, built-up adhesive or old, peeling vinyl graphics, a mechanical approach is often your best bet to start. It’s all about physically lifting the material off the glass with a scraper. The real trick is to maintain a low angle—ideally between 30-45 degrees—to get right under the adhesive without digging into the glass itself.
Use steady, even pressure and always scrape in a single direction. A back-and-forth sawing motion is a classic mistake and a surefire way to cause fine scratches. If you're working with delicate or tempered glass, a plastic razor blade is the only safe choice. Keep the sharp metal blades for tougher jobs on standard, sturdy glass.
Applying Heat To Soften Adhesives
Heat is your best friend when dealing with old, brittle adhesives. It makes them pliable again and so much easier to peel away. A standard hairdryer on its highest setting is usually powerful enough for most sticker residues. Just hold it about 15 centimetres from the glass and keep it moving to avoid creating hot spots.
For bigger jobs, like removing large window vinyls, a heat gun offers more grunt. Always start on the lowest temperature setting. The goal is just to warm the adhesive enough to loosen its grip, not melt the vinyl into a gooey, impossible mess. You’ll know it’s working when the edges of the sticker or decal start to lift away easily.
The real art of adhesive removal lies in combining methods. For instance, gentle heat can make the mechanical work of scraping significantly easier, reducing the force needed and minimising the risk of scratching the glass.
Using Solvents To Dissolve Residue
Once the bulk of the material is gone, you’ll probably be left with a sticky residue. This is where solvents come in. They work by chemically breaking down the adhesive, allowing you to simply wipe it away.
Common household options like isopropyl alcohol (rubbing alcohol) are excellent for cutting through many types of glue. Citrus-based cleaners are another brilliant option, especially for oil-based adhesives, and they tend to have a much more pleasant scent. Whatever you use, always apply the solvent to a microfibre cloth first—not directly onto the glass—to control the application and stop it from dripping everywhere.
This simple decision tree can help you choose the best starting point for your project.
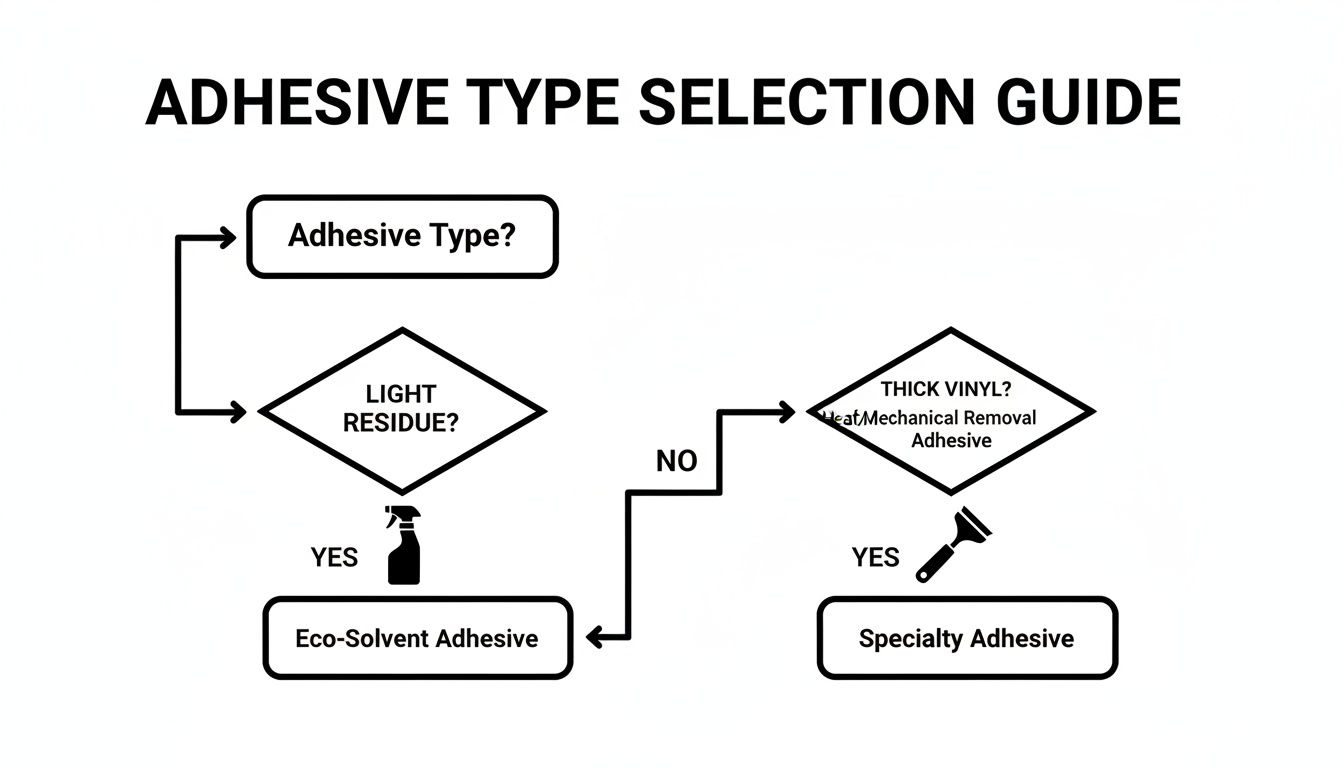
As the guide shows, lighter residues respond well to solvents, while thicker vinyls almost always require heat or mechanical methods first to get things started.
Commercial-Grade Adhesive Removers
For the toughest jobs, sometimes you need to bring in the big guns. Commercial-grade adhesive removers offer concentrated power designed for professional use. It's no surprise that powerful solvent-based removers hold a dominant 52.9% global market share.
However, with stringent UK safety standards in place, we've seen a 15-20% rise in the adoption of non-toxic, biodegradable alternatives since 2020. These products are perfect for the fast turnaround needs of print specialists and fit-out crews on construction sites.
Always check the product label to ensure it's safe for glass and follow the safety instructions to the letter, especially regarding ventilation. For a more detailed look at tackling sticky situations, check out our full guide on https://bannerprintingltd.co.uk/removing-sticker-residue-from-glass/. Many of the same principles of careful tool use also apply when you need to clean paint off windows without leaving a single scratch.
Adhesive Removal Method Comparison
To make things even clearer, here’s a quick breakdown of how these methods stack up against each other. Choosing the right tool for the job saves you time, effort, and potential damage.
| Method | Best For | Tools Required | Pros | Cons |
|---|---|---|---|---|
| Mechanical (Scraping) | Thick, old vinyl; layered stickers; heavy adhesive buildup | Metal or plastic razor blade scraper, safety gloves | Fast for bulk removal; highly effective on stubborn materials | High risk of scratching glass if done incorrectly; not for tempered glass |
| Heat Application | Brittle, aged vinyl; large decals; temperature-sensitive adhesives | Hairdryer or heat gun, scraper, gloves | Softens adhesive for easy peeling; non-chemical; reduces scraping force | Can cause damage if overheated; may not work on all adhesive types |
| Solvents | Light to moderate sticky residue; tape marks; fresh sticker glue | Microfibre cloths, isopropyl alcohol, citrus cleaner, acetone | Excellent for final cleanup; effective on a wide range of residues | Can be messy; requires good ventilation; may damage surrounding surfaces |
| Commercial Removers | Stubborn, cured adhesives; industrial glues; large-scale jobs | Product-specific applicators, cloths, PPE (gloves, goggles) | Extremely powerful and fast-acting; formulated for specific adhesives | Often contains harsh chemicals; requires strict safety precautions |
Ultimately, the best approach is often a combination. Start with heat or a scraper for the heavy lifting, then finish with a solvent to leave the glass perfectly clean and clear.
Safety Protocols for Handling Glass and Removers
Getting a clean, professional finish is only half the battle. When you’re removing adhesive from glass, especially in a commercial setting, doing the job safely is what truly matters. Skipping safety protocols can lead to injured staff, damaged glass, and mistakes that cost far more than the project is worth.
Before you even think about starting, getting your personal protective equipment (PPE) sorted is non-negotiable. This isn’t just a box-ticking exercise; it’s about protecting yourself from very real hazards.
- Safety Goggles: Absolutely essential. They shield your eyes from chemical splashes and tiny bits of debris, which is a common problem when scraping off old, brittle vinyl or stickers.
- Solvent-Resistant Gloves: Don’t make the mistake of using standard latex gloves. They’ll quickly degrade. You need proper nitrile or similarly tough gloves to protect your skin from the harsh chemicals in most commercial-grade removers.
Handling Tools and Different Glass Types
Sharp tools get the job done quickly, but they also carry the biggest risks. If you’re using a metal razor blade, the technique is everything. Always keep the blade at a low angle to the glass and scrape away from yourself using smooth, controlled movements. Trying to rush or using too much force is the quickest way to put a deep, ugly scratch in the glass—or worse, give yourself a nasty cut.
Even more important is knowing what kind of glass you’re dealing with. Never, ever use a sharp metal tool or concentrated heat on tempered glass. You’ll often find this type of safety glass in modern shopfronts, doors, and some vehicles. It’s designed to shatter into thousands of tiny, granular pieces when its surface is compromised.
Believe it or not, a single deep scratch from a metal blade can be enough to trigger this shattering effect. For tempered glass, stick to plastic scrapers and chemical solvents to avoid a dangerous and expensive disaster.
Chemical Safety and Proper Disposal
When you bring out the solvents, good ventilation is your best friend. The fumes from products like acetone or professional-grade removers can be powerful and harmful in spaces without much airflow. Make sure you open windows and doors to get fresh air circulating. For bigger indoor jobs, setting up a few fans is a smart move to keep the air moving.
Finally, a professional job includes responsible clean-up. Soaked rags, used gloves, and empty chemical containers need to be disposed of correctly according to local and UK workplace safety regulations. Following these best practices for glass cleaning and adhesive removal ensures a safe working environment for you and everyone else on site.
Effective Eco-Friendly Adhesive Removal Solutions
If your business champions sustainability, reaching for harsh chemical solvents isn't your only move. You can get a sparkling clean finish with powerful, eco-friendly solutions that skip the toxic fumes and reinforce your commitment to green practices. It's the perfect approach for cafes, wellness centres, or any brand where your environmental image really matters.

Often, the best natural cleaners can be made from simple items you probably already have in the cupboard. They use natural acids or oils to break down the sticky bonds in adhesive, making stubborn residue easy to wipe away.
DIY Natural Adhesive Removers
Before you buy a specialised product, give one of these surprisingly effective homemade solutions a try. They work wonders on light to moderate residue.
-
Baking Soda and Coconut Oil Paste: This combination is fantastic for tackling those tacky, gummy messes. Just mix equal parts baking soda and coconut oil until you have a thick paste. Slather it onto the adhesive, let it sit for 15-30 minutes, and then use a microfibre cloth to scrub the residue away in a circular motion. The baking soda provides a gentle abrasion while the oil gets to work dissolving the glue.
-
White Vinegar Solution: The acetic acid in white vinegar is a brilliant solvent for many types of adhesives. For the best results, warm the vinegar slightly—don't boil it—and apply it to the residue with a cloth. Let it soak for about ten minutes to really penetrate the glue before wiping it all clean.
This natural approach is more relevant than ever. In the UK, water-borne adhesives now dominate 56% of the market thanks to their low environmental impact. The trade-off? Their eco-friendly formula means they leave residue behind on roughly 40% of temporary installations, creating a constant clean-up challenge. You can dig deeper into these trends by exploring data on the UK adhesives market.
When you're using natural removers, patience is everything. Unlike harsh chemical solvents that work almost instantly, eco-friendly options need a bit more time to do their job. Giving them that extra 10-15 minutes to soak in can make all the difference.
Choosing Plant-Based Commercial Removers
If a DIY solution isn't quite cutting it, the market for plant-based, biodegradable adhesive removers has exploded. These products give you the power of a commercial-grade cleaner but without the nasty volatile organic compounds (VOCs).
Look for products that are:
- Citrus-Based: Many of the best eco-removers harness the power of citrus oil (d-limonene) to cut right through grease and glue.
- Soy-Based: These are known for their low evaporation rate, meaning they can keep working on stubborn adhesives for much longer.
- Biodegradable: Always check the label to make sure the product will break down naturally and won't harm the environment when you're done.
By opting for these greener alternatives, your business can maintain pristine, professional-looking glass while staying completely true to its sustainable values.
Troubleshooting Stubborn Residue and Common Issues

Sometimes, even after you’ve peeled off a sticker or graphic, you’re left with a frustrating, tacky film or a faint outline. This happens all the time, especially with adhesive that’s been baked on by the sun for years.
When you’re up against this kind of challenge, one product alone rarely does the trick. The best strategy is to combine methods—use one technique to weaken the bond, then another to finish the job. Layering your approach is the secret to breaking down even the most stubborn gunk.
Tackling Adhesive Ghosting
One of the most common headaches is 'ghosting'. This is that annoying, hazy silhouette left behind by old vinyl lettering, often seen on shop windows. It’s caused by a mix of microscopic glue particles and the fact the glass has weathered differently where it was covered.
To get rid of ghosting, you’ll need a two-pronged attack. First, grab a high-quality citrus-based solvent and a non-abrasive scrubbing pad to lift any lingering adhesive. Then, follow up with a thorough clean using a good glass polish or even some ultra-fine steel wool (grade #0000 only). This gently buffs the glass surface itself, restoring a clean, uniform finish.
These issues are a constant reality for UK businesses. A staggering 950 kt of flat glass was produced in the UK back in 2019, much of it ending up as shop fronts and displays. With the UK adhesives market projected to hit USD 2.83 billion by 2033, knowing how to deal with the aftermath is more important than ever.
Pro Tip: If you're combining heat and solvents, always heat first. A blast with the heat gun softens the glue. If you wipe solvent onto a hot surface, it just evaporates before it can work. Gentle heat followed by a solvent is the winning combination.
Working with Specialised Glass Surfaces
Not all glass is the same, and using the wrong tool on a delicate surface can be a costly mistake. Frosted, etched, or textured glass needs a completely different approach to standard, smooth panes.
-
Frosted or Etched Glass: Whatever you do, never use a razor blade or any abrasive material here. You will scratch and permanently ruin the finish. Stick to chemical removers. A gel-based adhesive remover is ideal because it clings to the surface without dripping. Let it sit, then gently work it with a soft-bristled brush before wiping clean.
-
Textured Glass: The tiny grooves in textured glass are a magnet for sticky residue. Your best bet is a good solvent and a stiff nylon brush (definitely not a wire one). The bristles are perfect for getting into all those little crevices to scrub out the gunk that a cloth would just glide over.
By tailoring your approach to the specific problem and the type of glass, you can conquer even the most difficult adhesive removal jobs and get a perfectly clean, professional result every time.
Your Adhesive Removal Questions Answered
Even with the right techniques, you’ll sometimes run into tricky situations. Getting the right answer is the key to avoiding costly mistakes, like a permanently scratched shop window or a ruined tint. We’ve put together answers to the most common queries we hear from UK businesses to help you get over those final hurdles.
Think of this as your go-to reference for those "what if" moments. A little extra knowledge ensures you can approach any job with confidence and achieve a flawless, professional result every time.
Can I Use a Razor Blade on Any Type of Glass Window?
Definitely not—you have to be extremely cautious here. A new, single-edge razor blade is brilliant on standard annealed glass (the kind you find in many older shopfronts), but it can easily scratch or even shatter tempered glass.
Tempered glass is often used for safety in modern doors and buildings, and it has a high surface tension that a deep scratch can compromise.
Always test your tool in a small, hidden corner first, no matter what type of glass you think it is. For tempered glass, it’s always much safer to use a plastic razor blade or scraper with a solvent to minimise risk. This simple check can prevent a costly disaster.
What Is the Best Way to Remove Old, Sun-Baked Vinyl Adhesive?
Old, sun-baked adhesive is one of the toughest challenges out there. The residue becomes brittle and practically welded to the glass. Your best bet is to combine a few methods.
First, gently heat the area with a hairdryer or a heat gun on its lowest setting to soften the adhesive. Once it's warm, carefully scrape away as much as you can with a plastic scraper. You’ll be left with a stubborn film, and for that, you'll need a good solvent. Try a citrus-based commercial remover or even some WD-40. Let it sit for 5-10 minutes so it can get to work, then scrub with a non-abrasive pad. Finish by wiping the glass clean with isopropyl alcohol to remove any oily film left behind.
Will Adhesive Removers Damage Window Tinting Film?
Yes, almost certainly. Most solvent-based adhesive removers will damage, discolour, or even dissolve window tinting film. Remember, the tint is applied to the inside of the glass. If you're removing a sticker from the interior of a tinted window, you absolutely cannot use harsh chemical solvents or sharp razors.
Instead, you need a much gentler approach:
- Warm, Soapy Water: This should always be your first and safest option. Use it with a soft microfibre cloth and a bit of elbow grease.
- Isopropyl Alcohol: For really stubborn spots, you can try dabbing the area with a cloth lightly dampened with isopropyl alcohol. But you must test it on a tiny, inconspicuous spot first, as some tints can still be damaged by it.
Patience is everything when working on tinted surfaces. If you rush the job with aggressive chemicals or tools, you’ll almost certainly ruin the film, forcing a costly replacement of the entire window tint.
At Banner Printing Ltd, we know that keeping your business looking its best is a top priority. Whether you're putting up new promotional banners or cleaning up after an event, having the right visuals makes all the difference. For high-quality, durable banners that make an impact, visit us at https://bannerprintingltd.co.uk.


