At its heart, a professional photography backdrop with stand is a simple but powerful tool: a portable system designed to create a clean, branded, or scenic background for your photos and videos. It’s the secret to instantly taking your visual content from amateur hour to studio quality.
Whether you're at an event, running an in-store promotion, or shooting products, this straightforward setup ensures your brand looks polished and consistent every single time.
Why a Professional Backdrop Is Your Secret Weapon
In the world of visual marketing, you get seconds—not minutes—to make a first impression. Let’s be honest, a cluttered office background or a creased sheet tacked to the wall doesn't just look bad; it can instantly damage your brand's credibility.
A dedicated photography backdrop with a stand is far more than just a piece of material. It's a strategic asset that broadcasts professionalism.
Think of it like the difference between a tailored suit and an off-the-rack outfit. Both get the job done, but one screams attention to detail, quality, and confidence. A high-quality backdrop does exactly the same thing for your brand’s image, transforming any space into a professional studio.
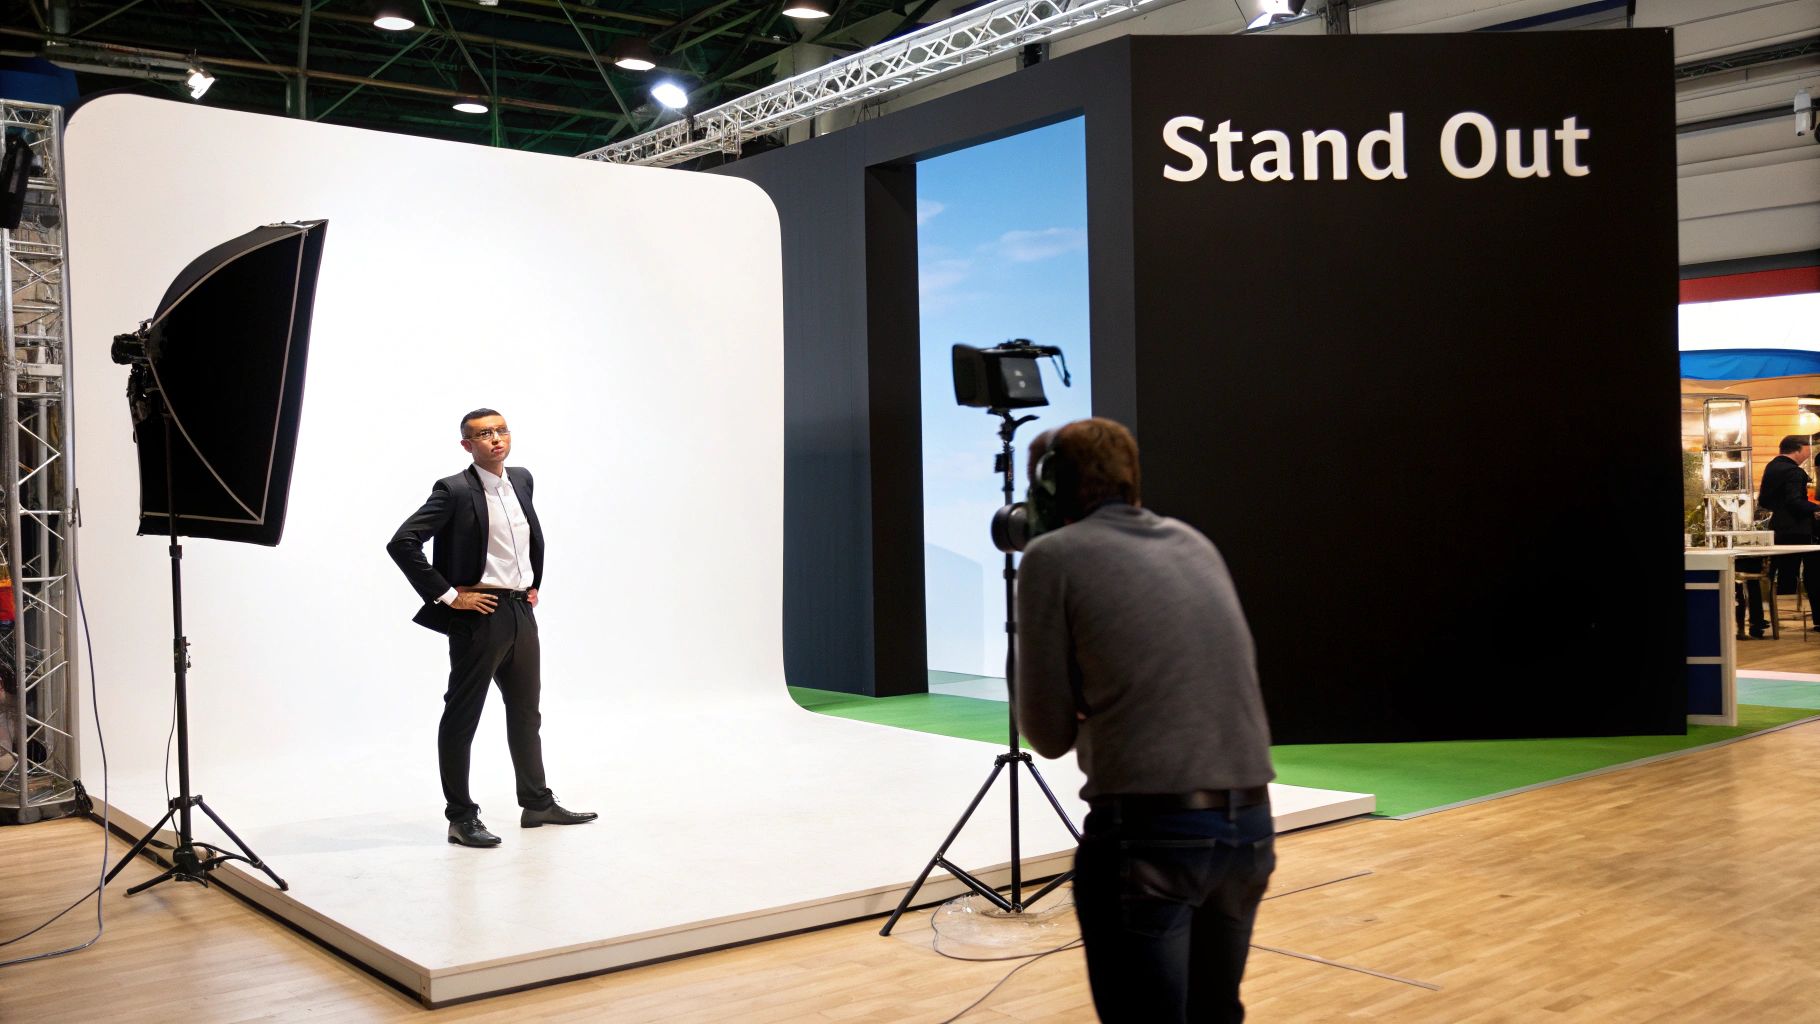
Elevate Your Brand Image Instantly
Picture this: you're at a bustling trade show, a corporate event, or hosting an in-store launch. A branded backdrop acts as a powerful visual anchor. It creates a controlled, consistent environment that reinforces your brand identity in every single photo and video taken. This consistency is absolutely vital for building brand recognition and trust.
The advantages go well beyond just looking good:
- Boosts Credibility: It sends a clear signal to customers, partners, and competitors that you invest in quality and take your brand seriously.
- Ensures Consistency: Your brand colours, logo, and messaging are perfectly represented, no matter where you are.
- Increases Engagement: A sharp-looking backdrop is an irresistible photo opportunity for attendees, sparking user-generated content that spreads your brand name for you.
A Growing Demand for Professional Visuals
The shift towards high-quality visual content isn't just a gut feeling; it’s a massive market trend. The UK's professional photography sector is projected to hit a market value of £1.9 billion in 2025, with commercial and event photography leading the charge. This explosion in growth underscores just how essential tools like a photography backdrop with stand have become for businesses and event organisers.
A professional backdrop cuts through the noise. It eliminates distracting backgrounds and puts the focus squarely on your subject—whether that’s a person, a product, or your brand message. It’s the simplest way to take control of your visual narrative.
This level of control is key. Choosing the right product photography backdrop can directly influence sales and customer perception. It's not just about aesthetics; it’s about commercial success.
To put it simply, investing in a backdrop system isn’t just another expense. It’s an investment in how your brand is perceived. It's a versatile, reusable tool that delivers value again and again, ensuring every visual touchpoint is polished, professional, and perfectly on-brand.
How a Professional Backdrop with Stand Delivers Instant Value
So, who really benefits from a professional backdrop? The short answer is almost any business that cares about its image. Here's a quick look at how different users can get immediate value.
| User Type | Primary Benefit | Example Use Case |
|---|---|---|
| Small Businesses | Professionalism on a Budget | Creating clean product shots for an e-commerce website in a small office space. |
| Event Organisers | Enhanced Attendee Experience | Setting up a branded photo wall at a conference for attendees to share on social media. |
| Marketing Agencies | Brand Consistency for Clients | Using a consistent backdrop for video testimonials and client case studies. |
| Retailers | In-Store Promotions | A vibrant, seasonal backdrop for in-store photo opportunities with new product lines. |
| Exhibitors | Attracting Booth Traffic | A bold, graphic backdrop that makes their trade show stand pop in a crowded hall. |
Ultimately, by taking control of your background, you take control of how the world sees your business. It's a small change that makes a huge difference.
Choosing Your Perfect Backdrop Material and Finish
The material of your photography backdrop is the bedrock of your visual message. It doesn’t just affect the look of your photos; it dictates how your display performs in the real world. Think of it less as a technical choice and more as a branding decision that tells your audience who you are.
Your choice of material directly impacts everything from durability and portability to the subtle textures that show up in your final images. A weatherproof option for an outdoor festival has a completely different job to do than a sophisticated setup for indoor corporate headshots. Let's break down the main options so you can make the right call.
Durable and Versatile Vinyl Backdrops
Vinyl is the undisputed workhorse of the backdrop world, and for good reason. It’s the reliable all-rounder, perfect for any business needing a durable, multi-purpose solution that just works. Its biggest strength is its resilience—it’s tough, tear-resistant, and ridiculously easy to clean. A quick wipe-down is usually all it takes to have it looking brand new.
This makes vinyl the go-to choice for high-traffic areas or any outdoor event where it might face the unpredictable British weather. For UK businesses doing the rounds at markets, festivals, or trade shows, a weatherproof vinyl backdrop is an absolute essential.
Elegant and Professional Fabric Backdrops
If vinyl is the practical workhorse, then fabric is the sophisticated show horse. Fabric backdrops, typically made from high-quality polyester, deliver a premium, elegant look with a soft, non-reflective surface. This material drapes beautifully and soaks up light, which is a massive help in cutting down the glare you often get with flash photography.
Because they’re so lightweight, fabric backdrops are also a breeze to pack up and transport. This makes them a superb choice for:
- Corporate Events: Creating a polished, professional setting for speaker panels and headshots.
- Studio Photography: Achieving that soft, even background for portraits or product shots.
- Exhibition Booths: Projecting a high-end, classy brand image indoors.
The trade-off? Fabric needs a bit more care to keep it clean and wrinkle-free. But for the visual payoff, it’s often well worth the effort.
Sustainable PVC-Free Eco Options
For brands where sustainability isn't just a buzzword but a core value, PVC-free materials are a fantastic alternative. These eco-friendly options give you excellent print quality and durability without the environmental baggage of traditional vinyl. Choosing a PVC-free backdrop sends a clear signal to your customers that you’re a brand that cares.
They perform brilliantly for indoor applications and are fast becoming the preferred choice for businesses looking to align their marketing materials with their green credentials.
The Critical Choice Between Matte and Gloss Finishes
Once you've settled on a material, the next decision is the finish. It might seem like a small detail, but it has a huge impact on your final images, especially when lighting comes into play. The choice is really between matte and gloss.
The finish on your backdrop is like the final coat of paint on a car—it defines how it interacts with light and determines the final impression. A matte finish absorbs light for a clean, professional look, while a gloss finish reflects it for a high-energy, vibrant effect.
For almost every photography and event situation, a matte finish is the way to go. Its non-reflective surface is specifically designed to absorb light from camera flashes and bright event lighting, which stops distracting glare and hot spots dead in their tracks. This ensures your branding, logos, and, most importantly, the people in front of the backdrop are always clear and sharp in photos.
A gloss finish, on the other hand, is highly reflective. While this can create a punchy, wet-look effect, it’s generally a nightmare for any situation involving flash photography. It’s best saved for specific decorative purposes where you actively want to catch the light and draw attention, rather than for creating a neutral background. For very specific uses like detailed product shots, you can find more tips in articles on choosing a background for jewellery photography. But for event backdrops, matte is almost always the safer, more professional option.
Finding the Right Stand for Stability and Portability
A brilliant backdrop is useless if it’s sagging, wobbly, or a pain to set up. The stand isn’t just some extra bit of kit; it’s the very foundation of your display. Choosing the right one is all about striking that perfect balance between rock-solid stability, ease of transport, and how fast you can get it up and running on-site.
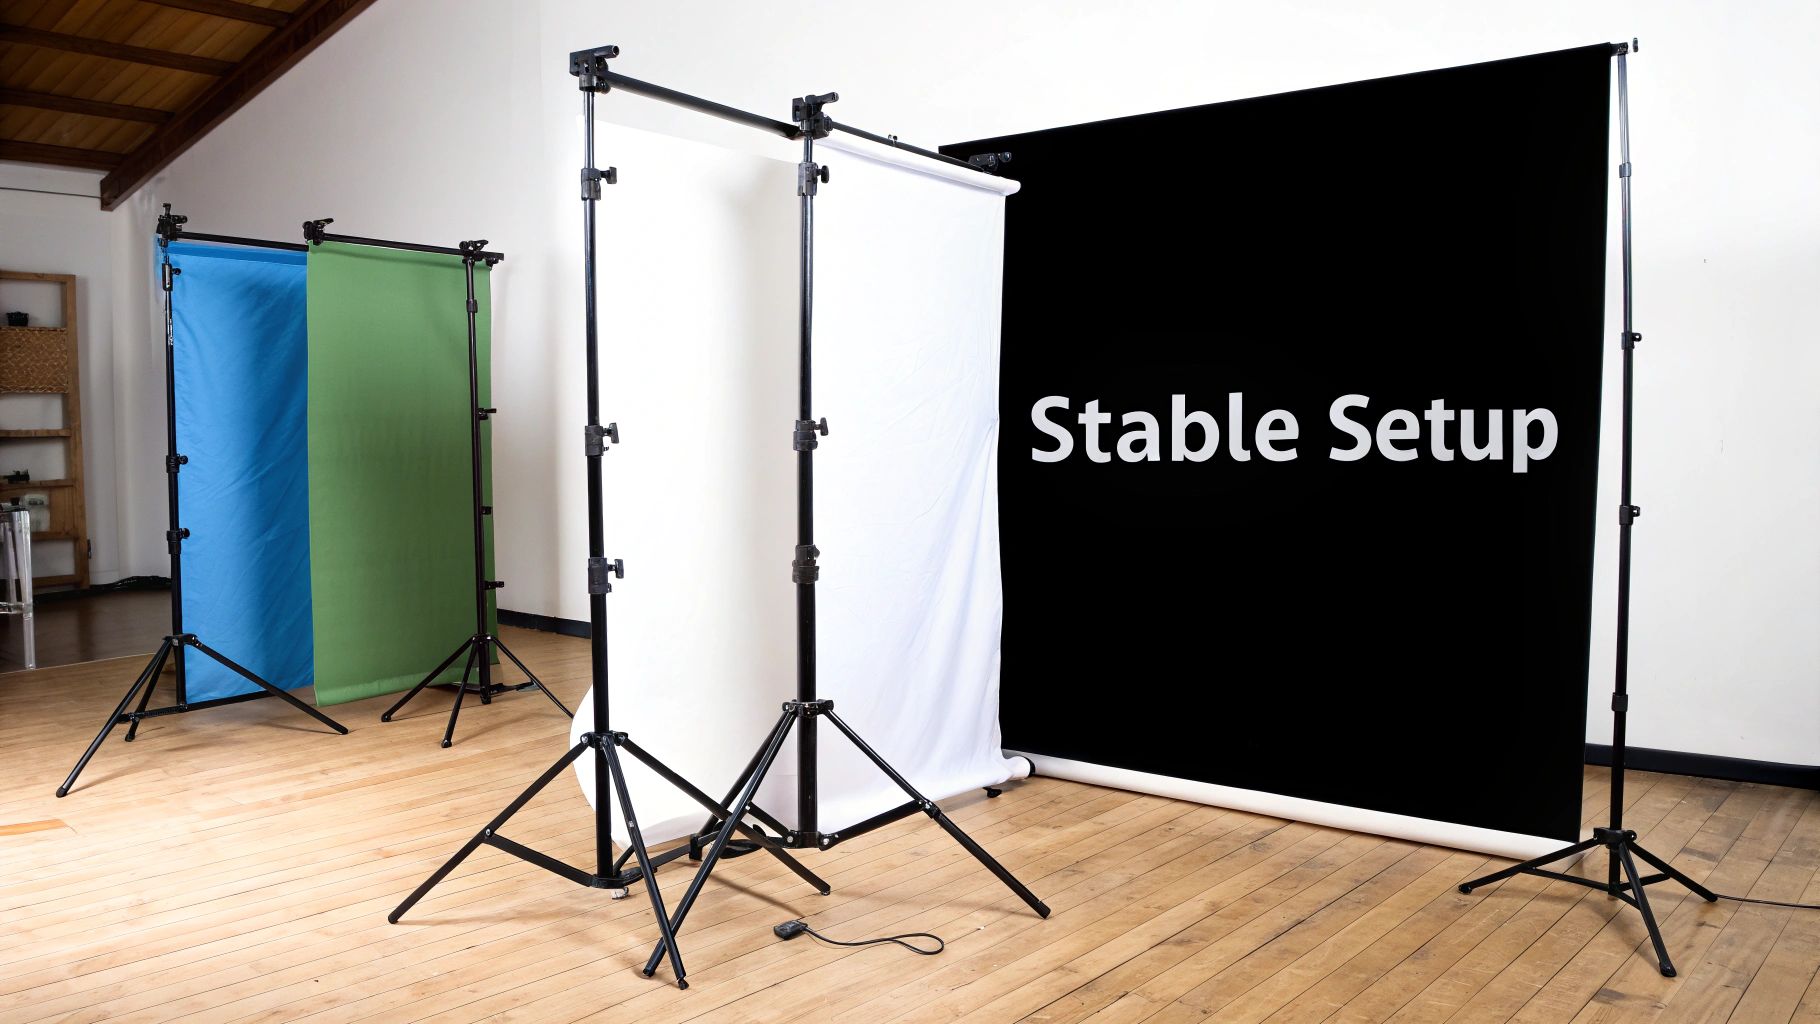
Think of it like choosing a vehicle. A small, nimble car is great for zipping around town (portability), but you'd want a heavy, sturdy truck for long hauls and tough jobs (stability). What you need really depends on where you're going and what the job demands.
Adjustable Telescopic Stands
For sheer versatility, nothing beats the classic telescopic stand. This is the go-to for most people. It features two tripod-style legs and a horizontal crossbar that you can adjust for both height and width. Its biggest advantage is that you can use a whole range of different-sized backdrops with just one stand system.
These are typically made from lightweight aluminium and pack down neatly into a carry bag. That makes them perfect for mobile photographers, small businesses on the move, or anyone needing a reliable photography backdrop with stand that one person can handle. It’s the ultimate flexible friend.
Simple Crossbar Systems
If you're watching the pennies, a simple crossbar system is a straightforward, no-frills option. They tend to be more basic and might not have the same range of adjustment as a telescopic stand, but for a permanent indoor setup—like a small home studio or a dedicated corner for video calls—they get the job done.
They’re perfectly fine for lightweight fabric backdrops in a controlled setting, but you might find they struggle with the weight of a heavy vinyl banner. They're best for situations where you set them up once and leave them there.
Robust Pop-Up Frames
When you need a flawless, taut finish and lightning-fast setup, pop-up frames are in a league of their own. These clever systems use an accordion-style frame that literally "pops" open in moments. Your backdrop (usually fabric) attaches with Velcro, giving you a perfectly flat, seamless graphic wall.
A pop-up frame is like a pre-built toolkit. Instead of fumbling with separate poles and connectors, you just expand one single unit. This massively reduces setup time, making it the top choice for busy exhibitors at trade shows and big corporate events.
They are a bit heavier and pricier, but you're paying for speed, stability, and an incredibly professional look. For any business that regularly attends exhibitions, the hours saved on setup alone make it a worthwhile investment. You can see more of these in our guide to portable display stands for exhibitions.
Backdrop Stand Comparison for UK Businesses
So, which stand is right for you? It really boils down to your specific needs. Are you a solo operator who values portability above all, or do you need maximum stability for a huge event? This quick table breaks it down.
| Stand Type | Best For | Setup Time | Portability | Typical Size Range |
|---|---|---|---|---|
| Telescopic Stand | Mobile photographers, small businesses, varied events | 5-10 minutes | Excellent | 1.5m to 3m wide |
| Crossbar System | Budget-conscious users, permanent indoor setups | 5-10 minutes | Good | Fixed or limited |
| Pop-Up Frame | Trade shows, exhibitions, corporate events | 1-3 minutes | Moderate | 2m to 4m wide |
At the end of the day, the best stand is the one that fits your budget, your team, and the places you’ll be using it. Think about how often you'll be packing it up and moving it—that will quickly tell you whether a nimble telescopic system or a heavy-duty pop-up frame is the smarter choice for your business.
Getting the Size Right for Maximum Impact
Choosing the size of your backdrop isn't just a practical decision about fitting it in the car. It’s about creating the perfect frame for your subject and making a powerful visual statement.
Go too small, and your shots will look cramped and amateurish. Go too big, and you're just paying for material you don't need while giving yourself a logistical headache. The real secret is matching the backdrop dimensions to exactly what you’re shooting.
Think of it like an artist's canvas. A simple headshot only needs a small canvas. But if you’re capturing a whole team at an awards night, you need a much wider canvas to get everyone in the shot without the distracting reality of the venue creeping in at the edges.
Sizing for Individuals and Small Groups
For solo portraits, professional headshots, or product shots of a single item, you simply don’t need a massive setup. A backdrop that's far too wide is just wasted material you have to lug around and set up for no good reason.
Here are a few common scenarios to guide you:
- Headshots and Bust Shots: A backdrop around 1.5 metres (approx. 5ft) wide is more than enough. This gives your photographer plenty of room to frame the subject’s head and shoulders without any background distractions peeking in from the sides.
- Full-Body Portraits (Single Person): To capture a full-length shot of one person, you'll want to go a bit wider to allow for different poses. A backdrop that’s at least 2 metres (approx. 6.5ft) wide is a safe bet, giving your subject space to move without breaking the illusion.
- Two or Three People: Shooting a small group, like a duo for a podcast cover or a three-person team for a website, means you need to expand your canvas. A width of around 2.4 metres (approx. 8ft) provides comfortable space, ensuring the people on the ends aren't brushing up against the edge of the frame.
Sizing for Events and Large Groups
Event photography is a completely different beast. Your backdrop is no longer just a background; it’s a centrepiece. It has to be big enough to work as a proper photo booth, a red-carpet-style media wall, or a professional stage setting. Skimping on the size here is a classic mistake that instantly makes an event feel smaller and less professional.
An event backdrop has to be generous. It needs to handle the unpredictable nature of group photos—people shifting around, different camera angles, and spontaneous poses. You need a backdrop that provides a clean, branded background no matter what’s happening in front of it.
For these larger-scale uses, wider is almost always better. A 3-metre (approx. 10ft) wide backdrop is a brilliant starting point for most event photo walls, easily accommodating groups of four to six people.
For those events where you want to make a truly impressive statement or expect larger groups, our popular 10ft x 8ft backdrop with stand is the perfect choice. It delivers that ideal combination of size and impact, creating a genuinely professional photo zone.
One final, crucial tip: always check your venue's physical limitations. Measure the ceiling height and the floor space you’ve been allocated. There's nothing worse than turning up on the day to find out your grand backdrop is too tall for the room or too wide for the designated spot. A quick measurement beforehand saves a world of trouble.
Preparing Your Artwork for a Flawless Print
A stunning photography backdrop begins long before the ink ever touches the material. It starts with your digital artwork. Getting your print file right from the beginning is the single most important step to guarantee your final backdrop looks sharp, vibrant, and completely professional.
Think of your design file as the blueprint for a building. If the measurements are off or the lines are fuzzy on the plan, the finished structure will have flaws. It's exactly the same with large-format printing. Nailing the technical details—like resolution, colour mode, and file format—is essential for a flawless result. Let's walk through what you need to know.
Understanding Print Resolution (DPI)
First up is resolution, which we measure in DPI (Dots Per Inch). Picture a mosaic. If you build it with massive, chunky tiles (low DPI), the image will look blocky and pixelated when you get close. But if you use thousands of tiny, intricate tiles (high DPI), the picture becomes sharp and crystal clear.
For something as large as a photography backdrop, your artwork needs plenty of "tiles" to look crisp. A computer screen can get away with 72 DPI, but print needs far more detail to avoid looking amateurish.
For large-format printing, the gold standard is a resolution of at least 150 DPI at the final, full print size. This ensures every logo, piece of text, and photo on your backdrop is reproduced with absolute clarity.
Submitting a low-resolution file is one of the most common mistakes we see. It forces our printers to stretch your image, which leads directly to that blurry, unprofessional finish nobody wants. Always start your design in the right resolution from the get-go.
Getting Colours Right with CMYK
Next, let's talk about colour. The screen you're looking at right now uses an RGB (Red, Green, Blue) light-based model to show you colours. Our printers, on the other hand, use a CMYK (Cyan, Magenta, Yellow, Black) ink-based model. This difference is absolutely critical.
If you design in RGB, that vibrant electric blue on your screen might look duller or darker when it's actually printed. This is because the range of colours is different. To avoid any nasty surprises, always set your design software’s colour mode to CMYK right from the start. This gives you a much more accurate preview of how the final colours will look on the material.
Choosing the Right File Format
Finally, how you save your artwork really matters. Some file formats are brilliant at preserving quality for print, while others… not so much.
- PDF (Portable Document Format): This is our preferred format. A high-quality PDF locks in all your fonts, images, and vector graphics into one neat, reliable file.
- AI (Adobe Illustrator) and EPS (Encapsulated PostScript): These are vector formats. That means they can be scaled up to the size of a building without losing a shred of quality, making them perfect for designs with logos and text.
We always perform a free artwork check before printing, but sending us a print-ready file saves everyone time and gets your backdrop to you faster. For a deep dive, check out our complete guide on uploading artwork for custom banners. Getting these technical details right ensures your backdrop makes the powerful impact you're looking for.
Your Step-by-Step Setup and Care Guide
A photography backdrop with a stand is a fantastic bit of kit, but how long it lasts and how good it looks comes down to one thing: proper setup and care. Treating your system well doesn't just keep it looking sharp for every event; it protects your investment for years to come.
Getting the setup right is the first step towards a professional finish. A rushed job can leave you with a wobbly stand or a wrinkled backdrop—tiny details that can really spoil your photos. The good news is, our telescopic stands are designed to be put up quickly and easily, even if it's your first time.
Assembling Your Telescopic Stand
Let's walk through the simple process to get your stand up and ready. Follow these steps for a sturdy, secure setup every single time.
- Position the Tripods: First, open up the two tripod bases and spread their legs until they're stable. Place them roughly where you want the backdrop, making sure they're far enough apart to fit the crossbar.
- Raise the Uprights: Unlock the telescopic sections on the vertical poles and raise them to your chosen height. It's often easier to set them a bit lower than the final height and adjust them at the end. Make sure both uprights are level.
- Assemble the Crossbar: Click the sections of the horizontal crossbar together—most use a simple push-and-click system. Adjust its length to match the width of your backdrop banner.
- Attach the Crossbar: Carefully place one end of the crossbar onto the top of a tripod stand and secure it with the wingnut. Then, extend the bar and fix the other end to the second tripod.
- Hang Your Backdrop: Gently slide the pole pocket of your backdrop over the crossbar. This is much easier to do before you raise the stand to its full height.
- Final Adjustments and Tensioning: Now, raise the whole system to its final height, checking it's still level. Smooth out the backdrop material, and use the clips provided to pull the sides taut. This gives you that perfectly flat, wrinkle-free surface.
Pro Tip: If you're setting up outside, especially with the classic British wind, always pop sandbags or weights on the base of each tripod. It’s a simple move that adds crucial stability and stops your backdrop from turning into a giant sail.
Looking After Your Backdrop for the Long Haul
Once the event is over, proper care is vital. How you clean, store, and transport your backdrop directly affects its appearance and lifespan. Different materials need different handling to keep them looking their best.
Think of maintenance as a strategy, not a chore. A few minutes of careful work after each use will prevent creases, stains, and damage, ensuring your photography backdrop with stand is always ready for its next close-up.
- Cleaning Vinyl and PVC-Free Backdrops: These durable surfaces are the easiest to look after. Just grab a soft, damp cloth with a bit of mild soap and wipe away any dirt or spills. Steer clear of abrasive cleaners or harsh chemicals, as they can damage the print.
- Caring for Fabric Backdrops: Fabric needs a gentler approach. You can get most wrinkles out with a handheld steamer on a low heat setting. For any stains, spot-clean them gently. Always double-check the care instructions before thinking about a machine wash.
To avoid permanent creases, never fold your backdrop for storage. The best way is to roll the banner carefully around a solid tube with the printed side facing out. This stops deep folds from setting in and keeps the surface smooth. Store the rolled backdrop and its stand in their carry bag in a cool, dry place, away from direct sunlight. This simple routine will keep your setup in pristine condition for countless events.
Your Backdrop Questions, Answered
Jumping into a new piece of kit like a photography backdrop always comes with a few questions. We get it. You want to be sure you're making the right call and can hit the ground running with confidence.
To give you a head start, here are the straight-up answers to the most common queries we get from UK businesses and event organisers just like you.
Fast Turnaround and Outdoor Use
How quickly can I get my hands on a custom printed backdrop and stand?
We know that event and campaign deadlines can creep up on you. Speed is everything. That’s why we’ve built our entire process around getting your backdrop to you fast. From our Manchester facility, most custom jobs are printed and dispatched within 24-48 hours once you’ve given the final artwork the thumbs up.
With free tracked UK delivery as standard, your professional backdrop will be with you in no time. No stress, no last-minute panic—just ready for that big trade show, in-store promotion, or corporate event.
Can I actually use my photography backdrop outside?
You certainly can. For any outdoor event, we always point people towards our weatherproof vinyl material. It’s built to be tough, water-resistant, and a breeze to wipe clean, which makes it the perfect choice for the notoriously unpredictable British weather.
The number one rule when setting up outdoors? Stability. Make sure the stand is on solid, level ground. If there’s a bit of a breeze, don’t leave it to chance—a few sandbags or weights on the tripod bases is a simple trick that keeps your whole display secure and looking sharp.
A well-secured backdrop doesn't just look more professional; it's a safety essential. Taking a moment to anchor it properly prevents any embarrassing mishaps and ensures your setup stays pristine all day long.
Looking After Your Backdrop & Getting the Artwork Right
What’s the secret to keeping my fabric backdrop wrinkle-free?
When it comes to fabric, it’s all in the storage. The best way to dodge those annoying wrinkles is to gently roll the material around a tube after you’re done with it. Whatever you do, try not to fold it, as that’s what creates those deep, stubborn creases.
If a few wrinkles do appear, don't worry. Most of our fabric backdrops can be revived with a handheld steamer on a low heat setting. Just be sure to test it on a small, out-of-the-way corner first to be on the safe side.
What resolution does my design need to be for a big backdrop?
To make sure your final print is razor-sharp and professional, high-quality artwork is non-negotiable. As a rule of thumb, we recommend sending your design file over with a resolution of at least 150 DPI at its final, full print size. This ensures every logo, image, and line of text is crisp and clear, even when people are looking at it up close. Our in-house team gives every file a free check and will flag any potential resolution problems before we even think about hitting print.
Ready to create a professional visual presence for your brand? At Banner Printing Ltd, we provide high-quality, custom-printed photography backdrops with stands, dispatched fast from our UK facility. Explore our range of backdrops and get started today.


