
If you're looking for a pull up banner, the most common size you'll see across the UK is 850mm x 2000mm. This dimension has become the industry go-to because it hits that sweet spot between making a real visual impact and still being incredibly easy to carry around. It's a solid, versatile choice for just about any setting, from trade shows to shop floors.
A Quick Guide to Standard Pull Up Banner Dimensions
Before you dive into designing, getting to grips with the different pull up banner dimensions available is the first step. While you can find a huge variety of sizes out there, a few have really cemented themselves as industry standards. Why? Because they just work. They’re practical, they suit most business needs, and they give your message the space it deserves.
Picking the right size from the start is crucial. It ensures your message is actually seen, your banner fits neatly into its allocated spot, and you aren't left wrestling with something too bulky to transport. Most of the popular formats are designed to balance a generous print area with true portability. In the UK, you’ll typically find standard widths of 800mm, 850mm, and 1000mm, usually with a height of around 2000mm to 2200mm.
The Main Size Categories
To make things simpler, you can think of roller banners in three main groups:
- Standard Banners: These are your workhorses. They're the go-to for most events, offering plenty of display space without being a hassle to manage.
- Wide Banners: Perfect when you need to make a bigger statement. Think backdrops for a presentation, media walls, or just grabbing attention in a large, busy venue.
- Desktop Banners: These are the compact A4 or A3 versions. They're brilliant for popping on reception desks, till points, or information counters where space is tight.
Here’s a quick visual to show you how these popular sizes stack up against each other.
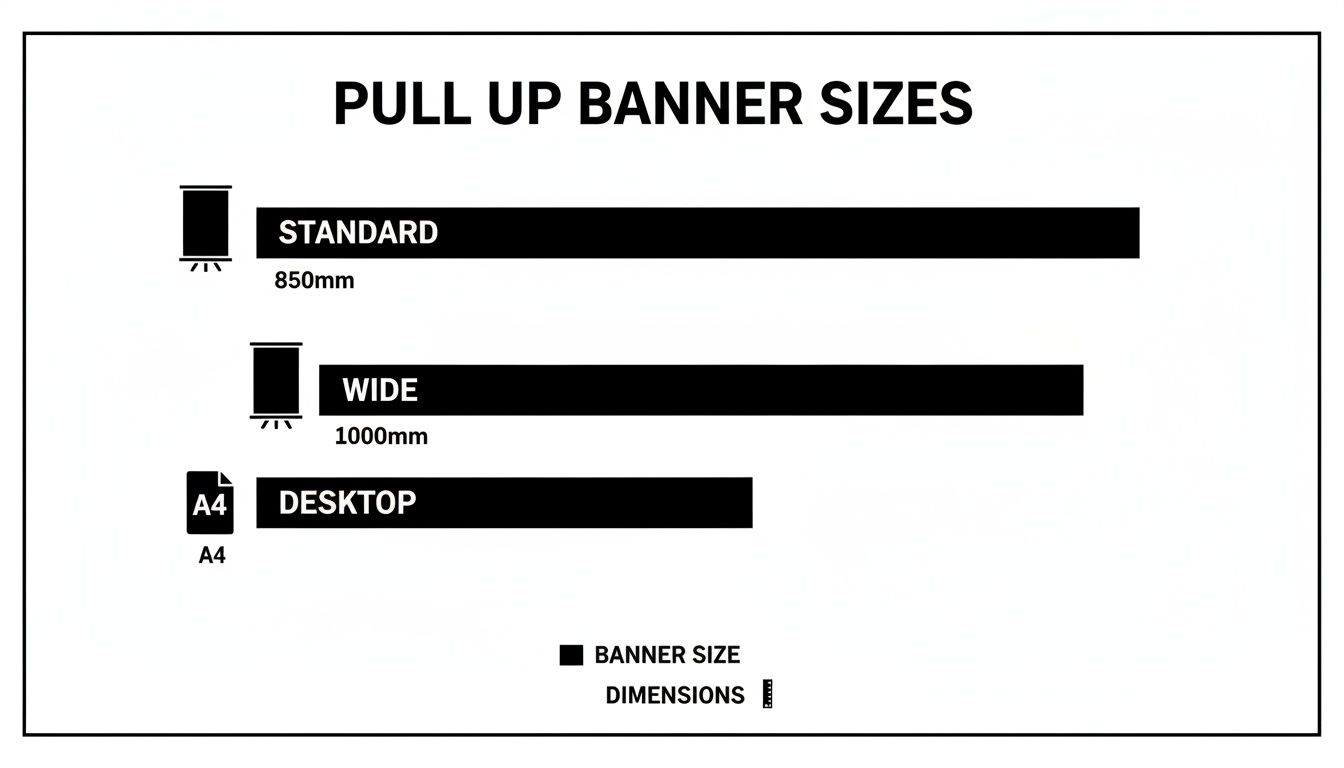
As you can see, the standard 850mm banner gives you a strong visual presence. The wider formats dial that impact up a notch, while the desktop versions are perfect for more intimate, close-up messaging.
For a deeper dive into all the options, have a look at our complete guide to roller banner sizes. Matching the right dimension to your specific goal is what makes a good banner a great one.
Standard UK Pull Up Banner Sizes and Common Uses
To help you choose, here's a quick lookup table of the most common roller banner dimensions and where they shine.
| Banner Name/Type | Width x Height (mm) | Width x Height (inches) | Best For |
|---|---|---|---|
| Desktop A4 | 210mm x 297mm | 8.3" x 11.7" | Reception desks, information points, till areas, restaurant tables. |
| Desktop A3 | 297mm x 420mm | 11.7" x 16.5" | Larger counters, product displays, point-of-sale promotions. |
| Standard | 850mm x 2000mm | 33.5" x 78.7" | The all-rounder: trade shows, events, retail, lobbies, presentations. |
| Wide | 1000mm x 2000mm | 39.4" x 78.7" | Creating a backdrop, high-traffic areas, larger exhibition stands. |
| Extra Wide | 1500mm x 2000mm | 59.1" x 78.7" | Media walls, photo backdrops, making a major statement in open spaces. |
| Super Wide | 2000mm x 2000mm | 78.7" x 78.7" | Large-scale backdrops, stage presentations, significant brand launches. |
This table should give you a solid starting point. By matching the banner's footprint to the venue and your marketing objective, you can ensure your message lands with maximum impact.
Preparing Your Artwork for Print
Once you've settled on the perfect pull-up banner dimensions, the next job is getting your design file ready. Submitting print-ready artwork is the secret to a professional finish, helping you sidestep common headaches like blurry images, off-key colours, or vital information getting chopped off. A few key technical rules are all it takes to make sure your banner prints exactly as you imagined it.
First up, let's talk about bleed. This is simply a little bit of extra artwork that extends beyond the banner's final trimmed edge. Adding a 3-5mm bleed on all sides is standard practice. It acts as a small safety net for the cutting process, guaranteeing your background colour or image covers the entire surface with no annoying white borders.
Defining Your Safe Area
Just as important is the safe area – this is the zone inside the main dimensions where all your must-see content should live. Think of it as an internal buffer that protects your logos, text, and key visuals from being trimmed during finishing or hidden by the stand.
For pull-up banners, the most critical safe area is at the bottom. The graphic panel has to retract into the stand's cassette, and if you place important details too low, they simply won't be seen.
Pro Tip: Keep all essential text, contact details, and logos at least 70-100mm away from the bottom edge of your design. This makes sure your core message is fully visible when the banner is assembled and on display.
Resolution and File Formats
To get that crisp, professional print quality, your artwork's resolution is everything. A helpful guide on understanding 300 DPI resolution for printing really breaks down why this is so important. For large format items like pull-up banners, a resolution of 150-300dpi (dots per inch) at the final print size is the industry standard.
Using a lower resolution can leave you with a pixelated or blurry banner, which really undermines your brand's professional image. It’s also vital to design your artwork in CMYK (Cyan, Magenta, Yellow, Key/Black) colour mode. This is the colour space used for physical printing, and it’s the only way to ensure your colours come out looking right.
Finally, the file format you send us makes a big difference. Here are the best options to go for:
- PDF (Press Quality): This is our preferred format, hands down. A vector-based PDF, created in a program like Adobe Illustrator, keeps text and logos perfectly sharp, no matter how big they are printed.
- TIFF or JPEG: These are fine alternatives if your design is purely image-based. Just make sure they're saved at the highest quality setting and meet that crucial 150-300dpi requirement.
For a more detailed walkthrough, our guide on uploading artwork for custom banners gives you a clear step-by-step process. Getting these specs right from the start means no production delays and a flawless banner every time.
Choosing the Right Banner Dimension for Your Needs
Picking the right pull-up banner size isn’t just about making sure it fits in your designated spot; it's about matching the dimensions to your marketing goals. Each size has its own strengths, from easy portability to sheer visual power. Getting this right means your investment works as hard as you do, whether you're at a jam-packed trade show or a quiet reception area.
Ultimately, the choice comes down to balancing impact with practicality. A wider banner will always grab more attention, but it needs more floor space and is a bit heavier to carry around. On the flip side, a slimmer banner is incredibly easy to transport and fits just about anywhere, but it might get lost in a massive exhibition hall.
The Versatile 850mm Standard Banner
The 850mm x 2000mm banner is the industry's go-to for a very good reason. It’s popular because it nails that perfect sweet spot between visibility and convenience, making it the default choice for countless UK businesses.
This size gives you a generous canvas for your message without overwhelming smaller venues. It’s big enough to be read clearly from several metres away, yet its slim profile lets you tuck it into tight corners, place it next to a reception desk, or fit it neatly into a compact exhibition booth.
- Best For: First-time exhibitors, in-store promotions, corporate events, and almost any general indoor use.
- Key Advantage: Unbeatable portability and versatility. It fits in nearly any car and can be set up by one person in moments.
The Impactful 1000mm to 1200mm Wide Banners
When you need to make a bigger splash, stepping up to a 1000mm or 1200mm wide banner is a brilliant move. That extra width gives your design so much more breathing room, allowing for more ambitious graphics, bigger text, and punchier imagery.
These dimensions are perfect for establishing a more solid presence. They work beautifully as a backdrop for a small presentation area or to anchor a larger trade show stand, clearly marking out your territory and drawing eyes from across the room. They're a little heavier, sure, but the extra impact more than makes up for it.
The Dominant 1500mm and Wider Formats
For maximum dominance, the 1500mm and even 2000mm wide banners are in a league of their own. These aren't just signs; they're portable media walls. They function as photo backdrops, main-stage graphics, or environmental pieces that completely command a space.
A wider banner transforms your display from a simple sign into an immersive brand experience. It’s perfect for product launches, press events, or any situation where you need to make an unforgettable impression.
Their scale, however, demands a bit of planning. You’ll need to confirm that your venue has enough floor space and ceiling height to accommodate them. Getting them there also requires a larger vehicle, so logistics are a key consideration. Choose these larger formats when your goal is to create a powerful, visually arresting focal point that leaves a lasting mark.
Matching Banner Dimensions to Your Venue
Getting your banner's visibility right means picking dimensions that truly fit the environment. A banner that looks fantastic online can easily overwhelm a small shop or, worse, get completely lost in a massive exhibition hall. The trick is to think carefully about your space before you commit to a size.
Take a good look at where it's going. Ceiling height, how far away people will be viewing it from, and the general flow of foot traffic are all crucial factors. A tall, skinny banner is brilliant for venues with high ceilings, as it naturally draws the eye upwards. On the other hand, a wider format might be just what you need to anchor your space in a busy, open-plan area.
Venue-Specific Recommendations
To make the best choice, you have to picture where your banner will live. Every location comes with its own set of challenges and opportunities.
-
Trade Show Booths: Here, floor space is gold dust. The standard 850mm banner is often the perfect solution, giving you great visibility without eating into your valuable interaction area. If you've got a larger stand, think about using two standard banners to frame your booth or a single, wider 1200mm banner as a central backdrop. Our guide to banners for trade show displays has more specialist tips for making a real impact.
-
Retail Stores: In a busy shop, your banner needs to shout for attention without blocking the aisles. A slim 850mm banner is ideal for flagging promotions near entrances or next to specific product displays. If you’re placing it in a spacious window, a 1000mm banner can create a powerful pull for passing traffic on the street.
-
Corporate Lobbies: Reception areas and lobbies tend to have higher ceilings and a more polished, professional feel. This is where a slightly taller or wider format looks more established and less temporary. A 1000mm banner adds a welcome sense of permanence and authority.
Maximising Impact in High-Traffic Areas
In the UK, pull-up banners are the absolute workhorses of marketing, especially in the events and retail worlds where you need low-cost, high-impact messaging. In 2023 alone, the UK's event industry saw nearly 7 million visitors, creating a huge demand for effective physical displays. For many businesses, a single, well-placed banner at a trade stand can boost enquiries by 10–25%, proving just how powerful it is to match the right pull-up banner dimensions to the right venue.
Understanding Single-Sided vs Double-Sided Banners
Once you’ve settled on the dimensions for your pull-up banner, there's another crucial decision to make: single-sided or double-sided? This choice isn’t just about cost; it directly affects where you can place the banner and how effectively it will grab attention, especially in busy, open-plan venues.
The overwhelming majority of pull-up banners you see are single-sided. This is the standard, go-to option that’s both effective and budget-friendly. It’s perfect for placing against a wall, tucking into the corner of an exhibition stand, or positioning at the side of a presentation space. Since the graphic is only visible from the front, its job is to capture attention from a single direction.
On the other hand, double-sided banners are engineered specifically to engage people from multiple angles. They feature two separate graphic panels that retract into a specially designed, heavier base. This lets you display the same message on both sides or even run two completely different campaigns at once.
Key Differences and Use Cases
It's important to understand that a double-sided model isn't just two banners stuck back-to-back; the hardware and strategic use cases are fundamentally different. Getting this right ensures your investment pays off.
-
Single-Sided Banners:
- Best For: Positioning against a solid backdrop like a wall or an exhibition shell scheme. Think of it as a one-way communication tool.
- Hardware: Features a lighter, more compact base with a single roller mechanism inside. Easy to carry and quick to set up.
- Advantage: More affordable and lighter, making it the ideal choice for most everyday applications where you control the viewing angle.
-
Double-Sided Banners:
- Best For: Open areas where foot traffic comes from all directions—think corridors, the middle of an exhibition floor, or reception lobbies.
- Hardware: Built with a wider, heavier base to provide the stability needed to support two independent graphic panels.
- Advantage: Maximises your visibility and messaging opportunities in high-traffic, 360-degree environments. You get twice the exposure.
While a double-sided banner requires a higher initial investment, its ability to deliver twice the exposure in an open-plan setting can offer a far better return. For those key central placements where every glance counts, the extra cost is often easily justified. Choosing the right format from the start ensures your banner works as hard as you do.
How Banner Size Impacts Cost and Production Time
When you're ordering a pull-up banner, the dimensions you choose have a direct and significant impact on both the final price and how quickly you'll get it. It's not just about the design; the size itself shapes everything from material usage and labour to the entire production timeline.
Choosing a standard size, like the industry workhorse 850mm x 2000mm, is almost always your best bet for value. Why? Because printers have their workflows dialled in for these popular dimensions. This means production is streamlined, material waste is minimised, and your order gets dispatched much faster.
On the other hand, if you opt for custom or non-standard dimensions, expect a higher price tag. These bespoke orders require manual setup, often lead to less efficient use of material rolls, and can involve unique finishing processes that add time and cost to the job.
Standard Sizes Offer Speed and Savings
The efficiency gained from printing standard sizes can't be overstated. Large-format printers here in the UK have perfected their processes around these dimensions, often allowing them to print, finish, and ship orders within 24–48 hours. Opting for a standard 850mm system can reduce material waste by 8–12% compared to a non-standard width, and that's a saving that gets passed directly on to you.
It's a clear win-win. You get a lower price per unit and a much quicker turnaround, making it far easier to hit those tight deadlines for your next event or marketing push.
By sticking to standard pull up banner dimensions, you're tapping into a highly optimised production process. This guarantees not only a cost-effective solution but also reliability and speed when you need it most.
Here’s a quick breakdown of how standard and custom sizes stack up against each other.
Impact of Banner Size on Cost and Production
| Banner Type | Typical Cost Factor | Material Efficiency | Average Turnaround |
|---|---|---|---|
| Standard Sizes | Lower cost per unit | High (minimal waste) | 1-2 working days |
| Custom Sizes | Higher cost per unit | Lower (more offcuts) | 3-5 working days |
As you can see, the benefits of standardisation are clear. Unless your project has a very specific requirement that only a custom size can fulfil, sticking to the tried-and-tested dimensions is the smartest move for your budget and schedule.
Getting a handle on how size affects material, labour, and overhead is key. For a deeper dive, understanding the principles of calculating production costs can give you a real edge. Ultimately, balancing your budget with your marketing goals often starts with choosing the right dimensions from the very beginning.
A Guide to Desktop and Mini Pull Up Banners
It’s not all about large, floor-standing banners. Mini pull up banner dimensions offer a small but surprisingly powerful way to get your message across at close quarters. Often called desktop banners, they typically come in standard paper sizes, which makes designing for them feel instantly familiar. Their tiny footprint is perfect for adding a promotional punch without eating up valuable counter space.
The two sizes you'll see most often are A4 and A3. An A4 banner (210mm x 297mm) is brilliant for subtle promotions on till points, café tables, or reception desks. If you need a bit more visual weight, the slightly larger A3 banner (297mm x 420mm) is a great choice for product displays or information points at markets and events.
Designing for a Smaller Canvas
When you’re working with a much smaller area, your design has to be ruthlessly efficient. Forget cramming everything in; the key here is clarity and immediate impact.
- Bold Fonts: Stick to simple, strong typefaces that are easy to read from a short distance. Now is not the time for thin, wispy, or overly decorative fonts.
- Simple Graphics: A single, high-impact logo or a crisp product shot will always beat a cluttered, complex design at this scale.
- Concise Message: Keep your text down to a powerful headline and a very clear call to action. Less really is more.
Mini banners are absolute naturals for point-of-sale marketing. Why? Because they’re impossible to miss when a customer is paying. They are low-cost, incredibly portable, and perfect for driving those last-minute impulse buys or providing key information right where it’s needed most.
Frequently Asked Questions
When you're sorting out the details for a new pull up banner, a few common questions always pop up. We've put together some straight answers to help you get your artwork spot-on and finalise your order with confidence.
Getting these little details right can make a huge difference to how professional your finished banner looks and performs.
What Is the Most Popular Pull Up Banner Size in the UK
Without a doubt, the most popular and widely used pull up banner size in the UK is 850mm wide by 2000mm high. You'll see this one everywhere, and for good reason. It's the industry standard because it strikes the perfect balance between visibility, portability, and value.
It's large enough to get noticed but fits neatly into almost any exhibition space, shop floor, or reception area without dominating the room. Because it’s so common, finding compatible stands and accessories is never an issue, and most printers (like us!) treat it as a standard format for quick turnarounds.
How Much Safe Area Should I Leave at the Bottom
This is a critical one. You absolutely must leave a generous 'safe area' at the bottom of your artwork, completely clear of any important text, logos, or contact details.
We strongly recommend keeping all your key design elements at least 70-100mm away from the very bottom edge. This is the part of the graphic that retracts down into the base unit. Anything placed in this zone risks being completely hidden by the stand's mechanism or sitting too low to be seen properly when it's on display.
Can I Reuse My Pull Up Banner Stand with a New Graphic
In most cases, yes, but it really depends on the type of stand you have. The majority of standard roller banner stands are built to hold a single graphic permanently. To replace the panel, you have to carefully dismantle the spring-loaded roller mechanism, which can be fiddly and might damage the unit if you're not sure what you're doing.
Some of the more premium or 'cassette' style banner stands, however, are specifically designed for this. They let you swap graphics with ease.
If you know you'll be updating your marketing message often, it’s worth investing in a model with a replaceable cassette system. It can save you a lot of money in the long run. Always check with your supplier about the specific model you own before ordering a replacement graphic.
What Resolution Should My Artwork Be for a Large Banner
For large format printing like a pull up banner, you should aim for an artwork resolution between 150dpi and 300dpi at the final, full print size. Unlike a business card or flyer that needs a rock-solid 300dpi because it's viewed up close, banners are seen from a few feet away.
Because of this viewing distance, 150dpi is almost always sharp enough to produce a crisp, clear, and professional-looking print. We wouldn't recommend going any lower, as you'll start to see pixelation and blurriness. And for the best colour results, always design your artwork in a CMYK colour profile, not RGB.
Ready to create a banner that stands out? Banner Printing Ltd offers a wide range of standard and custom pull up banner dimensions to suit any venue or event, all with fast, free UK delivery. Explore our collection and get an instant quote today!


