
You've seen them a million times behind celebrities at film premieres and awards ceremonies. That huge branded wall covered in logos? That's a stand and repeat banner.
In simple terms, it's a portable, custom-printed backdrop designed to create a professional photo opportunity anywhere, anytime.
What Is a Stand and Repeat Banner Anyway?
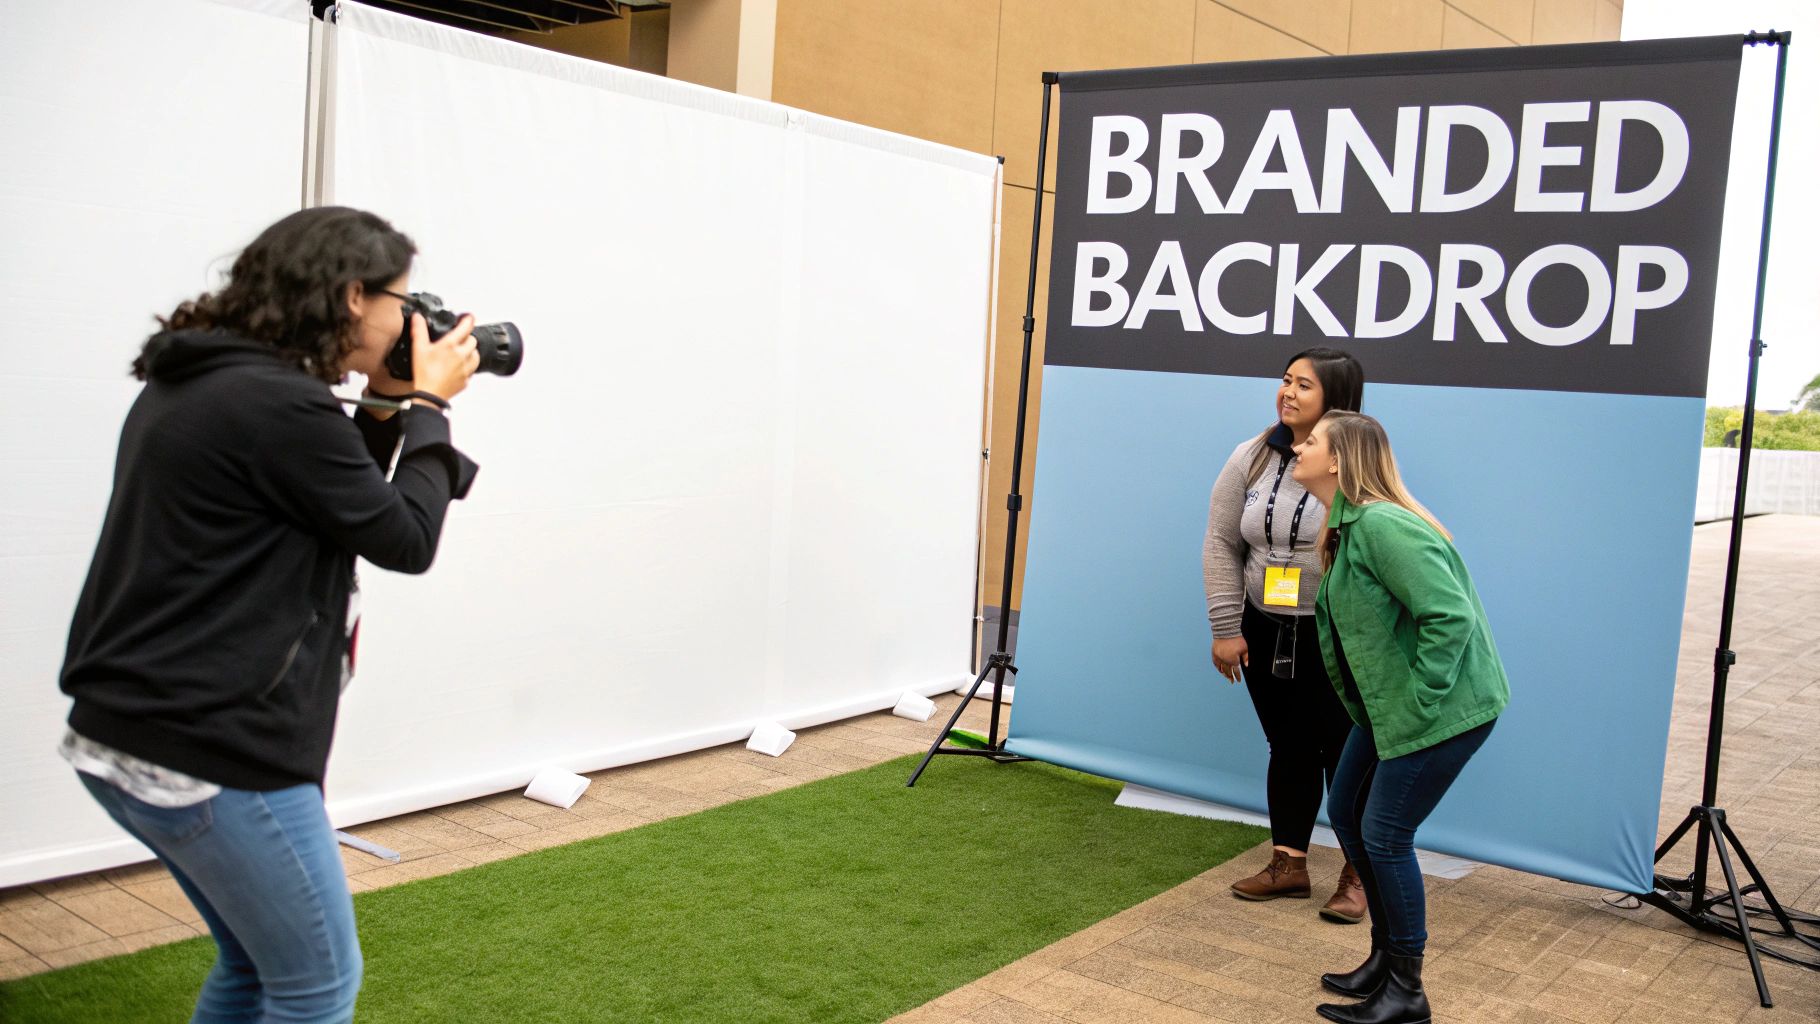
Think of the classic red carpet moment. The name actually comes from the process itself: a guest "steps" onto the red carpet, poses for a photo in front of the banner, and moves on, allowing the process to "repeat" with the next person.
The real genius is in the repeating logo pattern. It’s a deliberate design choice that guarantees brand visibility. No matter how many people are in the photo or how it's cropped later for social media, your logo (or your sponsor's) is guaranteed to be in the shot. It cleverly turns every single photo into a marketing asset.
From Hollywood Glamour to UK Events
This whole concept started on the glitzy red carpets of Hollywood events like the Oscars, where sponsor exposure is everything. It didn't take long for UK event organisers to see the potential, and soon these backdrops became a familiar sight at high-profile events like the BAFTAs and London Fashion Week.
But they're not just for A-listers anymore. Their use has exploded across the corporate and charity sectors here in the UK. In fact, by the 2010s, surveys of UK event planners showed that nearly 70% used stand and repeat banners to amplify brand visibility at everything from corporate functions to fundraisers. They've gone from a niche media tool to a mainstream marketing essential.
A stand and repeat banner is more than just a decorative backdrop; it’s a dedicated branding zone. It actively invites people to engage with your brand and share their experience, turning them into organic ambassadors online.
Why It’s Such an Effective Tool
The power of a stand and repeat banner is its ability to seamlessly connect a physical event with the digital world. In today's social media-driven age, a great photo opportunity isn't just a bonus—it's an expectation. These banners deliver that experience perfectly.
Here’s a quick rundown of why they work so well:
- Guaranteed Brand Exposure: The repeating logos ensure your brand is the silent co-star in every picture, getting seen wherever those photos are shared online.
- A Professional Atmosphere: It instantly makes any event feel more prestigious and organised. Attendees feel like VIPs, which elevates the entire experience.
- Drives Social Sharing: A well-designed, well-lit backdrop is a natural magnet for photos. It encourages guests to snap and share, creating a stream of valuable user-generated content for your brand.
- Serious Sponsorship Value: For sponsors, it’s a tangible and highly visible return on their investment, making it much easier to secure partnerships for your events.
Ultimately, a stand and repeat banner is a smart investment in your visual marketing. It's a simple, effective tool that turns your guests into active brand promoters and makes sure your event gets seen long after it's over.
Choosing the Right Banner Material and Size
A killer design gets your stand-and-repeat banner noticed, but it’s the material and size that really seal the deal for a professional look. Getting these physical details right is absolutely crucial. It’s the difference between a crisp, impressive backdrop that makes your brand shine and one that looks cheap or, even worse, causes a headache for photographers.
Your choice here affects everything, from how your logo looks in photos to how easy the banner is to transport and how long it will last. Let’s break down the practical side of things to help you pick the perfect combo for your next UK event.
The Great Material Debate: Fabric vs Vinyl
When it comes down to materials, the two main players are vinyl and fabric. Each has its own strengths, especially when you factor in photography and how often you plan to use it. Understanding what sets them apart is the key to making a smart investment.
Vinyl banners are a classic choice and often the more budget-friendly route. They're known for being tough and making colours pop, which is great for one-off events or when you need your visuals to be really vibrant.
But here’s the catch: the finish is everything. A glossy vinyl banner is a photographer’s worst enemy, creating a harsh glare the second a camera flash hits it. That glare can completely wash out logos and ruin the very photos you’re trying to capture.
For any stand-and-repeat banner destined for photography, a matte finish is non-negotiable. It soaks up light instead of bouncing it back, making sure your logos stay sharp and clear in every single shot. It preserves the whole point of having the backdrop in the first place.
Fabric banners, on the other hand, are naturally glare-free. They have a premium, soft-touch feel that looks incredibly sophisticated and high-end. The material is also much lighter than vinyl, which makes it a breeze to transport and far less likely to show creases.
Picking the Perfect Banner Size
Once you’ve sorted the material, it’s time to think about dimensions. The size of your stand-and-repeat banner should really depend on your venue, how many people you expect to be in photos at once, and the overall vibe you’re going for.
A banner that’s too small can get lost in a big room or awkwardly crop people out of photos. Go too big, and you might not even be able to fit it in your designated spot. A bit of planning here goes a long way.
Common Banner Sizes and Their Best Uses
-
Small Events (8ft x 8ft / 2.4m x 2.4m): This is the industry standard and for good reason—it’s incredibly versatile. It’s big enough to comfortably frame two to four people, making it perfect for smaller gatherings, trade show booths, or any spot where space is tight.
-
Medium Events (10ft x 8ft / 3m x 2.4m): Expecting small groups of four to six people? This wider option gives everyone a bit more breathing room in the frame. It’s a popular pick for corporate parties, award nights, and product launches.
-
Large Events (12ft+ x 8ft): For the big occasions—galas, red carpet events, or anywhere you’ll have large group shots—you need to go wider. A banner that’s 12ft (3.6m) or more ensures your branding stretches right across the photo, no matter how big the group is.
You'll notice the standard height for most backdrops is 8 feet (2.4 metres). This is tall enough to sit neatly behind most adults, stopping distracting ceilings or background clutter from creeping into the top of your pictures. For a deeper dive, you can learn more about choosing materials and sizing for backdrop banners in our detailed guide.
Banner Material Comparison for UK Events
To help you see the differences at a glance, here’s a straightforward comparison of the most popular materials for stand-and-repeat banners at UK events. This should make your decision a whole lot easier.
| Material Type | Best For | Pros | Cons |
|---|---|---|---|
| Matte Vinyl | Indoor events, vibrant graphics, and budget-conscious projects. | Excellent colour vibrancy, highly durable and easy to wipe clean, and cost-effective. | Can be heavy and prone to creasing if not stored correctly; risk of glare if not fully matte. |
| Polyester Fabric | Premium events, frequent travel, and situations with flash photography. | Completely non-glare, lightweight and easy to transport, and machine washable and steamable. | Higher initial cost; may be less resistant to scuffs than heavy-duty vinyl. |
Ultimately, the right material comes down to balancing your budget with your event's needs. If your banner will be front-and-centre for photos, investing in a fabric or guaranteed matte vinyl option is always the safest bet.
Designing Artwork for Maximum Brand Impact
A stand-and-repeat banner isn't just a background; it’s one of your hardest-working marketing tools. Its success lives or dies by the quality of the artwork. Great design isn't about just slapping a few logos onto a canvas—it's about smart, strategic thinking that guarantees your brand looks fantastic in every single photograph.
When you get the logo placement, colours, and technical specs right, your banner transforms. It stops being a simple prop and becomes a powerful visual asset that boosts your presence, both at the event itself and all over social media afterwards.
Mastering Logo Placement and Spacing
The "repeat" is the whole point, but how you repeat the logos makes all the difference. The aim is simple: no matter where someone stands for a photo, your branding must be clear and visible. The two layouts you’ll see most often are the grid and the staggered pattern.
- Grid Layout: This is your classic, symmetrical arrangement. Logos are lined up in neat rows and columns, giving a clean, corporate, and highly organised feel.
- Staggered Layout: Sometimes called a checkerboard pattern, this layout offsets each row of logos, a bit like a brick wall. It’s a bit more dynamic and cleverly increases the chances of a logo being captured, even if someone is partially blocking another one.
Getting the size and spacing right is also crucial. A classic mistake is making the logos too small or squeezing them too close together. As a rule of thumb, logos should be somewhere between 8 to 11 inches wide. This makes them perfectly readable in photos taken from a typical distance. Consistent, balanced spacing is what gives the final banner that polished, professional look.
Choosing Camera-Friendly Colours and Backgrounds
Your brand colours are essential, but you need to make sure they'll work well on camera. High-contrast combinations are always a winner. A dark logo on a light background (or the other way around) will pop in photos and ensure your branding is impossible to miss.
A simple background is almost always the best choice. Busy patterns or low-contrast colour schemes can make logos hard to read and will distract from the main subject—the people in front of it! Stick with a clean white, grey, or a solid brand colour for a foolproof result.
Want to make your banner work even harder? Add a QR code. Taking advantage of the key advantages of QR code technology is a brilliant way to connect your physical display to your digital world. Link it straight to your website, a special offer, or a social media competition.
This graphic breaks down the key physical options—material, finish, and size—that provide the canvas for your design.
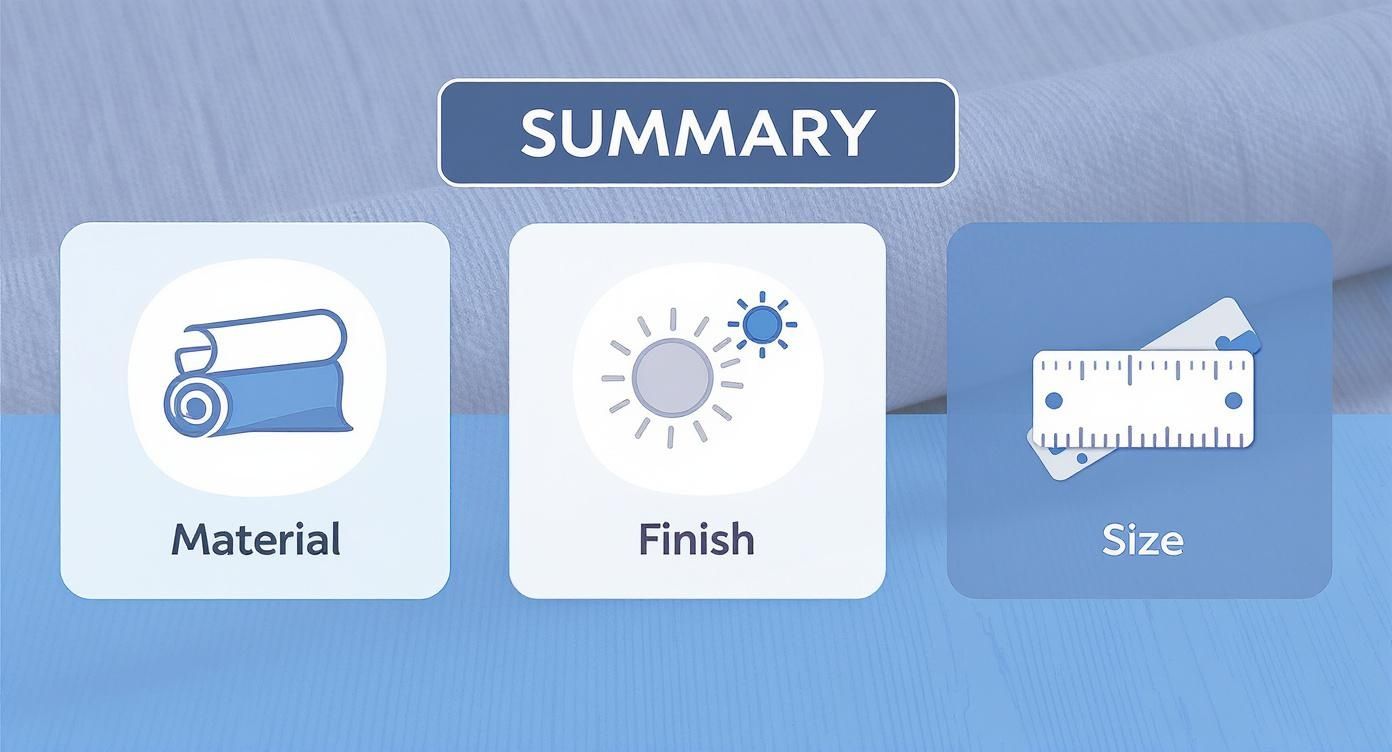
As you can see, the right material and finish are just as important as the digital artwork for getting that professional, glare-free finish everyone wants.
Technical File Requirements Made Simple
Don't let the technical stuff intimidate you. Getting the artwork file right is non-negotiable for a sharp, professional print, but the key rules are actually very straightforward.
- Use High-Resolution Logos: Always supply your logos in a vector format (files ending in .AI, .EPS, or .SVG). Vector files can be scaled up to any size without losing a drop of quality, which means no blurry, pixelated logos.
- Design at Full Size: Your design file should be set up at the exact final dimensions of the banner (e.g., 2.4m x 2.4m). This ensures what you see on your screen is exactly what you get.
- Check Your Colour Mode: Make sure your file is saved in CMYK (Cyan, Magenta, Yellow, Black). This is the standard colour mode for professional printing, whereas RGB is for screens.
Submitting a print-ready file saves a huge amount of time and helps avoid any nasty surprises. For a complete checklist, have a look at our guide on uploading artwork for custom banners to get it right the first time.
Your Practical Guide to Banner Setup and Takedown
Let’s be honest, wrestling with a giant banner frame on event day can feel a bit daunting, especially when the clock is ticking. But here's the good news: most modern systems are designed for simplicity. You don't need a specialist crew or a van full of tools. With one or two people, you can have a stunning backdrop ready in minutes.
The real secret is to do a quick trial run before you leave for the venue. That five minutes of practice will transform a stressful job into a smooth, confident task. Here's a walkthrough of the common steps to get your banner looking its best.
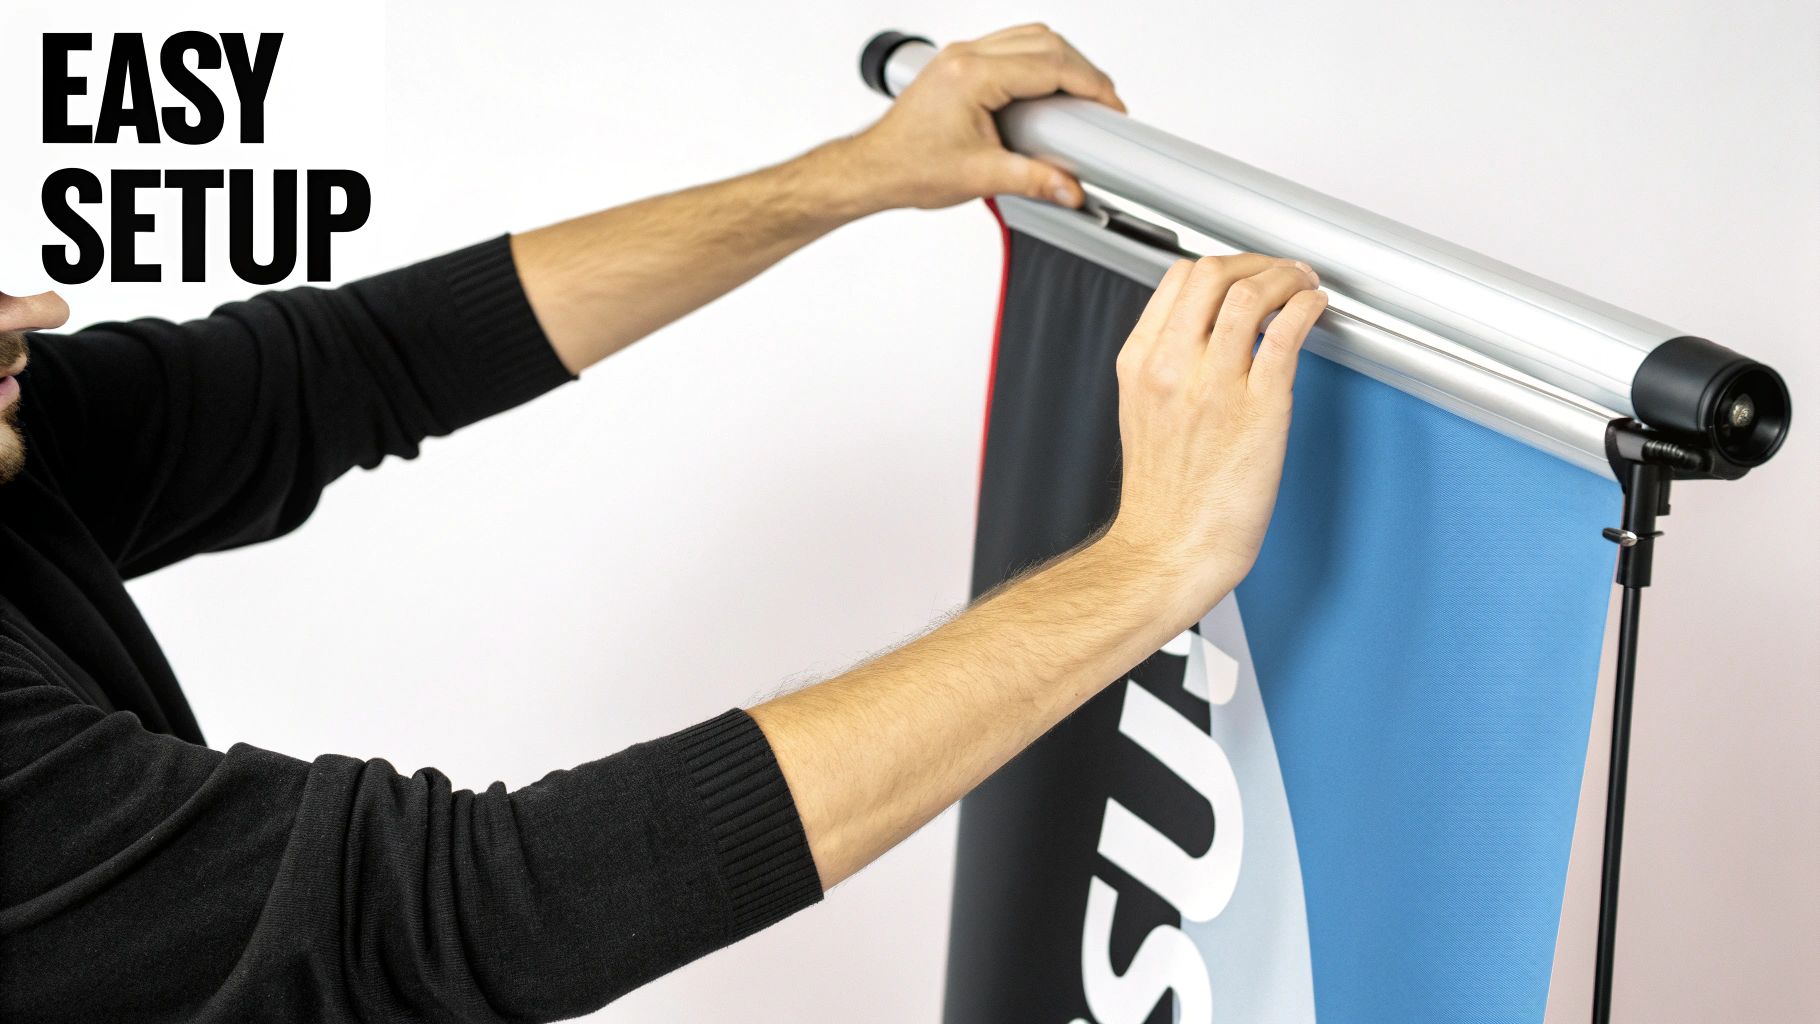
Assembling Your Telescopic Banner Stand
The most popular frame for a large stand-and-repeat banner is a telescopic one. It's a straightforward system of adjustable poles that lets you dial in the perfect height and width, making it a reliable workhorse for UK events.
Here’s a simple, step-by-step process:
- Lay Out the Kit: First things first, open the carry bag and lay out all the poles and feet on the floor. This quick check ensures everything is there before you start building.
- Build the Base: Attach the vertical side poles to the flat metal feet. Most just have a simple screw-in mechanism you can easily tighten by hand.
- Construct the Frame: Now, extend the two vertical poles to your chosen height and lock them in. Next, attach the horizontal crossbars at the top and bottom, pulling them out to match the width of your banner.
- Attach the Banner: Time for the graphic. Carefully unroll it and slide the top horizontal pole through the pole pocket stitched into the top edge. Do the same with the bottom pole and pocket.
- Raise and Secure: With a friend, lift the banner and hook the top crossbar onto the vertical poles. Now you can tweak the tension to pull the graphic taut, giving it that smooth, professional finish.
A taut, wrinkle-free surface is what you're aiming for. Once it's up, take a moment to smooth the material. If you're using a fabric banner, a hand-held steamer is a miracle worker for any stubborn creases from transit.
Achieving That Flawless Finish
The difference between an amateur-looking display and a truly professional one is all in the final adjustments. Pulling the banner tight is crucial – it eliminates the sagging and ripples that look terrible in photos.
Once the banner is attached, work with your helper to gently pull the corners, ensuring the tension is spread evenly across the frame. The locking mechanisms on most telescopic stands allow for tiny adjustments until the surface is perfectly flat. It’s a small step that makes a massive difference to the final impact.
Safe Takedown and Smart Storage
Dismantling your banner properly is just as important as setting it up. A little care here will dramatically extend its life, making sure it looks just as sharp at your next event.
- Clean Before Packing: Before you pack it away, give the banner a quick wipe-down with a dry cloth to get rid of any dust or dirt.
- Roll, Don't Fold: This is the golden rule. When taking the banner off the frame, always roll it carefully with the printed side facing outwards. Folding creates permanent creases that can crack and ruin the print over time.
- Retract Poles Systematically: Lower and retract all the poles before packing them neatly back into their carry case. This stops them from getting bent or bashed about in transit.
Follow these simple steps, and you'll be able to manage your stand-and-repeat banner with confidence, ensuring you always put on a polished and professional show.
When to Use a Banner for Your Business
So, beyond the flashbulbs of a red-carpet premiere, where does a stand-and-repeat banner *actually* make sense for a business? You might be surprised by just how versatile they are. This one bit of kit can elevate all sorts of events, turning any old space into a professional, branded environment that gets people talking.
Picture your next corporate conference. Popping a banner at the entrance immediately sets a polished, professional tone. It makes attendees feel like they've arrived at a serious event from the second they walk in. It's also the perfect backdrop for your speakers, panel discussions, or any media interviews, making sure your company’s logo is front and centre in every official photo and video.
Boosting Your Trade Show Presence
Let's be honest, at a busy trade show, you've got seconds—if that—to grab someone's attention. A big, bold stand-and-repeat banner is a powerful visual magnet for your booth. It draws eyes from across a crowded hall and turns a generic, shelled-out space into your branded territory.
This creates the perfect spot for people to snap photos with your team or your latest product. It's one of the simplest yet most effective brand activation ideas out there, encouraging visitors to share their experience on social media right from the show floor. For more tips on making an impact, our guide on choosing effective banners for trade show displays is packed with ideas.
From Product Launches to Internal Events
Got a new product or service you’re ready to unveil? A stand-and-repeat banner creates an exciting focal point for the big reveal. It gives press photographers and influencers a clean, professional backdrop, ensuring every image that hits the web is stamped with your brand. That kind of repetition is gold during a critical marketing campaign.
But it’s not just for external events. They’re fantastic for internal do's, too.
- Company Awards Nights: Make your team feel like A-listers as they step up to collect their awards. It adds a touch of class and makes the whole evening feel more special.
- Charity Galas & Fundraisers: A brilliant way to add value for your sponsors. Offer them prominent logo placement on the backdrop, justifying a higher tier of investment.
- Grand Openings: Create a brilliant photo opportunity for your first customers, local press, or influencers at a new shop or office launch.
These banners have even found a new lease of life in our hybrid working world. They provide a crisp, professional, and clutter-free branded background for virtual conferences, webinars, and important client video calls. No more distracting home office backgrounds.
Ultimately, a stand-and-repeat banner is a smart move for any occasion where you want to control how your brand looks. It’s a reliable workhorse for getting user-generated content, boosting sponsorship value, and simply making any event feel more organised and significant.
Navigating UK Planning and Event Regulations
For UK event organisers, the rules around displaying large banners can feel a bit murky, especially when your event spills into a public space. Nobody wants the headache of a fine or being told to take down their branding just as things are getting started.
Getting a handle on the basics of UK planning regulations is crucial to making sure your stand and repeat banner is both effective and, more importantly, fully compliant.
The key distinction you need to understand is between temporary event dressing and permanent advertising. A banner tucked inside a private venue for a one-day conference is almost never going to be an issue. But if that same banner is outdoors, facing a public road, or left up for a while, it might just wander into the territory of local council advertisement consent rules.
When Might You Need Council Consent?
The two things that really matter are the location and how long your banner will be up. You’ll almost certainly need to have a word with your local council if your banner:
- Is visible from a public road: Anything that could potentially distract drivers gets looked at very closely.
- Is in a conservation area: These protected zones have much stricter rules on all types of signage to preserve the area's unique character.
- Will be displayed for a long period: A banner for a weekend festival is one thing; one that’s up for several weeks is another entirely.
This isn't just red tape for the sake of it; it's about public safety and keeping our public spaces looking good. Advertising banners in the UK are managed by strict local planning laws to prevent visual clutter. Since these rules were tightened, things have improved – major urban councils reported a 15-20% decrease in unauthorised banner displays by 2020. You can get the official line by exploring the UK government's advice on advertisements.
Staying on the Right Side of the Rules
The best advice? Always err on the side of caution. If your event involves any outdoor branding, particularly in a prominent spot where the public will see it, a quick call or email to your local council’s planning department is time well spent. They can give you clear, specific advice for your situation.
Think of it this way: a banner inside a hotel ballroom for an awards night is just part of the décor. But a banner tied to railings on a high street to promote that same event? That's an advertisement, and it plays by a different set of rules.
Understanding this difference means you can plan your event's branding with confidence. A proactive approach ensures your stand and repeat banner makes a huge impact for all the right reasons, without attracting any unwanted official attention. A few minutes checking things out beforehand can save you a world of trouble later on.
Common Questions About Stand and Repeat Banners
Even after you've got your design sorted, a few practical questions always seem to pop up before you hit the 'buy' button. It’s completely normal.
Here are the answers to the most common queries we get from UK event organisers. Think of it as a final checklist to make sure you're getting exactly what you need.
How Much Does a Stand and Repeat Banner Cost in the UK?
The price for a stand and repeat banner in the UK typically falls somewhere between £150 and £400+. That might seem like a wide range, but the final figure really comes down to three key choices you make.
- Size: It's simple, really – a bigger banner needs more material and more ink. A sprawling 12ft backdrop for a gala will naturally cost more than a standard 8ft one for a small booth.
- Material: Your choice here makes a big difference. A premium, non-glare fabric banner will be at the higher end, but it gives you that seamless, professional look and travels beautifully. A quality matte vinyl is a more budget-friendly option and offers brilliant value, especially for indoor events.
- Stand Type: Just like with any bit of kit, sturdier costs more. A heavy-duty, adjustable telescopic stand is a bigger investment upfront but will last you for years. A more basic, fixed-size frame gets the job done for less.
It’s all about balancing what you need for this event against your budget. For a one-off conference, a great vinyl banner is a smart buy. If you're planning on using it again and again, investing in a durable fabric banner with a robust stand will pay for itself over time.
What Is the Typical Turnaround Time?
This is the big one for any event planner: "Will it get here on time?" The good news is that for most UK suppliers, the turnaround for these banners is impressively quick.
Generally, you should expect production to take just 24 to 48 hours from the moment you approve the final artwork proof. After it’s dispatched, standard UK delivery usually adds another 1-2 working days.
My advice? Always aim to order at least a week before your event. It just gives you that breathing room for any unexpected courier delays and lets you do a quick practice setup without any last-minute stress.
Can I Reuse My Banner for Multiple Events?
Absolutely! This is one of their biggest strengths. A well-looked-after stand and repeat banner isn't a disposable item; it’s a long-term marketing asset that delivers value event after event.
The secret to making it last is all in the care and storage. Fabric banners are fantastic for reuse because they’re lightweight, resist creasing, and can often be machine-washed on a gentle setting. Vinyl banners are also tough, but you must follow one golden rule: always roll, never fold. Folding a vinyl banner creates sharp creases that can permanently ruin the print.
Just roll your banner up, pop it back in its carry case, and keep the stand clean. Do that, and it will look sharp and professional for countless trade shows, parties, and conferences to come.
Ready to create a professional photo opportunity that gets your brand noticed? At Banner Printing Ltd, we specialise in high-quality, custom-printed backdrops with fast, free UK delivery. Design your perfect stand and repeat banner today at https://bannerprintingltd.co.uk.


